Introduction
In SharePoint, we basically work for Document Management System. SharePoint is a DMS developed by Microsoft. Developer can use .NET to develop SharePoint Solution. There are some other tools like SharePoint Designer which help to develop SharePoint Solution. InfoPath is a SharePoint Designer that works with Internet Explorer while developing. After development for user use, it can work with any browser.
SharePoint is being seen as ideal for managing manuals, policies and procedure documents. Companies are starting to further embrace the document management model of creation, storage, retention and expiry and SharePoint is certainly strong in those areas.
Consider an organization where there is an email system like Microsoft Exchange. Hope this tip will helps developer to find log in and other employee detail information from Active Directory of the organization.
Background
Document Management mostly requires - Secure Access, Storage, Search, Archive, Management and Collaboration. For each and every cases matching information with the log in user with AD is essential for fraud prevention.
Here, I will describe how data can be retrieved from Active Directory.
Basic knowledge of SharePoint is required to work further.
What is InfoPath?
InfoPath can be considered as a development tool for SharePoint where developer can develop moderate solutions without writing code but using its internal options.
Let's Start
1. Create a List in SharePoint
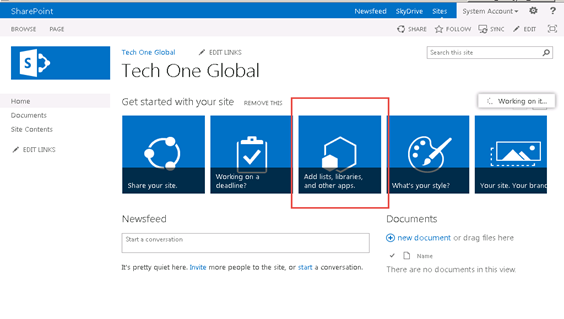
Run Your SharePoint Site in Internet Explorer. On the Home Page, you will find Add List and Libraries option as like the Screen Shot:
On the appeared window, click Custom List:

A window will appear where you need to give your list name:
If everything goes ok, you will find a list created with your name:
Now select your list and go to setting:
Like other database, create your Column with required name and Data type.
And finally Press OK button to Create the List.
2. Load User Profile From Active Directory into InfoPath.
Ensure you are using Internet Explorer - Click Customize Form as it looks below:
Just wait a while, another form will be loaded:
Here, I have add Submit Button Manually:
3. Create a Data Connection with Active Directory
Click data and take a Data Connection:
Select Create a New Connection to - Receive Data like:
Now first part (http://splab3) is the changeable option according to your address. You need to put your SharePoint site address in place of http://splab3 rest are same.
Select Get User Profile Name.
Uncheck Store a Copy, if checked:
Check Automatically Retrieve data when the form is opened:
Select GetUserProfile by Name:
Click on Show Advanced Details:
From the Field section, select GetUserProfileByName, then propertyDetails inside dataFields and select Reporting Table:
You will find a form like:
Click the Preview Button marked in the Box:
From this form, copy the Field name you require. As we are looking for AccountName, copy the AccountName Field.
Now for the designer, select the control tools (textbox, label) you wish to see Account Name and in Properties add some functional rules like the following:
Click Preview Button Again and Find Account Name is showing on controls from Active Directory.

