Introduction
Are you bothered by the extremely slow Android Emulator on Windows? Now, Intel provides us a efficient tool to get rid of this problem.
For official details, please see https://software.intel.com/en-us/android/articles/intel-hardware-accelerated-execution-manager. This tip is about configuration on Intel x64 based CPU with Windows and Android Studio.
What is Intel HAXM?
Quote:
The Intel Hardware Accelerated Execution Manager (Intel® HAXM) is a hardware-assisted virtualization engine (hypervisor) that uses Intel Virtualization Technology (Intel® VT) to speed up Android app emulation on a host machine. In combination with Android x86 emulator images provided by Intel and the official Android SDK Manager, HAXM allows for faster Android emulation on Intel VT enabled systems.
Installation
That's very easy!
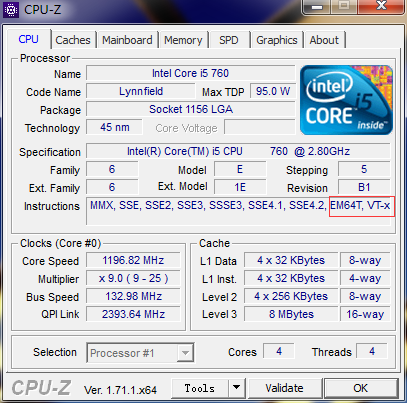
STEP 1: Make sure that your CPU supports Intel VT-x and EM64T. You can check it using CPU-Z but don't worry about this, because almost all of main stream CPUs meet this requirement.

STEP 2: The installation package is default included in the installation path of Android SDK, and my SDK was installed along with Android Studio. Find it at:
...\Android SDK\extras\intel\Hardware_Accelerated_Execution_Manager\
Run intelhaxm-android.exe.
Just follow the Installation Wizard to complete. If it occurs some error that you didn't enable VT-x, don't worry, just enter BIOS when you're restarting your computer. Then, find "Enable VT-x" or something like that, turn on it and try again.
STEP 3: Create a "Phone" and enjoy!
NOTICE: Must create a virtual device using the x86 system image, or HAXM will not help you.

If you see the following RED information when you start a emulator instance, Congratulations!

Modify HAXM's Configuration
You may remember that you were asked to assign space of memory used by HAXM when you install HAXM. You may think a phone doesn't need so much memory (2GB default) and assign a smaller number for that (maybe 1GB), but for now, 1GB is not enough for latest OS or your apps. After several hours, you'll find out that there is no entry to reset the memory config :( Damn it!
The only way to modify the memery config is running the installation again, and choose "change".
That's it. Thanks for reading!
