Introduction
For many people who are accustomed to working on Windows PCs, the process of starting a new affair with a Mac OS X machine could prove to be a daunting one. Among other things, you wish to be able to continue using the same NTFS drive that you have been using on Windows on Mac. The good and bad news are Mac does support reading on NTFS by default but not writing.
Before you scramble to look for some third party tools that can enable NTFS write on Mac, wait a second and hear me out. The truth is the latest OS X does support NTFS write function but for some strange reason, it has not been enabled.
Doing is believing. Follow this tip and you will get to keep the beloved NTFS drive with your new Mac.
Prerequisite
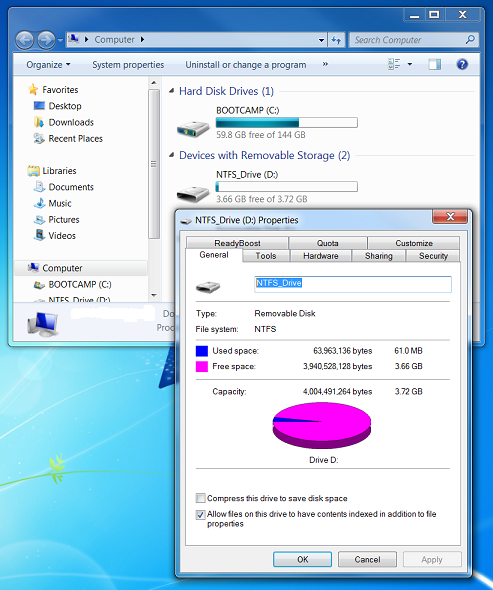
Prerequisite? Do not be overly alarmed. Just make sure your NTFS drive has a single-word name, i.e., a name without any white space. To do this, right-click the drive icon on the Windows explorer > choose Properties > type a name in the text box (Figure 1).
 |
| Figure 1: Setting Drive Name
|
Let's Do It...
Turn on your Mac, launch the Finder, and plug in your favourite NTFS drive which should appear as an icon on the desktop as well as on the Finder sidebar (Figure 2). I have named my NTFS drive as "NTFS_Drive". As of now, you can only read contents from this drive.

 |
| Figure 2: Mac's Desktop
|
Follow these steps to enable NTFS write on your drive.
-
Click the magnifying glass icon  on the upper-right corner of the menu bar, or press the Command key together with the Space bar on the keyboard, to launch the Spotlight Search bar as shown in Figure 3.
 |
| Figure 3: Spotlight Search
|
-
Type "terminal" into the Spotlight Search bar (Figure 4) and hit Enter to locate and launch the Terminal program (Figure 5).
 |
| Figure 4: Launch the Terminal program
|
 |
| Figure 5: The Terminal
|
-
On the command prompt of the Terminal window (Figure 5), type the following one-line command (Figure 6) to launch a text editor program called "nano" and open a file called "fstab" as shown in Figure 8. Enter your password when prompted.
sudo nano /etc/fstab
 |
| Figure 6: Launching nano Text Editor
|
*nano is a simple text editor for use on UNIX-based operating systems. You have just found out that your Mac is actually a UNIX-compliant machine as shown in Figure 7.
 |
| Figure 7: UNIX 03 Certified
|
-
On the nano editor (Figure 8), type the following one-line command, substitute the "NTFS_Drive" label with your drive name, followed by a series of key strokes: Control O, Enter, and Control X, to save the file and close the nano editor. You have just created a UNIX script to enable read and write on the NTFS drive. Leave the Terminal open for now.
LABEL=NTFS_Drive none ntfs rw,auto,nobrowse
 |
| Figure 8: nano Text Editor
|
-
Eject your NTFS drive momentarily and plug it back. This time, the drive is neither shown on the desktop nor on the Finder sidebar. Fret not. Go back to the Terminal, on the command prompt, type the following command and hit Enter to open all available drives on the Finder. There you are, you should see your drive on the Finder as shown in Figure 9.
open /Volumes
 |
| Figure 9: NTFS Drive shown on the Finder
|
-
Drag and drop the NTFS_Drive icon to the Favorites section of the Finder sidebar as shown in Figure 10.
 |
| Figure 10: Set up Drive on Sidebar
|
Congratulations! From now on, whenever you plug in the NTFS drive, it will appear on the Finder sidebar and you can read and write to it. Make sure you eject it properly as you have always done on Windows.
Going the Extra Mile...
If your Mac comes with a BOOTCAMP, you can enable it to write too. Just repeat the preceding steps, add a new line of command to the /etc/fstab file using BOOTCAMP as the LABEL. This shall be your homework. ;P
