Introduction
Do you want a mobile app which can do some tasks such as playing music, downloading file while you are viewing the news or chatting? This kind of application is called by "Service". It can run in the background and not affect to your current operation.
This tip will show you how to develop a simple service application on Android Platform.
This application allows user to start and stop a background service. This service displays the Toast Message when starting or stopping.
Background

A service is one of the Android components which runs in the background. It doesn't run on main UI thread so it doesn't have direct interaction with the user.
Service has no UI and does not affect the activity lifecyle. It runs in the background thread of the application to perform long running or repeative operations such as internet download, playing music, monitoring the data, etc.
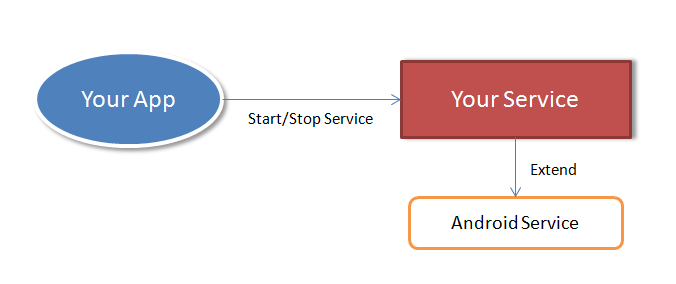
As in the above figure, an application component such as activity, fragment call method Start service to start the service. After it is called, a service runs in the background even if the component that started it is destroyed. It only stops when the application calls the stop service.
Using the Code
Open Eclipse, create an Android Application Project as normal. In this tip, I create an Android 5.0.1 project. The default package is com.example.servicedemo.
In AndroidManifest.xml file, declare the Android Service.
<service
           android:name="com.example.servicedemo.DemoService"
           android:label="@string/service_demo" >
</service>
Note that you have to declare the full name and path of your service to prevent the exception when launching the app.
"com.example.service.demo" is a package name. DemoService is service name.
Create a new Java class name "DemoService".
<p<img height="257px" src="/KB/android/884235/Snap_2015-03-09_at_15.50.00.png" width="389px">
Implement this class as Service by extending to Service class.
package com.example.servicedemo;
import android.app.Service;
import android.content.Intent;
import android.os.IBinder;
public class DemoService extends Service {
@Override
public IBinder onBind(Intent intent) {
return null;
}
}
In the above code block, the Service is default Android Service class.
Now, we start to design a simple GUI of this app. To design GUI, you can use the Built-in Layout design tool or code by XML. In this article, I prefer the XML code.
Open the strings.xml file, define some string constants for this app.
="1.0"="utf-8"
<resources>
<string name="app_name">ServiceDemo</string>
<string name="hello_world">Hello world!</string>
<string name="action_settings">Settings</string>
<string name="service_demo">Service Demo</string>
<string name="start_service">Start Service</string>
<string name="stop_service">Stop Service</string>
</resources>
Open the activity_main.xml file, enter the following code.
<RelativeLayout xmlns:android="http://schemas.android.com/apk/res/android"
    xmlns:tools="http://schemas.android.com/tools"
    android:layout_width="match_parent"
    android:layout_height="match_parent"
    android:paddingBottom="@dimen/activity_vertical_margin"
    android:paddingLeft="@dimen/activity_horizontal_margin"
    android:paddingRight="@dimen/activity_horizontal_margin"
    android:paddingTop="@dimen/activity_vertical_margin"
    tools:context="com.example.servicedemo.MainActivity" >

    <TextView
        android:id="@+id/textView1"
        android:layout_width="wrap_content"
        android:layout_height="wrap_content"
        android:layout_alignParentTop="true"
        android:layout_centerHorizontal="true"
        android:layout_marginTop="144dp"
        android:text="@string/service_demo"
        android:textColor="#000"
        android:textSize="20sp" />

    <Button
        android:id="@+id/btn_start_service"
        style="?android:attr/buttonStyleSmall"
        android:layout_width="wrap_content"
        android:layout_height="wrap_content"
        android:layout_alignStart="@+id/textView1"
        android:layout_below="@+id/textView1"
        android:layout_marginTop="28dp"
        android:text="@string/start_service" />

    <Button
        android:id="@+id/btn_stop_service"
        style="?android:attr/buttonStyleSmall"
        android:layout_width="wrap_content"
        android:layout_height="wrap_content"
        android:layout_alignStart="@+id/btn_start_service"
        android:layout_below="@+id/btn_start_service"
        android:layout_marginTop="42dp"
        android:text="@string/stop_service" />

</RelativeLayout>
In this code, we create a relative layout and add 2 buttons named "Start Service" and "Stop Service" to do the corresponding action. The GUI layout will be displayed like this in GraphicLayout tab.

In MainActivity, implement the following code:
package com.example.servicedemo;
import android.content.Intent;
import android.os.Bundle;
import android.support.v7.app.ActionBarActivity;
import android.view.View;
import android.view.View.OnClickListener;
import android.widget.Button;
public class MainActivity extends ActionBarActivity implements OnClickListener {
Button mStartService;
Button mStopService;
@Override
protected void onCreate(Bundle savedInstanceState) {
super.onCreate(savedInstanceState);
setContentView(R.layout.activity_main);
mStartService = (Button) findViewById(R.id.btn_start_service);
mStopService = (Button) findViewById(R.id.btn_stop_service);
mStartService.setOnClickListener(this);
mStopService.setOnClickListener(this);
}
@Override
public void onClick(View v) {
if (v.getId() == R.id.btn_start_service) {
startService(new Intent(getBaseContext(), DemoService.class));
} else {
stopService(new Intent(getBaseContext(), DemoService.class));
}
}
}
Open the DemoService.java, enter the following code:
package com.example.servicedemo;
import java.util.Timer;
import java.util.TimerTask;
import android.app.Service;
import android.content.Intent;
import android.os.IBinder;
import android.util.Log;
import android.widget.Toast;
public class DemoService extends Service {
private static final String TAG = "DemoService";
private final int INTERVAL = 60 * 1000;
private Timer timer = new Timer();
@Override
public IBinder onBind(Intent intent) {
return null;
}
@Override
public void onCreate() {
super.onCreate();
Toast.makeText(this, "Service is created", Toast.LENGTH_SHORT).show();
}
@Override
public int onStartCommand(Intent intent, int flags, int startId) {
Toast.makeText(this, "Start Service", Toast.LENGTH_SHORT).show();
timer.scheduleAtFixedRate(new TimerTask() {
@Override
public void run() {
Log.d(TAG, "Start to do an action");
}
}, 0, INTERVAL);
return super.onStartCommand(intent, flags, startId);
}
@Override
public void onDestroy() {
Toast.makeText(this, "Stop Service", Toast.LENGTH_SHORT).show();
if (timer != null) {
timer.cancel();
}
super.onDestroy();
}
}
In the above code, when service is started, it will repeat running an action (Print the log) after period time INTERVAL (Milliseconds). You can change this action to whatever you want such as play music, downloading file, etc.
When user presses the Stop button to stop service, the service is destroyed in method onDestroy, you can stop the current action here. In this code, the timer is canceled to stop printing the log on Logcat.
History
This is the initial version of this tip.
Reference
