Introduction
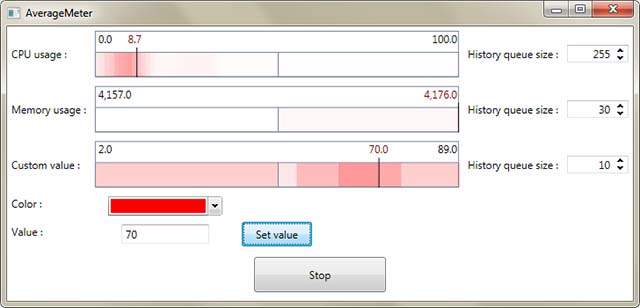
There are a lot of charts and pies to show and analyse series of information graphically. In some cases, we need to have an average value of the currently retrieved values from any resources and we don't need to hold all of the values. For better understanding, assume that we have a sensor that gives us the vibration amount of a bridge. With these values, we have the maximum, minimum and average vibration amounts on this bridge. By using this set of values, we partially can ensure that this bridge can work under pressure. For being able to analyse the performance, we need a range of the last fetched values. Sometimes, having a visual result of information can be more effective in our application dashboard; so we can create a control that shows our information in a graphic mode.

Background
I was developing an application that was using cameras and an ANPR (Automatic Number Plate Recognition) library to reading licence plates. This library was returning two important values to me. The first one was Confidence and the second one was AverageHeight that by using these values, I was able to calibrate and reposition camera (if needed). But in some cases, the minimum and maximum values difference was too much. Because of that, I decided to create a control to demonstrate the current value and the range of the currently fetched values.
Using the Code
For implementing the UI of the control, I added the AverageMeter.xaml resource dictionary and defined this dictionary in Generic.xaml file as merged dictionary like this:
<ResourceDictionary
    xmlns="http://schemas.microsoft.com/winfx/2006/xaml/presentation"
    xmlns:x="http://schemas.microsoft.com/winfx/2006/xaml">
    <ResourceDictionary.MergedDictionaries>
        <ResourceDictionary Source="/AverageMeterTester;component/Themes/AverageMeter.xaml"/>
    </ResourceDictionary.MergedDictionaries>
</ResourceDictionary>
In AverageMeter.xaml file, I defined a Border as my control template with a Canvas inside it. This canvas is for creating control's schema. Body of the AverageMeter.xaml file is like this:
<ResourceDictionary xmlns="http://schemas.microsoft.com/winfx/2006/xaml/presentation"
                    xmlns:x="http://schemas.microsoft.com/winfx/2006/xaml"
                    xmlns:local="clr-namespace:AverageMeterTester">
    <Style TargetType="{x:Type local:AverageMeter}">
        <Setter Property="Template">
            <Setter.Value>
                <ControlTemplate TargetType="{x:Type local:AverageMeter}">
                    <Border Background="{TemplateBinding Background}"
                            BorderBrush="{TemplateBinding BorderBrush}"
                            BorderThickness="{TemplateBinding BorderThickness}"
                            CornerRadius="{TemplateBinding CornerRadius}"
                            Width="{TemplateBinding Width}"
                            Height="{TemplateBinding Height}">
                        <Canvas x:Name="DrawingArea"/>
                    </Border>
                </ControlTemplate>
            </Setter.Value>
        </Setter>
    </Style>
</ResourceDictionary>
The main part of the control is implemented in AverageMeter.cs file. In this file, we have properties, methods and one event. This class contains a private member that I named _queue. I use this variable to keep previous values and highlight important ranges in desired positions. I defined a DependencyProperty with name HistoryQueueSizeProperty that is for controlling the maximum length of the _queue. When a new value is set to Value property, if the length of the _queue is more than HistoryQueueSizeProperty, I remove the oldest value from the top of the list, then I add new value to the bottom of the list; else I add the new value to the bottom of the list without any other work. Every time, after changing the _queue, I search for minimum and maximum values in the list. There is a property with name GlobalMinimumAndMaximumProperty. When this property set to "True", minimum and maximum values calculate from all the previously set values. But if GlobalMinimumAndMaximumProperty is set to "False", minimum and maximum values calculate from currently exist items in _queue. For finding the latest value's position in control, I use these minimum and maximum values like below:
double GetLeft(double value)
{
     return (value - _valueMinimum)*(ActualWidth/(_valueMaximum - _valueMinimum));
}
The main method of this class is Draw(). In this method, I add and locate child controls on _drawingArea canvas. For drawing the max height areas, I create a Rectangle control for each item in _queue and change its size according to current scale and position. Start of this Rectangle calculates from the previous item in _queue and end of it calculates from its dependent value.
I hope this small user control helps you to create perfect user controls.
