Introduction
Today, we will create a simple AngularJS crud application. I created this application in Visual Studio 2013. I also downloaded a few dependencies like AngularJS, Bootstrap and Jquery.
If you want to see a live copy of the application, you can do so by clicking the link here:
Update
I've created a validation tip article here: Validation in AngularJS. Please check it out. It shows you how to validate data you've entered in your forms.
Background
AngularJS is supposed to make web development easier by allowing developers to separate code in module, controller and services. The framework is very popular in the development world and more and more companies are using it.
Application
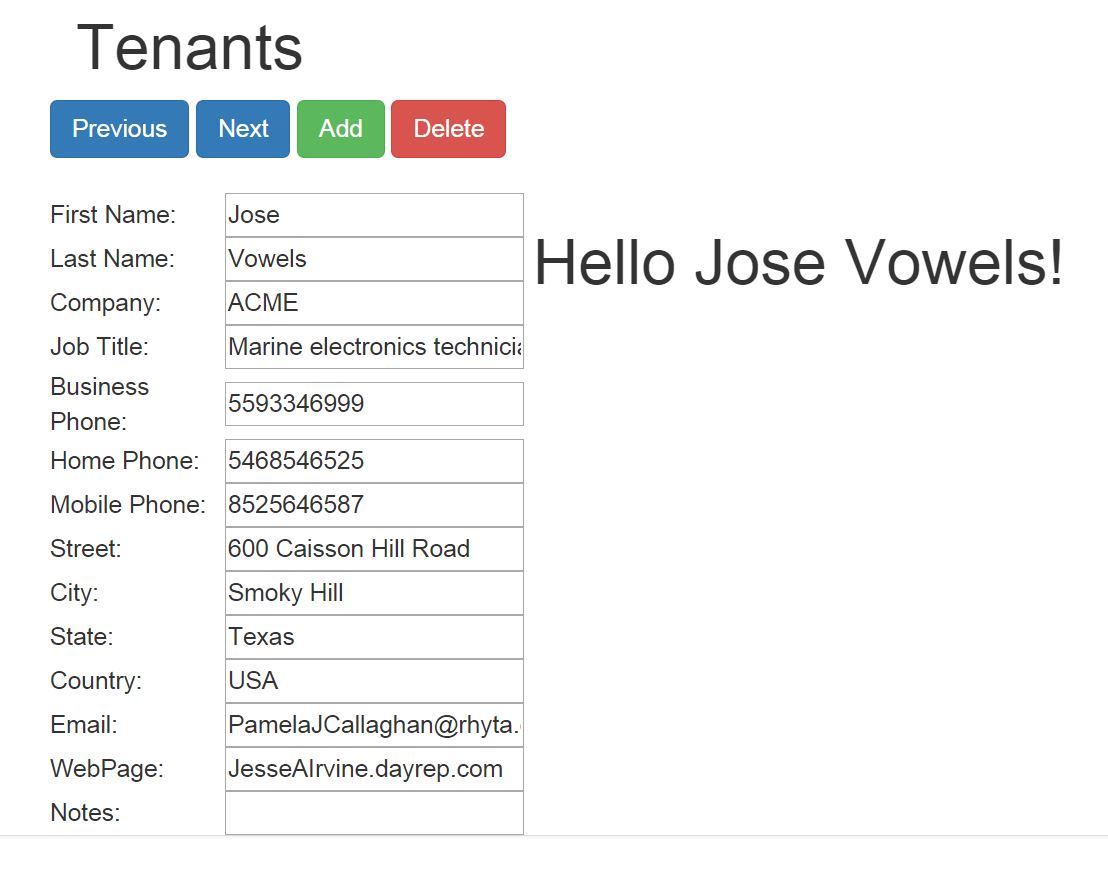
Here is a screen shot of the application. This application allows you to add, delete and browse through a list of tenants. We are using bootstrap, AngularJS, JQuery. Visual Studio solution is used to keep track of all the dependencies.

Module
The heart of an AngularJS application is the module. To create a module, we create a JavaScript file named realestateApp.js. The contents are:
(function () {
    angular.module("realestateApp", []);
}());
This will create a module named realestateApp. We will use this module in our app in this way in our HTML file:
<body ng-app="realestateApp" class="ng-scope">
Controller
Next, we need a controller to have access to model data and methods. This line will register a controller named tenantsController like this:
<div class="container" ng-controller="tenantsController" ngcloak>
This controller contains an angular value called $scope which acts like a model which elements inside the div can access. In our app, we add the model to $scope in this way:
$scope.tenant = tenantService.getTenant(0);
This allows div to use tenant as a model used for 2 way binding and also use methods on the model. An example how this is done is 2 ways. One is using model in an input text box like this:
<input type="text" ng-model="tenant.FirstName" placeholder="Enter a name here">
Any changes in the text form will automatically update the model so no saving is necessary.
Another way is to assign function to the click event on a button like this:
<button class="btn btn-primary" ng-click="previousTenant()">
This allows form events to call functions to update the model object and provide features such as load, add, and delete data into the model.
The controller which we called tenantsController contain methods to load model from a service called tenantService. The service is registered with the following line in tenantsController.js:
app.controller("tenantsController", ["$scope", "tenantService", tenantsController]);
It also has methods to manipulate the model. In our application, we use 4 methods and I've include the code here:
(function (app) {
    var tenantsController = function ($scope, tenantService) {
        var init = function () {
            $scope.tenant = tenantService.getTenant(0);
       };

        var index = 0;

        $scope.nextTenant = function () {
            index++;
            if (tenantService.isOverflow(index))
            {
                index--;
            }
            $scope.tenant = tenantService.getTenant(index);

        }

        $scope.previousTenant = function () {
            index--;
            if (index < 0) {
                index = 0;
            }
            $scope.tenant = tenantService.getTenant(index);
        }

        $scope.addTenant = function () {
            index--;
            if (index < 0) {
                index = 0;
            }
            $scope.tenant = tenantService.addTenant(index);
        }

        $scope.deleteTenant = function () {

            $scope.tenant = tenantService.deleteTenant(index);
            index--;
        }

        init();
    };
    app.controller("tenantsController", ["$scope", "tenantService", tenantsController]);
}(angular.module("realestateApp")));
These function will be available in the UI to hook up to events such as button press, key press, and other events.
Service
These methods along with the model are served through a service called tenantService. This service contains the original data in JSON format, here is a small sample:
var tenant =
                  [
                      {
                          Id : 1,
                          FirstName: "Jose",
                          LastName: "Vowels",
                          Company: "ACME",
                          JobTitle: "Marine electronics technician",
                          BusinessPhone: "5593346999",
                          HomePhone: "5468546525",
                          MobilePhone: "8525646587",
                          FaxNumber: "9785465854",
                          Street: "600 Caisson Hill Road ",
                          City: "Smoky Hill",
                          State: "Texas",
                          Country: "USA",
                          Email: "PamelaJCallaghan@rhyta.com",
                          WebPage: "JesseAIrvine.dayrep.com",
                          Notes: " "
                      },
We now have a factory method architecture for the controller to use. The template code looks like this:
 var tenantService = function () {
        var tenantFactory = {};
         ......
         return tenantFactory;
};
app.factory("tenantService", tenantService);
This allows tenantService to be used by the controller like a module with properties, and methods.
In our factory methods, we have functions which the controller uses in our application, I include the code here:
var tenantService = function () {
        var tenantFactory = {};

        tenantFactory.getTenant = function (index) {
            var returnTenant = [];
            if (tenantFactory.isOverflow(index))
            {
                index = 0;
            }
            returnTenant.push(tenant[index]);
            return returnTenant;
        };

        tenantFactory.isOverflow = function (index){

            return (tenant.length <= index)
        };

        tenantFactory.addTenant = function (index) {
            var returnTenant = [];
            var newIndex = tenant.length + 1;
            tenant.push(tenantFactory.newItem(newIndex));
            returnTenant.push(tenant[tenant.length -1]);
            return (returnTenant)
        };

         tenantFactory.deleteTenant = function (index) {
            var returnTenant = [];

            tenant.splice(index,1);
           if (tenant.length <= index)
           {
               index = tenant.length -1;
           }
            returnTenant.push(tenant[index]);
            return (returnTenant)
        };

        tenantFactory.newItem = function (index) {

            var newItem = {

                Id: index,
                FirstName: "",
                LastName: "",
                Company: "",
                JobTitle: "",
                BusinessPhone: "",
                HomePhone: "",
                MobilePhone: "",
                FaxNumber: "",
                Street: "",
                City: "",
                State: "",
                Country: "",
                Email: "",
                WebPage: "",
                Notes: ""
            }
            return newItem;
        }

        return tenantFactory;
    };
When combined, the HTML page, controller, service and module files work together to bring a working application alive on the web without heavy DOM manipulation and spaghetti code.
We create separation of concerns which can be tested individually and write code which are maintainable and well organized.
I hope you enjoyed this application guide and appreciate AngularJS and its great features. In the future, I will post more articles on form validation, multiple views, and client server interaction.
History
