Introduction
This article describes how to create SQL Server database project use in Visual Studio 2012 and how to use TFS for version control. It's very important to track database changes and also it helps to identify the new changes in database server.
Background
In large ongoing software projects, normally we use three databases like test, stage and live if we maintain these three databases and add new queries from one database to another, we need to compare databases and also need to identify new changes carefully to do that we can create database projects use in Visual Studio and maintain versions use in TFS.
Using the Code
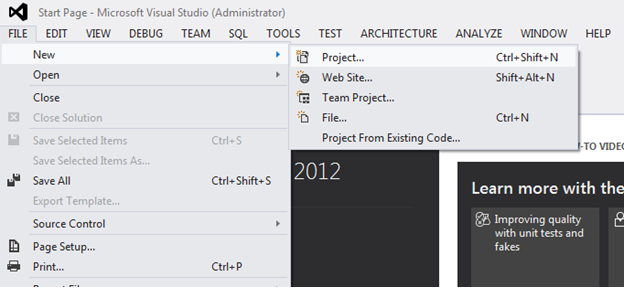
Go to file, then select -> New -> Project
Select SQL server -> then select SQL Server Database Project template.

Select Team ->then click Connect to Team Foundation Server option.
Select the TFS server you need to connect from dropdown box or click Servers option to add new TFS server.
Click Add button for Add new TFS server.
Login your Online TFS server use in MICROSOFT account.
Add your online TFS server URL then click OK.
Then Select server in the dropdown list.
Select server from the dropdown list and select Team Project Collection and Team Project you need to connect.
Select your project.
Now it is ready for Check In.
Commit then check In.
You can see success message in Team Explorer.
Your code in TFS:
Now start Generate DB script use in Schema Compare option.
Select your target and source for compare.
Select your source or Add new Connection.
Check connection and add Database for source.
Now it displays your source database. Then click ok.
Now you can see source is in dropdown now you need to select your target.
After selecting target and clicking ok, then it adds to the target dropdown list.
Then click compare option (left side top).
It displays your compare details.
Click update for add Compare results from source to target.
Click ok for confirm.
Update starting and it display progress.
Now you can checkIn New Changes into TFS.
Commit and then Checkin.
Now new changes are in TFS.
Change your database Store procedure and Check it from VS 2012 compare screen
Checkin new Store procedure changes, then it is in TFS.
If you need to generate database total script, you need to change project settings.
Select platform and select checkbox in Create script option.
Then click publish option for create DB script.
Select target database which needs to update from total script.
Now your target database details are there.
When after click generates Script button, it creates total db script SQL file.
When you execute that SQL script, it will update EyepaxTest database.
Finally, it will display execute successful message.
Points of Interest
MICROSOFT .NET MAKES LIFE EASY FOR SOFTWARE ENGINEERS. :)
History

