Introduction
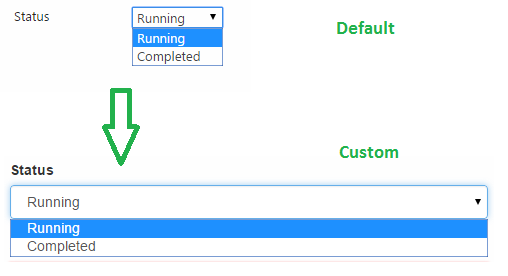
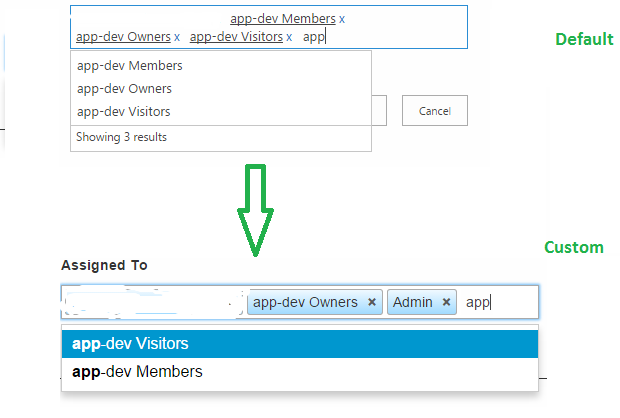
When we need to create a custom form for adding new items or editing items in a list, we may be stuck at some fields like Date, People or Group and Choice. The reason behind is: users will likely have Date Picker, People Picker and Dropdown, Radio buttons or check boxes for these kind of fields. We cannot impose them a text input for these kind of fields that they will type the exact value to the text input and then save. If we do so, then it will be total horrible, I suppose. So, the aim of this article is: how can we create these controls for better UX of our users.
Initial Setup
Before we dive into this article, the following knowledge is required.
- AngularJs
- jQuery
- SharePoint 2013 REST API to List
- SharePoint 2013 and AngularJs
For demo purposes, I am assuming that we have a list called Task with the following fields:
| Title | Single line of text |
| DueDate | Date and Time |
| AssignedTo | People or Group |
| Status | Choice |
Put some values in Status field like Running, Closed and so on for testing purposes. Now, we need to download some libraries like:
- jQuery (download from official site or nuget)
- AngularJs (download from official site or nuget)
- jQuey UI (download from official site or nuget)
- ui-date directive (it will be helpful if you like to develop Date Picker using AngularJs)
- ngTagsInput (it will be helpful if you like to develop People Picker using AngularJs)
- bootstrap-tagsinput (it will be helpful if you like to develop Date Picker using jQuery)
For styling everything, bootstrap should be a proper choice. I am not showing here the steps for creating app or Content Editor Web Part, but in the attachment you will find a SharePoint Hosted App using AngularJs. In this article, I will just discuss the approaches. So before creating these controls, add the above libraries into your project.
Choice

For creating a choice input field, at first, we have to get Choice field values.
var choiceFieldEndPoint = "/_api/web/lists/GetByTitle('List Name')/
fields?$filter=EntityPropertyName eq 'Name of the Choice field'"
If you send a get request to the above URL, it will return all values of the Choice field. In AngularJs, you may write your HTML like the following:
<select class="form-control"
        data-ng-model="vm.newTask.status"
        data-ng-options="status as status for status in vm.newTask.taskStatusOptions">
</select>
Now in the controller, get Choice field values from your service and bind it into vm.newTask.taskStatusOptions.
demoAppSvc.getTaskStatusOptions()
        .then(function (response) {
            vm.newTask.taskStatusOptions = response.d.results[0].Choices.results;
        });
If your Choice field allows multiple selections, then create check box group as shown below:
<label ng-repeat="status in vm.newTask.taskStatusOptions">
    <input type="checkbox"
           value="{{status}}"
           ng-checked="vm.selectedOptions.indexOf(status) > -1"
           ng-click="vm.toggleSelection(status)"> {{status}}
</label>
In controller, add the following code to make it work:
vm.selectedOptions = [];
vm.toggleSelection = function toggleSelection(status) {
                var index = vm.selectedOptions.indexOf(status);
                if (index > -1) {
                    vm.selectedOptions.splice(index, 1);
                } else {
                    vm.selectedOptions.push(status);
                }
            };
When you will save value to Choice field, write the following code if your Choice field does not allow multiple selections.
function saveTask(task) {
var data = {
__metadata: {
'type': 'SP.Data.TaskListItem'
},
Status: task.status
};
var url = "/_api/web/lists/GetByTitle('Task')/Items";
return baseSvc.postRequest(data, url);
}
If Choice field allows multiple selections, then you have to pass an array of string.
function saveTask(task) {
var data = {
__metadata: {
'type': 'SP.Data.TaskListItem'
},
Status: {
results: task.selectedOptions
}
};
var url = "/_api/web/lists/GetByTitle('Task')/Items";
return baseSvc.postRequest(data, url);
}
I am not showing here how baseSvc.postRequest has been created. I wrote other two articles about it using jQuery and AngularJs both.
How can we do that using jQuery, let's see it in action.
<select id="task-status"></select>
Now get Choice values by an Ajax request and populate dropdown as shown below:
function createStatusOptions() {
    $.ajax({
        url: _spPageContextInfo.siteAbsoluteUrl + choiceFieldEndPoint,
        type: "GET",
        headers: {
            "accept": "application/json;odata=verbose",
        },
        success: function(response) {
            var statusOptions = response.d.results[0].Choices.results
            var status = $('#task-status');
            $.each(statusOptions, function(index, value) {
                status.append($("<option>").attr('value', index).text(value));
            });
        },
        error: function(error) {
            alert(JSON.stringify(error));
        }
    });
}
If your choice field allows multiple selections, then create a checkbox group instead of select using jQuery what exactly I did using AngularJs above.
Date and Time Picker

In SharePoint, we can use jQuery UI date picker. It has the same version also in AngularJs. Let's start with AngularJs. Basically, I am recommending this. Before using it, please read the documentation.
<input class="form-control" data-ui-date="vm.dateOptions" data-ng-model="vm.newTask.dueDate" />
ui-date directive has been used here. You have to pass date option over it as shown below:
vm.dateOptions = {
    changeYear: true,
    changeMonth: true,
    yearRange: '1900:-0'
};
For saving this value into a Date and Time field, you have to convert it as ISOString.
function saveTask(task) {
    var data = {
        __metadata: {
            'type': 'SP.Data.TaskListItem'
        },
        Status: task.status,
        DueDate: new Date(task.dueDate).toISOString()
    };
    var url = "/_api/web/lists/GetByTitle('Task')/Items";
    return baseSvc.postRequest(data, url);
}
For jQuery, the following demonstrates the HTML and jQuery codes:
<input type="text" id="due-date">
$(function() {
    $("#datepicker").datepicker({
        changeYear: true,
        changeMonth: true,
        yearRange: '1900:-0'
    });
});
You can add more options that are available here.
People or Group Picker

For this control, I Googled a lot because we know that it's a very complex control. We need to show suggestions while typing in the input field, then remove user from input field and so on. Finally, I manage to find this and this. Basically, this directive allows us add tags in input field and it also shows suggestions while typing in. I have tried to make it as a People or Group Picker. Let's start with AngularJs step by step. First step should be getting suggestions while typing in. We can get suggetions from the following three endpoints.
var userSearchSuggestionEndpoint = "/_api/web/siteusers?$select=Id,
					Title&$filter=substringof('some character', Title)";
You can get search suggestion from the above URL which is very fine. But there is a problem: It will be a case sensitive search. I mean if you search with "Mo", it will return results that contains "Mo" in Title and will not return those that contains "mo".
var userSearchSuggestionEndpoint =
"/_api/SP.UI.ApplicationPages.ClientPeoplePickerWebServiceInterface.clientPeoplePickerSearchUser";
The above endpoint is very powerful. It can search users from all directories. We can get suggestion by a POST request to it.
var data = {
    queryParams: {
        __metadata: {
            type: 'SP.UI.ApplicationPages.ClientPeoplePickerQueryParameters'
        },
        AllowEmailAddresses: true,
        AllowMultipleEntities: false,
        AllUrlZones: false,
        MaximumEntitySuggestions: 50,
        PrincipalSource: 15,
        PrincipalType: 15,
        QueryString: "Your search string"
        Required: false,
        SharePointGroupID: null,
        UrlZone: null,
        UrlZoneSpecified: false,
        Web: null,
        WebApplicationID: null
    }
}
See more about SP.UI.ApplicationPages.ClientPeoplePickerQueryParameters in MSDN
It also has a problem that it does not return People or Group Id in response. Id is needed while saving value to the People or Group field. But it returns LoginName as key in response and we can get Id from LoginName. See here.
Now the last endpoint I found so far seems to be helpful. It has no case sensitive or LoginName issue. It provides us everything what we need for creating a People or Group picker.
function getPeoplePickerSuggestion(searchKey) {
    var userSearchSuggestionEndpoint = "/_vti_bin/ListData.svc/UserInformationList?
		$select=Id,Name&$filter=substringof('" + searchKey + "',Name)";
    return baseSvc.getRequest(userSearchSuggestionEndpoint);
}
Now look at the directive I have used from here. Please read the documentation for more customization.
<tags-input ng-model="vm.newTask.assignedUsers"
                    display-property="Name"
                    placeholder="Pick User"
                    add-from-autocomplete-only="true"
                    replace-spaces-with-dashes="false">
            <auto-complete source="vm.getPeoplePickerSuggestion($query)"></auto-complete>
</tags-input>
Basically, you have to pass array as ng-model which will be responsible for all picked users and an another function that returns deferred results as suggestion. See my controller code.
vm.newTask = {
    assignedUsers: []
};
vm.getPeoplePickerSuggestion = function(searchString) {
    return demoAppSvc.getPeoplePickerSuggestion(searchString)
        .then(function(response) {
            var results = response.d.results;
            return results.filter(function(user) {
                return user.Name.toLowerCase().indexOf(searchString.toLowerCase()) != -1;
            });
        });
};
If your People or Group field does not allow multiple selections, then your code should look like the following:
function saveTask(task) {
    var data = {
        __metadata: {
            'type': 'SP.Data.TaskListItem'
        },
        Title: task.title,
        DueDate: new Date(task.dueDate).toISOString(),
        Status: task.status,
        AssignedToId: 'Id of the selected user'
    };
    var url = "/_api/web/lists/GetByTitle('Task')/Items";
    return baseSvc.postRequest(data, url);
}
Following is for multiple selections. You will need to pass an array of integers instead of a single integer.
function saveTask(task) {
var data = {
__metadata: {
'type': 'SP.Data.TaskListItem'
},
Title: task.title,
DueDate: new Date(task.dueDate).toISOString(),
Status: task.status,
AssignedToId: {
results: []
}
};
var url = "/_api/web/lists/GetByTitle('Task')/Items";
return baseSvc.postRequest(data, url);
}
For jQuery version, at first see this document and implement it in your own way.
<input type="text" id="people-picker" />
$('#people-picker').tagsinput({
itemValue: 'Id',
itemText: 'Name',
typeaheadjs: {
name: 'users',
displayKey: 'Name',
source: getPeoplePickerSuggestion()
}
});
Conclusion
In the whole article, I gave you the high level idea. So, download my source code as well and start digging into that. Do not forget to give library references to your project. Otherwise, it will not work.
