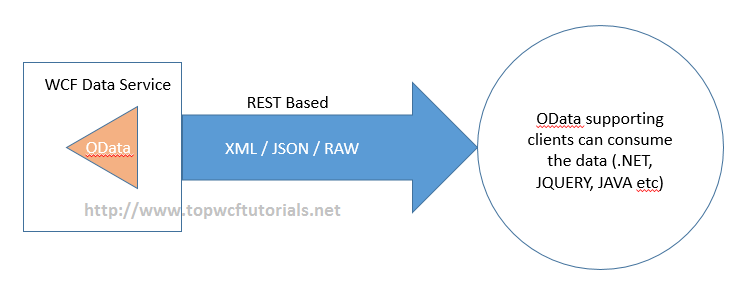
When it comes to Service Oriented Architecture or Programming, Microsoft’s WCF (Windows Communication Foundation) technology plays a prominent role in the field. It enables developers to segregate Services/Data with Client, hence it helps in developing a loosely coupled application with ease.
Before digging deeper into the definition of what WCF Data Service is, let me clarify the common confusion between WCF Service and WCF Data Service. In WCF Service, the focus is on creating Operations, where the generic services are implemented. It works with various protocols/techniques such as SOAP, MSMQ, HTTP, TCP, etc. Whereas WCF Data Service is completely focused on creating Data as a service. If we have a data model and if we need to make it available for the clients to consume it, then WCF Data Service is the right way. It only supports REST based HTTP protocol.
Here in this WCF tutorial, we are going to follow a simple step by step approach to create and consume a WCF Data Service. You can also download the complete source code here.
WCF Data Services 4.5 Exposed
Microsoft’s .NET Framework provides us a reliable Service technology called WCF Data Service, where it enables us to create a Data service which exposes our data-model to the clients. Here, the services which it creates are based on OData, i.e., Open Data Protocol, it is a standard technique to create and consume REST (Representational State Transfer) APIs, where the services are accessed by URLs via normal HTTP requests.

HTTP request includes GET, POST, PUT and DELETE verbs through which a CRUD based service can be created. This Data service can be consumed by any client application that supports HTTP-OData and format of receiving data can be of XML, JSON or Raw text.
WCF Data Services Tutorial – A Step by Step Approach
Create a WCF Data Service
You need Visual Studio 2010 IDE & SQL Server in your machine as prerequisites for building WCF Data Service. It would be nice if you have basic .NET knowledge. Let’s get started!
- Open Visual studio 2010 and create a Web -> ASP.NET Web Application with a language of your choice, either C# or VB. I’ve used C# throughout the lesson. The reason why we are creating an ASP.NET Web application is because in order to host and consume the WCF Data Service, we need a hosting and client application.

- Once the application is created, we need a
DataModel where it is going to be served. So let’s create a SQL Server database. Right click on the App_Data -> Create SQL Server database and define the schema as below:

- Now let’s feed some values into our newly created database table.

- We have our Database and Table ready, now it’s time for us to create an Entity Data Model. Right click on the project and Add New item -> Select ADO.NET Entity Data Model, a Wizard pops up, proceed further with it. Below screenshots help you in building a Model.


- Now we are done with Entity Model and for our Schema structure, this how the Model looks:

- We are good with our basic implementation in-order to adopt a WCF Data Service into our application. Ready to go. Let’s create a WCF Data Service. Right click on the Project -> Add New Item -> Select WCF Data Service.

- WCF creates us a basic template code for us to start with.

- Before moving forward, let us keep our Database Entity name handy. It can be found in Web.Config under Connection String.

- Here we have replaced the template code with
EntityName and Set of rules which decides the rights of access.

- If you run the application or just hit F5 selecting the WCF Data Service file, it opens up a browser and navigates us to http://localhost:/WCFDataFilename.svc. You can see an XML document with title holds to the Entity Name we created.

- To get the full database values as a XML model, just postfix the Entity Name with URL. As below:

- Quite simple, right! We do have some syntax approach in accessing the resource via OData. For example, if we need a Single record, access it like below:

Consume Data Model via WCF Data Service
- Open Default.aspx page of the ASP.NET Web application that we created a moment ago. Create a
Gridview.

- In-order to consume the WCF Data Service, we need to add a Service Reference. Right click on Reference Folder -> Add Service Reference -> Click on the Go. Since our Data service resides inside our application, it fetches URL automatically.

- Create an instance for the referenced Service, place the URI of our running Data Service. Map the Entity with the
DataSource of the GridView.

- Just run the application or hit F5 to see the magic!

- Great! We have successfully created a WCF Data Service and consumed it. If you are interested in understanding more about Web API service, follow Web API tutorial.
Retrieve the Data in JSON Format
JSON format is quite easy to read programmatically and faster than XML. In-order to get the data in JSON format, we need to have a special class file “JSONPSupportBehaviour.cs”. Include the file into our project and just decorate the Data Service class with the attribute JSONSupportBehaviourAttribute.
That’s it, now we can just retrieve the data in JSON format, by following OData special URL format, i.e., post fixing with $format=json.
You can get the JSONPSupportBehaviour.cs by downloading the source code.


Hope this article would have sown a little knowledge on WCF Data Service. Kindly let us know if you have any questions.
Download Source Code for this WCF Tutorial
Enjoy WCF Programming with WCF Tutorial!
Top 10 Interview Questions and Answers Series
The post Step by Step approach to create a WCF Data Service appeared first on WCF Tutorial.
