Introduction
I have a small project that needed an MRU. I like the way newer applications plug into Windows to show MRU files on the jump list in the taskbar using the SHAddToRecentDocs system function. I wanted flexibility with how the information was persisted, at least being able to use the registry or store its values in the application's local settings file. I also wanted it to work with either Windows Forms or WPF. This class does all that.
Background
There are a bunch of great examples across the web on MRU solutions for .NET projects. Two that I leveraged for this component were:
I wanted something that brought the best of these together and which could be dropped directly onto a form. Thus was born the code presented here.
Using the Code
This class can be used either as a component that one drops onto a form or as a local instance in an application. To demonstrate how the code works, I'll focus on the former case and describe how it relates to a local instance.
- Add the MRUManager.cs file to your project and rebuild the project. For Window Forms projects, this should put the
MRUManager and MenuStripMRUManager components in the Toolbox. - All MRU classes use application settings by default to store the history. In order to use this feature, you must configure settings for your project. Effectively, you need to make sure that your project has a class derived from
System.Configuration.ApplicationSettingsBase and that you have configured at least one setting. MRUManager hunts for this class in the assembly and will grab the first one it finds and use it to store the MRU file history. The class will use "__MRUList__" as the property name for storing the file history. An exception is thrown if no settings instance is defined. - Alternately, you can change out the storage function for the registry. To do this, you have to manually create the
MRUManager (or derivative) instance and supply a RegisterFileListStorage instance as the last parameter to the constructor. This will look in the executing assembly for the company and product name (or assembly name if those can't be found) and will store the MRU list in HKEY_CURRENTUSER\Software\[[Company]\[Product]|AsmName]\MRU. See example code at the end of this section to see how. - If all you need is the MRU and are handling all interactions with your UI, you can simply use the
MRUManager. You can drag it onto your form or create an instance of in your main form. It just provides the interaction with either settings or the registry and Windows to maintain the list of files. If you would like the class to also display a list of menu items in WinForms, then drag the MenuStripMRUManager onto your form. Ideally, this form should be the form that holds a MenuStrip used to deal with file actions (Open, Save, etc.). If you want to use this for an WPF project, create an instance of MenuMRUManager in your main window that contains a Menu instance. - Important: If you want to pull in items from Window's "Recent Items" list, you must supply the list of valid extensions to the
MRUManager instance's FileExtensions property. This list must be a vertical bar delimited list of extensions without the periods (e.g. "doc|docx|html|rtf"). - Important (2): The application must report all file openings in order to maintain the list. To do this, the application must call the
MRUManager instance's AddRecentFile method every time a new file is opened. - If you desire to maintain a list of files with more or less than 10 items, change the
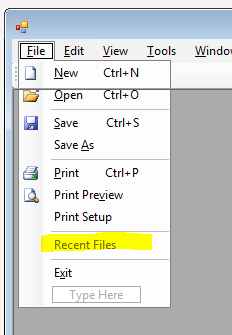
MaxHistoryCount property. - If you want to automatically create a menu list of most recent files:
- Create a
ToolStripMenuItem in your form's MenuStrip (or Menu in your WPF Window) that will host that menu list as dropdown menu items.

- Assign the menu item to the
MRUManager derivative instance's RecentFileMenuItem property. - Create an action which executes when the user clicks on one of the recent file menu item by going to events for the
MRUManager instance and double-click on the RecentFileMenuItemClick event. Complete the method body with what you want done. Usually, this is opening the file. - By default, the list of recent files will have a menu item at the end for clearing all MRU entries. It it titled, by default, "
Clear List". This can be changed by changing the MRUManager instance's ClearListMenuItemText property. If you want to remove this menu item, clear the property's value.
private void mruManager_RecentFileMenuItemClick(string file)
{
   OpenFile(file);
}
- If, other than clearing the list, you need to do other work when the MRU list is cleared, create an action method for the
MRUManager instance's ClearListMenuItemClick event.
private void mruManager_ClearListMenuItemClick(StringCollection files)
{
   foreach (string file in files)
      ProcessClearedFile(file);
}
If you want to do all this manually, all those properties mentioned above are public members of the MRUManager class. Much of it can be done in a single constructor call.
var mgr = new MenuStripMRUManager("doc|docx|html|rtf",
recentFileToolStripMenuItem,
mruManager_RecentFileMenuItemClick,
mruManager_ClearListMenuItemClick,
new RegistryFileListStorage()
);
mgr.ClearListMenuItemText = "Clear my list now";
mgr.MaxHistoryCount = 20;
The constructor's last parameter begs a little explanation. The class indicated (RegistryFileListStorage) will switch the storage location of the history from the application settings to the registry (see #2 and #3 above).
If you want to use the drag-and-drop WinForms component and still use the registry, you can set the StorageHandler property to that same class instance. This will also allow you to change the registry key if desired.
InitializeComponent();
mruManager1.StorageHandler = new Community.Core.MRUManager.RegistryFileListStorage()
{ SubKeyName = "MyRegistryLoc\\MRU" };
History
- 18 Mar 2018: Reformatted code with ReSharper and added in fixes from users
- 21 Aug 2015: Initial publication
- 25 Aug 2015: Extracted menu and storage handling into interface classes and allowed for WPF and WinForm solutions. Fixed bugs. Added documentation.
