Introduction
Most of the software we all buy and receive, on either media (CD-ROM, download, etc...) provides the end-user with a wizard-like setup application. In some cases though, multiple products are available on the same support and when one inserts the CD-ROM in the CD tray, a nice splash screen appears, letting him/her select the application to install. Never wondered how this was made? Here is a (very) simple implementation of this kind of first-setup-screen.
Main functionalities
Before diving into this project, one must define precisely what should be made available to the user, how it should look like, what should it be doing...
Core
As this screen is the first one to pop up, it should be nice and appealing. But you should keep in mind that it is also the first piece of code to actually discover what is available on the host machine. Thus, the design should not be too fancy, because you do not know in advance what kind of graphic possibilities are available. On the same front, there is no need to present any .NET driven setup application, if .NET is not installed on the computer. There are other things you might want to check: network connection, user privileges, etc... We are not going to go too far here, as it should stay simple. I will show you in the code where you can add "element testing". The one major thing to remember is that this application will be started directly (through a boostrapper, see below), and this means there will be no time for library checking or loading.
Design
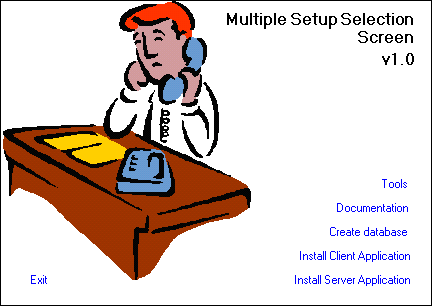
As I said previously, the design should stay sober. I propose a simple square box, with a white background, a simple bitmap, and system colors. Something like the one shown above on top of this page. To create such a screen using Visual Studio .NET, use the following steps:
- Start a new project and add a new Windows Form.
- Form properties should be:
- start position: center screen
- form border style: none
- Add a
Panel control to the form and set the properties to:
- border style: fixed single
- cursor: no
- dock: fill
- background image: any image you want
- Add Link Label controls and Label controls to show the options.
About the image: the Panel control will tile the background image and reproduce it as many times as it can fit in the Panel's width and height. When you create or select the image, add some extra white space around it to make the desired text and links fit.
The code
As mentioned above, we need to use as less resources as possible in the application, to make sure it starts and runs correctly. To start a setup application from this code, I will use the Process control from System.Diagnostics, which you can find in the Components Tab of the Toolbox, in Visual Studio IDE; simply drag and drop it on your main form and VS will do the rest. Switch to code view and add the following code:
Private Sub launchExternalSetup(ByVal WorkingDirectory, _
                                            ByVal FileName)
    Try
        pSetupLauncher.StartInfo.WorkingDirectory = _
                                           WorkingDirectory
        pSetupLauncher.StartInfo.FileName = FileName
        pSetupLauncher.Start()
    Catch ex As Exception
        MsgBox("An error occured while starting the " & _
                  FileName & " setup application." & _
                  vbCrLf & ex.Message, _
                  MsgBoxStyle.Critical + MsgBoxStyle.OKOnly)
    End Try
End Sub
The System.Diagnostics.Process component is very easy to use: simply supply the StartInfo property values and start the process. There is a wide range of parameters that you can describe in the ProcessStartInfo class, but here, we'll stay simple and supply only the path and the executable name of the process we want to start. For more info, browse to .NET Framework Class Library - ProcessStartInfo Class
Now that we have a process launcher mechanism, all we need to do is to get the event handlers to work:
Private Sub lnkClient_LinkClicked(ByVal sender As System.Object, _
  ByVal e As System.Windows.Forms.LinkLabelLinkClickedEventArgs) _
                                      Handles lnkClient.LinkClicked
        launchExternalSetup(Application.StartupPath & "\..\Client", _
                                                   "ClientSetup.exe")
End Sub
The lnkClient_LinkClicked sub is triggered each time the lnkClient Link Label control is clicked. In this event handler, I launch the launchExternalSetup procedure with valid arguments, and that's it. This is where you can add some testing on the machine's environment, such as network connection, or user privileges:
Private Sub lnkClient_LinkClicked(ByVal sender As System.Object, _
  ByVal e As System.Windows.Forms.LinkLabelLinkClickedEventArgs) _
                                     Handles lnkClient.LinkClicked
    If SomeConditionIsTrue then
        launchExternalSetup(Application.StartupPath & _
                             "\..\Client", "ClientSetup.exe")
    Else
        MsgBox("SomeCondition is not ok !")
    End If
End Sub
You could also decide to show or hide some of the Link Labels based on some other conditions, upon startup:
Private Sub frmSetup_Load(ByVal sender As Object, _
       ByVal e As System.EventArgs) Handles MyBase.Load
    If SomeConditionIsOk then
        lnkClient.enabled = true
    Else
        lnkClient.enabled = false
    End If
End Sub
Checking for .NET Framework - the bootstrap
As the Multiple Setup Selection Screen is a .NET application, you must first ensure that the .NET Framework is available. To achieve this, you must run a boostrapper - an application, written in native code, which will check for the Framework. If it's there, start the Setup Selection Screen; if it's not, ask the user to install the Framework, or take any other action you like. You might want to distribute the Framework with your application as well, and install it from the bootstrapper. Here is the VC++ code to achieve this:
#include <windows.h>
void InstallDotNet();
int APIENTRY WinMain(HINSTANCE hInst,
HINSTANCE hPrev,LPSTR cmdline,
int CmdShow)
{
HKEY hKey;
LONG lRet;
lRet = RegOpenKeyEx( HKEY_LOCAL_MACHINE,
"SOFTWARE\\Microsoft\\.NETFramework",
0, KEY_QUERY_VALUE, &hKey );
if( lRet != ERROR_SUCCESS )
{
InstallDotNet();
return FALSE;
}
RegCloseKey( hKey );
ShellExecute(NULL, "open",
"setup\\MultipleSetupSelectionScreen.exe",
NULL, NULL, SW_SHOWNORMAL);
return TRUE;
}
void InstallDotNet()
{
ShellExecute(NULL, "open",
"framework\\dotnetfx.exe", NULL,
NULL, SW_SHOWNORMAL);
}
I must admit that the original code (much longer) is not mine, I simply removed all unwanted portions, to keep the relevant stuff. Sorry for the missing credit line, but it wasn't there in the first place. This app is fast and simple. It checks in the registry if the .NET Framework key is present, using function RegOpenKeyEx which is part of the Advapi32.lib, available on all Windows version and defined in Windows.h. ShellExecute, can be found in shell32.lib, which is part of Windows since version 95.
Using the code
Now we have all the bits and parts of our Setup application. Let's put it all together. Let's suppose you want to distribute a complete solution with the following requirements:
- The solution is delivered on a CDROM.
- The solution comprises of five distinct applications, each coming with a separate setup.
- The user must be presented with a starting interface, letting him choose between the applications.
- The .NET Framework must be installed if not present.
- The setup should start itself automatically when the CDROM is inserted.
Following these requirements, here is a snapshot of the CDROM content:
cdrom\
    setup.exe
    autorun.inf
    setup\
        MultipleSetupSelectionScreen.exe
        cdrom.ico
    tools\
        ToolsSetup.exe
    database\
        DatabaseSetup.exe
    framework\
        dotnetfx.exe
    etc..
The setup.exe is our bootstrapper. The autorun.inf file contains the following:
[autorun]
OPEN=Setup.exe
ICON=setup\cdrom.ico
This will give our CDROM drive (in the file explorer) a nice new icon, and will start Setup.exe automatically if the user has enabled this feature on his computer.
After you have compiled all your code, create yourself the exact CDROM directory structure on your hard drive and copy all the parts in place. You have to rename boostrap.exe to Setup.exe. Burn a CDROM with the content of the top directory, including all sub dirs. Test...you're done!
Points of interest
This project is very simple, but yet demonstrates a way of presenting the end-user a way to select one installation procedure out of many. You will not find it very hard to introduce new features as explained above...Note that you could also monitor the applications that are launched using the StartProcessInfo; these applications need not to be setup applications either. Have fun!
History
This member has not yet provided a Biography. Assume it's interesting and varied, and probably something to do with programming.


 General
  News
News  Suggestion
  Question
  Bug
Bug  Answer
  Joke
Joke  Praise
  Rant
Rant  Admin
Admin 


