In this article, we will take a look at the prerequisites and steps to install CocosSharp for Windows Phone. We will also learn how to create the first CocosSharp Project for Windows phone, and also create a simple touch and fun game program.

Introduction
In this article, let's see about CocosSharp for Windows Phone. CocosSharp is a 2D Game engine for C#, F# and .NET developers, which is used to develop cross-platform games. For more details, check this link.
In this article, we will see:
- Prerequisites and Installation steps
- How to create the first CocosSharp Project for Windows phone
- First simple touch and fun game program
Prerequisites and Installation Steps
- Visual Studio 2015: You can download it from here.
- CocosSharp Installation Steps
To add the CocosSharp template in our Visual Studio, first, add the extensions in Tools option.
Open Visual Studio 2015 and at the top from Tools menu, select Options.

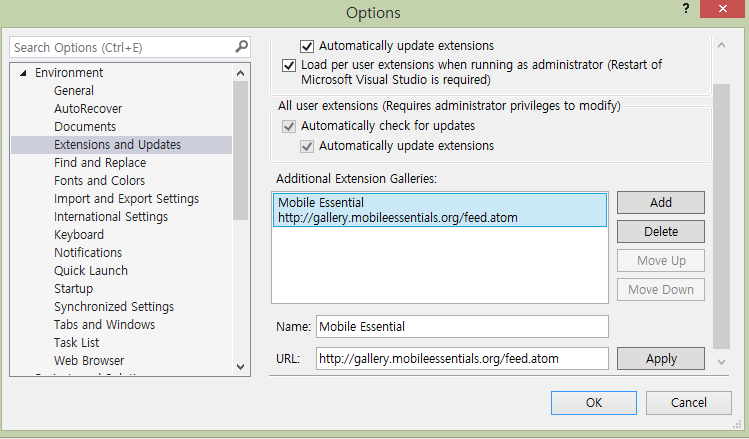
We can see our Options Window has been opened. Click “Extensions and Updates”. If Mobile Essential is not added, click Add, in name, we can give “Mobile Essential” and in URL, give the URL as http://gallery.mobileessentials.org/feed.atom. Click OK.

Next step is to download and install CoCosSharp Templates.
Click Tools, select Extensions and Updates from the menu.

In the left side, select Online -> Mobile Essential.

Now, we can see CocosSharp Templates. Click Download button.

Install CocosSharp Templates.

After Installation, open Visual Studio 2015, click Create New Project and select CoCosSharp from the left side templates. Select your CoCosSharp Development as Android, iOS or Windows. In our example, we will be using for Windows Phone.

If Xamarin is not installed, install it by following the steps given below:

Reference link.
Using the Code
Creating First CocosSharp Project for Windows Phone
After installing Visual Studio 2015 and CocosSharp templates, click Start >> Programs >> select Visual Studio 2015 >> click Visual Studio 2015. Click New >> Project >> select CocosSharp >> Select CocosSharp Game (Windows Phone).

Select your project folder, give your project name and click OK. Once our project has been created, we can see MainPage.Xaml and GameLayer.CS file in Solution Explorer.

MainPage.Xaml
By default, the main screen name will be Mainpage.xaml.
Here, the design page extension will be Extensible Application Markup Language (XAML). If you have worked with WPF, it will be easy to work with Universal Application as in WPF, all form file will be as XAML.
GameLayer.CS
GameLayer is the main Ccass of CocosSharp. The program will begin from this class and this is similar to our program class in C# Console Application.
GameLayer() Method
This class has the contractor method GameLayer(). For the layer, default back color will be set in the GameLayer() method parameter. We can change it, as per our need. When we create our first application, GameLayer() method will be added with a default backcolor and with one label, as given below. This method is similar to ASP.NET page Init method. Here, we can see in the code, mentioned above, one label has been added.
CCLabel label;
public GameLayer() : base(CCColor4B.Blue)
{
label = new CCLabel
("Hello CocosSharp", "MarkerFelt", 22, CCLabelFormat.SpriteFont);
AddChild(label);
}
AddedToScene() Method
This class has another override method AddedToScene(). In this method, we create events for our layer. For example, we can see, by default, this method will be initialized by an event for OnTouchesEnded mobile phone touch (in normal Emulator, it will be used as mouse click release event).
protected override void AddedToScene()
{
base.AddedToScene();
var bounds = VisibleBoundsWorldspace;
label.Position = bounds.Center;
var touchListener = new CCEventListenerTouchAllAtOnce();
touchListener.OnTouchesEnded = OnTouchesEnded;
AddEventListener(touchListener, this);
}
OnTouchesEnded() Event
This event will be triggered, whenever someone touches the mobile and takes the finger from the mobile. This is similar to MouseUp event.
void OnTouchesEnded(List<CCTouch> touches, CCEvent touchEvent)
{
if (touches.Count > 0)
{
}
}
Here, the default GameLayer class will look like:

Run the Program
Select our Emulator to display our output and click Run.

When we run the program, we can see the output in an Emulator.
Here, we can see our layer backcolor is set as blue and label is displayed in the center of the screen.

First Simple Touch and Fun Game Program
Now, let’s see, how to create our simple touch and fun game program by adding the images in our layer.
Click Start >> Programs >> select Visual Studio 2015 >> click Visual Studio 2015. Click New >> Project >> select CocosSharp >> select CocosSharp Game (Windows phone).

Select your project folder, give your project name and click OK.
Add Images
In this program, we will be adding an image to our layer and in it, when the user touches the Windows phone or clicks an Emulator, we will move the image upside and down. For this, first we will create some image by ourselves and add the images to our project.
To add image, right click on Content folder from solution. Click Add> select Existing Item >select your image and add to the content folder.

In our example program, we have added two images; one as a square and one as a ball.

For image rendering, we will be using CCSprite Class. To know more about CCSprite class, check this link.
Adding Images to Layers
First, we declare label, CCSprite variable. In this example, for the layer, we have set the backcolor as white.
We set the label color as blue. To add an image in our CCSprite class, we pass the image name as a method parameter. We add the image to the layer and similarly, we add two images.
CCLabel label;
CCSprite paddleSprite;
CCSprite paddleSpriteball;
Boolean reachedtop = false;
public GameLayer() : base(CCColor4B.White)
{
label = new CCLabel("Welcome to Shanu CocosSharp Game for Windows",
"MarkerFelt", 22, CCLabelFormat.SpriteFont);
label.Color = CCColor3B.Blue;
AddChild(label);
paddleSprite = new CCSprite("squre");
paddleSprite.PositionX = 100;
paddleSprite.PositionY = 100;
paddleSpriteball = new CCSprite("ball");
paddleSpriteball.PositionX = 620;
paddleSpriteball.PositionY = 620;
AddChild(paddleSprite);
AddChild(paddleSpriteball);
}
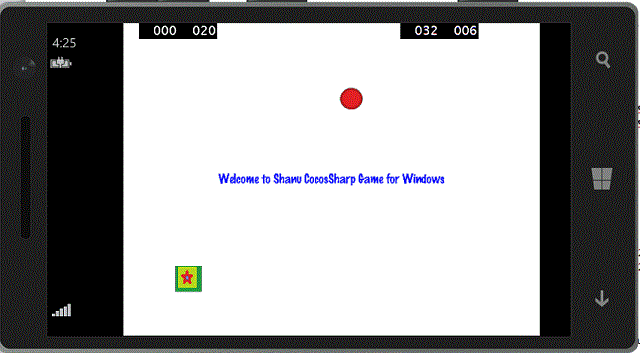
We set one image at the bottom left and another image at top right. When we run, we can see the output in our Emulator like this.

Now, we have added an image to our layer and also added welcome text in the center of the screen.
The next step is to create an event on Touch to move the image.
Touch Event to Move Image
In touch end event, we check for an image position and increment the X Value and Y Value to move up for one image and decrement the X Value and Y Value to move down of another image. Once the image reaches from top or bottom, we reverse the process for continuous image movement of upside and down.
void OnTouchesEnded(List<CCTouch> touches, CCEvent touchEvent)
{
if (touches.Count > 0)
{
if(paddleSprite.PositionY > 620)
{
reachedtop = true;
}
else if(paddleSprite.PositionY <100)
{
reachedtop = false;
}
if (reachedtop ==false)
{
if (paddleSprite.PositionY >= 80 && paddleSprite.PositionY <= 620)
{
paddleSprite.PositionX = paddleSprite.PositionX + 20;
paddleSprite.PositionY = paddleSprite.PositionX + 20;
paddleSpriteball.PositionX = paddleSpriteball.PositionX - 20;
paddleSpriteball.PositionY = paddleSpriteball.PositionX - 20;
}
}
else
{
paddleSprite.PositionX = paddleSprite.PositionX - 20;
paddleSprite.PositionY = paddleSprite.PositionX - 20;
paddleSpriteball.PositionX = paddleSpriteball.PositionX + 20;
paddleSpriteball.PositionY = paddleSpriteball.PositionX + 20;
}
}
}
When we run the program in Emulator or in Windows phone, we can see the output, as given below:

History
- 8th September, 2016: Initial version
