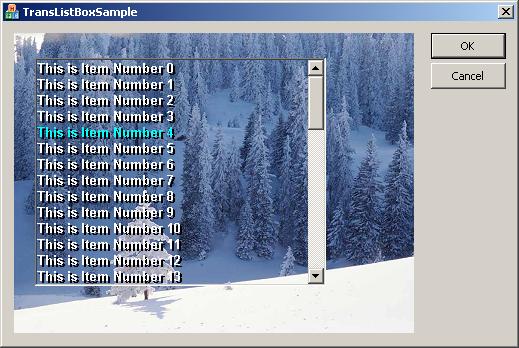
Introduction
Any experienced Windows programmer can tell you that transparency is not a trivial task in Windows. A transparent ListBox control is no exception. Actually ListBoxes are a bit harder than other controls. And the reason is the way ListBoxes do their scrolling. But overall it is a pretty simple concept to implement.
For example, in order to make a static control transparent, all anyone will have to do is to handle the WM_ERASEBKGND, and to also repaint the control when the user calls SetWindowText.
In the case of a ListBox, let’s say that we take over the WM_ERASEBKGND message and return TRUE (basically the easiest way to achieve transparency). When the user presses the down button of the Listbox’s scrollbar, what Windows does is bitblt the item's top index + 1 to the last shown item one line up, and then simply draws the new item. What happens there is that the background gets copied up with the item. Clearly not the results we would be looking for.
How to do it
So how would we achieve transparency with a ListBox? Let’s start with an owner draw ListBox.
First thing we have to do is copy the parent window's image before the first time the ListBox is drawn, this will give us the background for the listbox. We can do this in the WM_ERASEBKGND message handler. The first time this message is received the ListBox has not yet been drawn, so it is a safe place to take a snapshot of the parent window.
BOOL CTransparentListBox::OnEraseBkgnd(CDC* pDC)
{
   if (!m_HasBackGround)
   {
       CWnd *pParent = GetParent();
       if (pParent)
       {
         CRect Rect;
         GetClientRect(&Rect);
         ClientToScreen(&Rect);
         pParent->ScreenToClient(&Rect);
         CDC *pDC = pParent->GetDC();
         m_Width = Rect.Width();
         m_Height = Rect.Height();
         CDC memdc;
         memdc.CreateCompatibleDC(pDC);
         CBitmap *oldbmp = memdc.SelectObject(&m_Bmp);
         memdc.BitBlt(0,0,Rect.Width(),Rect.Height(),
                     pDC,Rect.left,Rect.top,SRCCOPY);
         memdc.SelectObject(oldbmp);
         m_HasBackGround = TRUE;
         pParent->ReleaseDC(pDC);
       }
   }
   return TRUE;
}
The second thing that we have to handle is drawing each item on the screen. Because of the scrolling we can’t trust the ListBox to do any of our drawing for us. So we override the DrawItem method and do nothing. And in turn place the code that would normally be placed there in a separate DrawItem method which we can call when we want to paint the ListBox, which we will in the OnPaint method. What OnPaint does is simply draw the background snapshot on to a memory DC, draw the visible items on to the same memory DC, and then bitblt the entire thing on the ListBox DC. Simple so far.
void CTransparentListBox::DrawItem( LPDRAWITEMSTRUCT lpDrawItemStruct )
{
}
void CTransparentListBox::DrawItem(CDC &Dc,
int Index,CRect &Rect,BOOL Selected)
{
if (Index == LB_ERR || Index >= GetCount())
return;
if (Rect.top < 0 || Rect.bottom > m_Height)
{
return;
}
CRect TheRect = Rect;
Dc.SetBkMode(TRANSPARENT);
CDC memdc;
memdc.CreateCompatibleDC(&Dc);
CFont *pFont = GetFont();
CFont *oldFont = Dc.SelectObject(pFont);
CBitmap *oldbmp = memdc.SelectObject(&m_Bmp);
Dc.BitBlt(TheRect.left,TheRect.top,TheRect.Width(),
TheRect.Height(),&memdc,TheRect.left,
TheRect.top,SRCCOPY);
CString Text;
GetText(Index,Text);
if (m_Shadow)
{
if (IsWindowEnabled())
{
Dc.SetTextColor(m_ShadowColor);
}
else
{
Dc.SetTextColor(RGB(255,255,255));
}
TheRect.OffsetRect(m_ShadowOffset,m_ShadowOffset);
Dc.DrawText(Text,TheRect,DT_LEFT|DT_EXPANDTABS|DT_NOPREFIX);
TheRect.OffsetRect(-m_ShadowOffset,-m_ShadowOffset);
}
if (IsWindowEnabled())
{
if (Selected)
{
Dc.SetTextColor(m_SelColor);
}
else
{
Dc.SetTextColor(m_Color);
}
}
else
{
Dc.SetTextColor(RGB(140,140,140));
}
Dc.DrawText(Text,TheRect,DT_LEFT|DT_EXPANDTABS|DT_NOPREFIX);
Dc.SelectObject(oldFont);
memdc.SelectObject(oldbmp);
}
void CTransparentListBox::OnPaint()
{
CPaintDC dc(this);
CRect Rect;
GetClientRect(&Rect);
int Width = Rect.Width();
int Height = Rect.Height();
CDC MemDC;
MemDC.CreateCompatibleDC(&dc);
CBitmap MemBmp;
MemBmp.CreateCompatibleBitmap(&dc,Width,Height);
CBitmap *pOldMemBmp = MemDC.SelectObject(&MemBmp);
CBitmap *pOldbmp = dc.SelectObject(&m_Bmp);
MemDC.BitBlt(0,0,Width,Height,&dc,0,0,SRCCOPY);
dc.SelectObject(pOldbmp);
Rect.top = 0;
Rect.left = 0;
Rect.bottom = Rect.top + GetItemHeight(0);
Rect.right = Width;
int size = GetCount();
for (int i = GetTopIndex(); i < size
&& Rect.top <= Height;++i)
{
DrawItem(MemDC,i,Rect,GetSel(i));
Rect.OffsetRect(0,GetItemHeight(i));
}
dc.BitBlt(0,0,Width,Height,&MemDC,0,0,SRCCOPY);
MemDC.SelectObject(pOldMemBmp);
}
Third and the tricky part is handling the scroll messages. To overcome the scroll problem, we intercept the WM_VSCROLL message and wrap the call to CListBox::OnVScroll with SetRedraw(FALSE), and SetRedraw(TRUE), followed by a call to RedrawWindow to refresh the content of the listbox. This will give a smooth and flicker free scrolling. Simple!
void CTransparentListBox::OnVScroll(UINT nSBCode,
UINT nPos, CScrollBar* pScrollBar)
{
SetRedraw(FALSE);
CListBox::OnVScroll(nSBCode,nPos,pScrollBar);
SetRedraw(TRUE);
RedrawWindow(0,0,RDW_FRAME|RDW_INVALIDATE|RDW_UPDATENOW);
}
The same type of approach has to happen when an item is selected. So we intercept the LBN_SELCHANGE message and force a redraw, since our DrawItem method does nothing.
BOOL CTransparentListBox::OnLbnSelchange()
{
   Invalidate();
   UpdateWindow();
   return TRUE;
}
Using the code
To use this class, simply insert a ListBox into your dialog box. Make sure you have set the Owner-draw and Has Strings flags. Attach a variable of type CTransparentListBox to the control and you are ready to go. My CTransparentListBox class also gives you the ability to specify different fonts, colors, and shadows. This will come in handy on backgrounds that are too busy or too dark for the standard colors, and font size.
class CTestDialog : public CDialog
{
....
CTransparentListBox m_ListBox;
};
void CTestDialog::DoDataExchange(CDataExchange* pDX)
{
CDialog::DoDataExchange(pDX);
DDX_Control(pDX, IDC_LIST1, m_ListBox);
}
BOOL CTransStaticDlg::OnInitDialog()
{
CDialog::OnInitDialog();
m_ListBox.SetFont(12,"Aria",
RGB(255,255,255),RGB(255,0,0));
m_ListBox.AddString("Test");
}
Have fun :)
