Other Articles in the Series
- Overview
- Add new Permission
- Project structure
- Multi-Languages (i18n)
- DI & IoC - Why and Why not?
- RESTful & WebApi
- Manage Application Lifecycle
- New version of TinyERP with Angular 2 (typescript)
- CQRS: Avoiding performance issues in enterprise app (basic)
- Multiple data-stores: Scale your repository (Part 1)
- Multiple data-stores: Scale your repository (Part 2)
What Can I Get From This Article?
In this article, I will introduce how to deploy the app to production environment in 2 modes:
- Client and Api in separated domain
- Client and Api in the same domain
What Should I Do To Deploy Client and API in Separated Domain?
OK, for deploying the client and Api on different domains is rather simple as below:
- Update configuration (in app.common/configurations/configuration.release.config) for production environment
- Publish code of Api using Visual Studio Editor
- Upload Api code to Api domain
- Update
ApiBaseUrl in app/config/appConfig.ts point to Api domain - Build client side
- Upload client to domain for client side
1. Update Configuration (in app.common/configurations/configuration.release.config) for Production Environment
Open your code in Visual Studio and navigate to "configurations/configuration.release.config" in app.common project as below:
="1.0"="utf-8"
<appconfiguration>
<authentication tokenExpiredAfterInMinute="20" ></authentication>
<paging pageSize="10"></paging>
<databases>
<clear />
<add name="DefaultConnection"
database="MyERP" server="<server>" port="<port>"
userName="<username>" password="<pwd>"
dbType="MSSQL" default="true"></add>
</databases>
<localization defaultLanguageCode="en"></localization>
<uitest reportTemplate="templates/report.xlsx"
notificationReceiver="thanhtuit27@gmail.com"
zipFile="report_{0}.zip" environtmenFile="environments.xml"
basePath="C:\data\projects\myERP\api\App.UI.Test\config\"
baseOutput="C:\data\projects\myERP\api\App.UI.Test\output\"
timeout="10"></uitest>
<mail server="smtp.gmail.com" port="587"
ssl="true" username="techcoaching123465789@gmail.com "
password="pwd" displayName="No-reply"
defaultSender="techcoaching123465789@gmail.com " />
<folder mailTemplate="templates/email/"
baseResourceFolder="C:\data\projects\myERP\api\App.UI.Test/resources/"></folder>
</appconfiguration>
Please be aware of <databases />. This is the list of connectionstrings that were used in our app. By default, it's name is "DefaultConnection".
Please update appropriate information as sample below:
<add name="DefaultConnection"
database="MyERP" server="localhost" port="1433"
userName="tinyerp" password="123456"
dbType="MSSQL" default="true"></add>
2. Publish Code of API using Visual Studio Editor
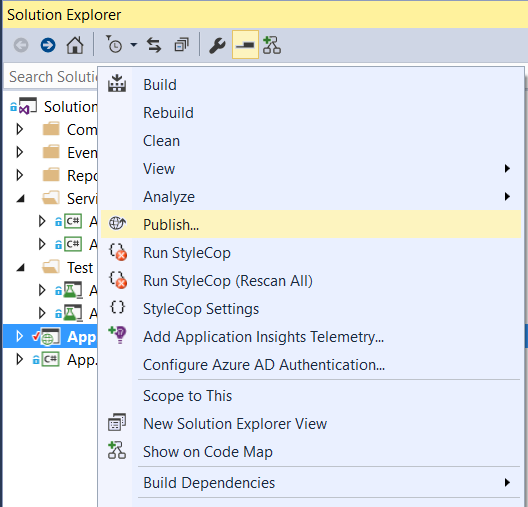
- Right click on
App.Api and select "Publish" from context menu:

- Select "
published" from dropdownlist and click on "Publish" button at the bottom of dialog:

- You will see the result as below:

The publish code was located at <solution root>/application.api/published.
To deploy the API, just upload this to API domain (for example: api.tinyerp.com)
3. Upload API code to API Domain
Using any FTP client to upload published file to your domain:

Access to api.tinyerp.com, you will receive as below:

4. Update ApiBaseUrl in app/config/appConfig.ts Point to API Domain
Please change the baseUrl in "<root>/app/config/appConfig.ts" as below:

5. Build Client Side
Open command prompt/ terminal and go to "<root>/client/", and run "gulp build":

After this command was finished, the compiled code was located in "<root>/client/dist" folder:

Look at this folder, all ts files were compiled into js files and were compressed into "<root>/client/dist/bundle.js". The remaining are html/ image files.
Open the "<root>/client/dist/bundle.js", we see the content was compressed:

We can also apply some minification during the compile process. So the code is safe to be delivered.
6. Upload Client to Domain for Client Side
Please use any FTP client tool, such as filezilla and upload those files into your domain (for example "tinyerp.com"). Then, we can check it by access to "http://tinyerp.com".
The result is the photo below:

Login with "tu.tran@yahoo.com/123456". We will see default page as below:

Congratulations! You deployed your client successfully.
I Got An Error as Below on IIS, How Can I Solve It?

If looked at "<root>/client/dist", there is web.config file. We need this file when deploying the app on IIS.
There is rewrite rule in web.config, this will always redirect the request to index.html.
<rewrite>
    <rules>
        <rule name="Rewrite to default"
        enabled="true" stopProcessing="true">
            <match url="^[^.]+$" />
            <conditions>
                <add input="/api/" pattern="^OFF$"/>
            </conditions>
            <action type="Rewrite" url="/" />
        </rule>
    </rules>
</rewrite>
Without this rule, IIS may not be able to handle request when user accesses "tinyerp.com/security/permissions".
To solve this, we need to install "Url Rewrite" for your IIS. We can download it from here.
I Got An Exception When Installing "Url Rewrite Module" on IIS?

This mostly related to IIS issue. Please refer to this link for solving this problem.
What Should I Do to Deploy Client and API in the Same Domain?
To deploy API and client on the same domain, it was mostly the same as in separated domain. The compiled Api code was uploaded to the sample folder with client with some modifications:
- Remove index.html from
App.Api - Merge web.config in both client and
App.Api
The final folder will be:

