Table of Contents
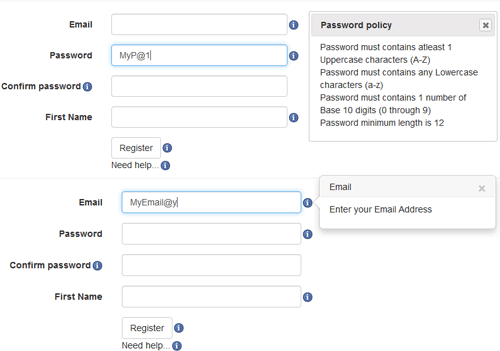
In this article, I will share the tips on how to dynamically add a help / tooltip / ScreenTip icon next to a form elements such as textbox, label, paragraph, button, etc. A message / tip / text will be displayed when the user clicks on the icon either through jQuery UI modal or Bootstrap popover, depending on the setting. All the text will be stored in a centralized location and will be retrieved on demand by using a Web API call. The idea was inspired by the following criteria:
- Most tooltip will close or disappears after the focus leave the icon or form element or when user start to type or after a few seconds. I want a tooltip that will stay open on click so that the user can take their time reading through the message, lookup other information if necessary and then enter the data into the form element. The user can drag or resize the tooltip if using jQuery UI Modal and dismiss the tooltip by pressing the x button
- The tooltip contents should come from a database and access by using Web API. One of my goal is to build an Administrator interface to manage the tooltip metadata in one location instead of going through every single page. Web API is being use so that the common metadata and service can be exposed to other application in the future.
- Easy to integrate. Assuming the Web API is ready and the scripts is being referenced correctly, all you have to do is just add an attribute to the form element, two attributes if you want to use the Bootstrap popover feature.
Initially the idea was to create the solution using jQuery UI only but then I decided to add some flavor to it by throwing in the Bootstrap Popover. The caveat of the popover is that user will not be able to drag or resize the tooltip dialog. Is up to the developer to decide if they want to display both or one of the other tooltip dialog modal.
Shown in listing 1 and listing 2 are example on how to add a tooltip icon using jQuery UI and Bootstrap popover respectively.
Listing 1
<input type="text" class="form-control" data-yourtooltipctrl="lookupKey1" />
Listing 2
<input type="text" class="form-control" data-yourtooltipctrl="lookupKey2" data-yourtooltiptype="1" />
The Web API in this article is very straight forward and listed in Listing 3. For the sake of simplification, the API return results were hardcoded or not from a data source. In reality, the result should be originated from a data source / repository. In this demo, the Web application will be using the POST method to get the tooltip metadata by key. There is nothing wrong with using GET method, the goal is to demonstrate how to pass in the AntiForgeryToken and multiple parameters to the API using POST method. Refer to the article Asp.net MVC Warning Banner using Bootstrap and AngularUI Bootstrap for more details on how AntiForgeryToken is being implemented and utilize by the application. There will be a JavaScript section below to show how to pass in multiple parameters and AntiForgeryToken through AJAX post.
Listing 3
public class ToolTipController : BaseApiController
{
IList<tooltip> toolTips = new List<tooltip>
{
new ToolTip { Id = 1, Key ="registerEmail", Title = "Email",
Description ="Enter your Email Address", LastUpdatedDate = DateTime.Now },
new ToolTip { Id = 2, Key ="registerPassword", Title = "Password policy",
Description ="some policy...", LastUpdatedDate = DateTime.Now}
};
…
[Route("{key}")]
public IHttpActionResult Get(string key)
{
var toolTip = toolTips.FirstOrDefault((p) => p.Key.ToLower() == key.ToLower());
if (toolTip == null)
{
return NotFound();
}
return Ok(toolTip);
}
[HttpPost]
[Route("GetWithPost")]
[AjaxValidateAntiForgeryToken]
public IHttpActionResult GetWithPost(Dummy dummy)
{
var toolTip = toolTips.FirstOrDefault((p) => p.Key == dummy.Key);
if (toolTip == null)
{
return NotFound();
}
return Ok(toolTip);
}
}
Listing 4 shows the contents of the BaseApiController. This base class is inherited from the ApiController and contains a structs. Struct type is being used here instead of class because there are only couple of property and short-lived. Please feel free to modify it to a class later to fulfill your requirements.
Listing 4
public class BaseApiController : ApiController
{
    public struct Dummy
    {
        public string Key { get; set; }
        public string Other { get; set; }
    }
}
Technically, the Web API can be hosted together with the Web Application or separately. In this sample application, the API and Application are being decouple. That being said, the Web and API application could be hosted on a different subdomain or domain. By design, the web browser security, same-origin policy, will prevents a web page from making AJAX requests to another domain or subdomain. However, this issue can be overcome by Enabling Cross-Origin Requests (CORS) to explicitly allow cross-origin requests from the Web to the API application.
Listing 5 shows the code in the Global.asax file to enable the CORS. The purpose of the SetAllowOrigin method is to check if the request URL in the white list, if yes, set the Access-Control-Allow-Origin header value with the URL value. This respond header will signal to the web browser that the requested domain/URL is permitted to access the resources on the server. In addition, before sending the actual requests, the web browser will issue a "preflight request" to the server by using the HTTP Options method. The response from the server will tell the browser what methods and headers are allow by the request. In the current example, the X-Requested-With and requestverificationtoken were added to the header. The former header is utilized by the AngularJS $http service function AJAX Request and the latter is the antiforgerytoken value from the web application. Checkout this article Enabling Cross-Origin Requests in ASP.NET Web API 2 to learn more on how CORS and Preflight Requests work.
Listing 5
internal void SetAllowOrigin(string url)
{
string allowOrigin = System.Configuration.ConfigurationManager.AppSettings["AllowWebApiCallURL"];
if (allowOrigin.Split(';').Select(s=>s.Trim().ToLower()).Contains(url.ToLower()))
{
HttpContext.Current.Response.Headers.Remove("Access-Control-Allow-Origin");
HttpContext.Current.Response.AddHeader("Access-Control-Allow-Origin", url.ToLower());
}
}
protected void Application_BeginRequest(object sender, EventArgs e)
{
SetAllowOrigin(HttpContext.Current.Request.Headers["Origin"] == null ?
string.Format("{0}://{1}", HttpContext.Current.Request.Url.Scheme, HttpContext.Current.Request.Url.Authority)
: HttpContext.Current.Request.Headers["Origin"]);
if (HttpContext.Current.Request.HttpMethod == "OPTIONS")
{
HttpContext.Current.Response.AddHeader("Access-Control-Allow-Methods", "GET, PUT, POST");
HttpContext.Current.Response.AddHeader("Access-Control-Allow-Headers", "Origin, X-Requested-With, content-type, Accept, requestverificationtoken");
HttpContext.Current.Response.End();
}
}
As mentioned previously, in this example, the Web and API application were both being hosted on a separate domain. The POST method in the API is expecting an anti-forgery token from the requester. In order for the Web API to decrypt the token, both the applications must use the same set of machine key. Here is the link http://www.developerfusion.com/tools/generatemachinekey/ to generate machine keys if your applications needed one.
On page load, the client script will find and iterate through all the HTML elements with data-yourtooltipctr data attribute. During the loop, an image button will be created and placed next to the element. The data-yourtooltipid attribute value in the button will be utilized by the Web API to retrieve the tooltip contents. Its value is generated from data-yourtooltipctr data attribute, so make sure the value is unique. The purpose of the data-yourtooltiptype attribute is to flag if the tooltip will be displayed using jQuery or Bootstrap. If the attribute is present, the tooltip will be display using Bootstrap Popover, else use jQuery UI Dialog plugin. Refer to listing 6 for more detail information. The image can be replaced by modifying the image source "/content/info_16x16.png".
Listing 6
$('[data-yourtooltipctrl]').each(function (index) {
var toolTipType = '';
if ($(this).data('yourtooltiptype')) {
toolTipType = $(this).data('yourtooltiptype');
}
var container = $("<a href='#' class='yourToolTipLink' data-yourtooltiptype='" + toolTipType
+ "' data-yourtooltipid='" + $(this).data('yourtooltipctrl')
+ "'><img alt='Click for detail' src='/content/info_16x16.png'/></a>" )
.css({
cursor: 'help' ,
'padding-left' : '2px'
});
$(this).css("display", "inline-block" );
if ($(this).is("label")) {
$(this).append(container);
}
else {
$(this).after(container);
}
});
Listing 7 shows the code logic for the image button/tooltip icon click event trigger by yourToolTipLink class selector. Initially, the logic will close all the previously open tooltip dialog. Then it will utilize the jQuery AJAX function to POST to the Web API. The API take two parameters, namely Key and Other. The Key value is retrieve from the yourtooltipid data attribute, the Other parameter hold a dummy value. As mentioned previously, the Web API will use the key to retrieve the tooltip contents. The AJAX function will also be utilizing the beforeSend function to include the AntiForgerytoken into the request header.
If the request succeeds, the logic will populate the dialog content. The modal will be displayed through jQuery UI Modal or Bootstrap Popover, depending if the data-yourtooltiptype attribute being specified in the HTML element. The challenging part of this script is that we have to maintain the API URL and can’t simply use relative path because the API is being hosted on a different domain. If that a problem, my suggestion is either modify this script to read the API URL from a global variable. The global variable should be populated from the code behind. Here is an article sharing some examples on how to pass the Server-side data to JavaScript. Or remember to update the URL when deploying the application to different environment.
Listing 7
$(".yourToolTipLink").on('click', function (e) {
e.stopPropagation();
e.preventDefault();
var o = $(this);
var toolTipTypeSpecified = $(this).attr('data-yourtooltiptype');
$(".yourToolTipLink").not(this).popover('hide');
if ($("#yourTooltipPanel").dialog('isOpen') === true) {
$("#yourTooltipPanel").not(this).dialog('close');
}
var Dummy = {
"Key": $(this).data('yourtooltipid'),
"Other": "dummy to show Posting multiple parameters to API"
};
jQuery.ajax({
type: "POST",
url: "http://localhost:47503/api/tooltip/GetWithPost",
data: JSON.stringify(Dummy),
dataType: "json",
contentType: "application/json;charset=utf-8",
beforeSend: function (xhr) { xhr.setRequestHeader('RequestVerificationToken', $("#antiForgeryToken").val()); },
headers: {
Accept: "application/json;charset=utf-8",
"Content-Type": "application/json;charset=utf-8"
},
accepts: {
text: "application/json"
},
success: function (data) {
if (toolTipTypeSpecified) {
o.popover({
placement: 'right',
html: true,
trigger: 'manual',
title: data.Title + '<a href="#" class="close" data-dismiss="alert">×</a>',
content: '<div class="media"><div class="media-body"><p>' + data.Description + '</p></div></div>'
}).popover('toggle');
$('.popover').css({ 'width': '100%' });
}
else {
$("#yourTooltipPanel p").html(data.Description);
$("span.ui-dialog-title").text(data.Title);
$("#yourTooltipPanel").dialog("option", "position", {
my: "left top",
at: "left top",
of: o
}).dialog("open");
}
}
});
});
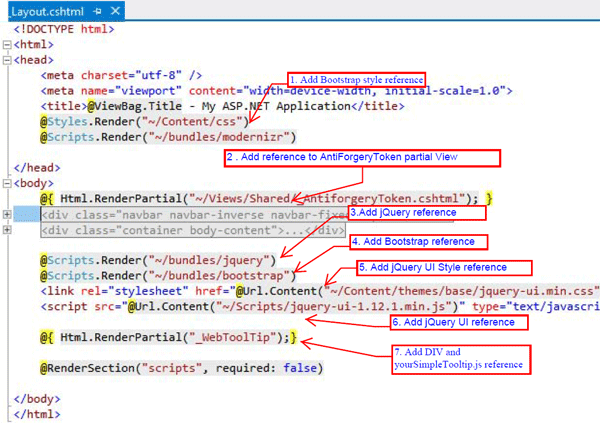
Assuming your Web API is ready and running. Add all the style and JavaScript references as indicated in Figure 1 to the _Layout page. It seems a lot but your application should have most of it already, example jQuery and Bootstrap. The _AntiforgeryToken.cshtml partial view contains hidden field to hold the antiforgerytoken. The _WebToolTip.cshtml partial view contain a div element with id="yourTooltipPanel" and a JavaScript reference to yourSimpleTooltip.js file. Update the Web API URL in the JavaScript to point to your Web API.
Figure 1

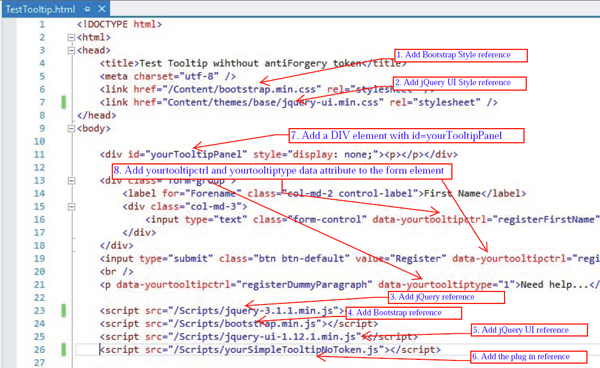
While writing this section, I noticed that the Antiforgerytoken could be a pain to integrate with other platform such as ASP.NET Webform, PHP, Classic ASP, etc. In the sample project, I created a sample HTML page to demonstrate on how to utilize this tooltip script without the token. Basically, I created another API method that doesn’t care about the token and clone the script to yourSimpleTooltipNoToken.js file. This file exclude the beforeSend function in the jQuery AJAX post. I didn’t make it dynamic to avoid complication. Refer to figure 2.
Figure 2

In my previous project, when adding new element to a form, I always set the position to absolute and calculate the x and y position dynamically. Let assume I’m adding an icon next to a textbox element. There is a flaw in this method, because when you resize the screen the icon position will be out of sync as indicated in figure 3. You have to refresh the browser to refresh the icon position so that it will appears next to the textbox again. In this project, I use the jQuery after method to insert the icon after the form element. That way, the icon will always stick with the element during screen resize.
Figure 3

I hope someone will find this information useful and make your programming job easier. If you find any bugs or disagree with the contents or want to help improve this article, please drop me a line and I'll work with you to correct it. I would suggest downloading the demo and explore it in order to grasp the full concept because I might miss some important information in this article. Please contact me if you want to help improve this article and use the following link to report any issues https://github.com/bryiantan/SimpleLibrary/issues.
Tested on: Internet Explorer 11,10,9.0, Microsoft Edge 38, Firefox 52, Google Chrome 56.0, iPhone 6

07/03/2017 – Initial version
07/20/2017 – Removed redundant tags
http://mvc.ysatech.com/Account/Register
Download Source Code (https://github.com/bryiantan/SimpleLibrary)
Enabling Cross-Origin Requests in ASP.NET Web API 2
How can I close a Twitter Bootstrap popover with a click from anywhere (else) on the page?
Show one popover and hide other popovers
Why ASP.NET MVC Request.IsAjaxRequest method returns false for $http calls from angular
