Introduction
Using <DIV> elements creates logical divisions for your web page. With a little help from JavaScript, Div can also be used in changing visual appearances of the pages. The big deal about DIV is the innerHTML property. By manipulating innerHTML, a page can be turned into a set of appearance, data, and style independent sub pages.

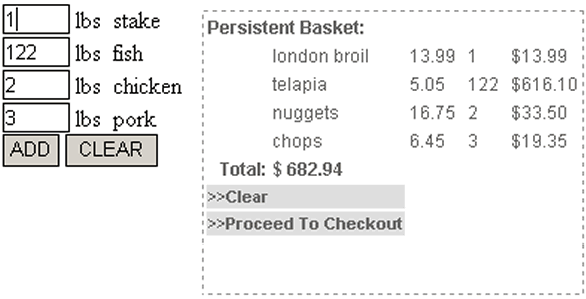
Presented above is the product ordering menu and basket. The basket uses my custom "smartDiv" JavaScript object. The use of this object helps to create a persistent, save state shopping module within the page. "smartDiv" is an object located in an external JavaScript file. It has two parameters:
- XML root name
- URL of the transformer (XSLT)
smartDiv has "SET" properties describing the DIV's visual appearance.
SetClassNameSetPositionSetSizeSetBorder
Also, it has another important property xml_dom, which will be explained in details later. The only method smartDiv has is the TransformXML method. This function retrieves the XSLT by using XMLHTTP and the parameter URL. The next step transforms xml_dom into HTML by using XSLT, and writes the result into the DIV's innerHTML.
function smartDiv(rootname,URL) {
this.Display = document.createElement('div');
this.Display.id = 'bask';
document.body.appendChild(this.Display);
this.Display.style.position = 'absolute';
this.Display.innerHTML ='';
this.SetClassName = function(cname) {
--------------------
}
this.SetSize = function(w,h) {
--------------------
}
this.SetPosition = function(l,t) {
--------------------
}
this.SetBorder = function(bs,bc,bw) {
--------------------
}
this.xmlHTTP = null;
this.xml_dom = new ActiveXObject("MSXML2.DOMDocument");
this.xml_dom.loadXML('');
this.root = this.xml_dom.createElement(rootname);
this.xml_dom.appendChild(this.root);
this.xslresponse =null;
this.TransformXML = function() {
try {
this.xmlHTTP = new ActiveXObject("Microsoft.XMLHTTP");
this.xmlHTTP.open("GET",URL,false);
this.xmlHTTP.send();
this.xslresponse = this.xmlHTTP.responseText;
this.xml = new ActiveXObject("Msxml2.DOMDocument.4.0");
this.xsl = new ActiveXObject("Msxml2.DOMDocument.4.0");
this.xml.async = false;
this.xsl.async = false;
this.xml.validateOnParse = false;
this.xml.loadXML(this.xml_dom.xml);
this.xsl.loadXML(this.xslresponse);
this.Display.innerHTML = this.xml.transformNode(this.xsl);
} catch (e){
alert(e.description);
}
}
}
How to make "smartDiv" work
- The ordering page creates an instance of
smartDiv. If you noticed, I call this instance Basket. Size, position, and style are set next. Also, the name of the root tag and XSLT's URL are assigned.
function initDiv() {
 Basket = new smartDiv('Basket','basket.xslt');
 Basket.SetClassName('Border');
 Basket.SetSize(180,280);
 Basket.SetPosition(200,20);
 Basket.SetBorder('dashed','#999999',1);
}
- Each time the quantity of ordered goods changes, the XML is adjusted accordingly.
This is where smartDiv's xml_dom property is used.
Going through the list of "TEXT" elements, we collect them into xml_dom.
It looks like this:
<Basket>
    <Product qty="1" name="fish" price="1.99"/>
</Basket>
Now the only thing left for us to do is to call smartDiv's TransformXML method, and it does its job for us. The results are displayed within the DIV element.
smartDiv.prototype.BuildXML = function() {
 var elm = document.forms[0].elements;
 oSelection = this.xml_dom.selectNodes("//Product");
 oSelection.removeAll();
 for (var i=0; i < elm.length ;++i){
    if (elm[i].type == 'text') {
    var Product = this.xml_dom.createElement("Product");
    var attr = this.xml_dom.createAttribute("qty");
    attr.value = elm[i].value;
    Product.setAttributeNode(attr);
    attr = null;

    ---------------------------

    this.root.appendChild(Product);
 }}
 this.TransformXML();
}
var Basket;
Other functionality
The function Clear speaks for itself. It cleans all "TEXT" elements and xml_dom as well.
function Clear() {
  var elm = document.forms[0].elements;
  for (var i=0; i < elm.length ;++i){
    if (elm[i].type == 'text') {
       elm[i].value = '';
    }
  }
  Basket.BuildXML();
}
