Introduction
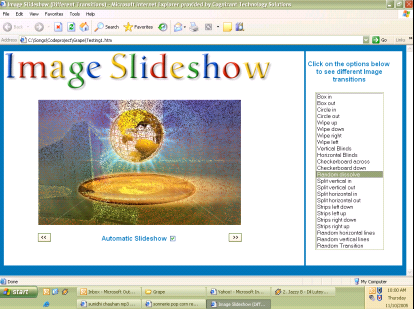
This is a simple tutorial illustrating how to create Web-Based image slideshows with some cool transition effects similar to those found in Microsoft's PowerPoint. The slideshow cycles through the set number of images without having to reload the rest of the page. There are about 23 different transitions to choose from. There is also an option which chooses a number at random from the other 23 transitions. These transitions can also be applied to images by triggering small snippets of JavaScript.
Four small JavaScript functions are used for this:
image_effects(): Generates the different transition effects.
previous_image(): Displays the previous image.
next_image(): Displays the next image.
slideshow_automatic(): Displays the next image after a certain delay.
Create image list and preload images
Create a list of images to display in the slideshow:
var image=new Array("images/image1.jpg",
"images/image2.jpg",
"images/image3.jpg",
"images/image4.jpg",
"images/image5.jpg",
"images/image6.jpg",
"images/image7.jpg",
"images/image8.jpg",
"images/image9.jpg",
"images/image10.jpg"
)
var num=0
var timeDelay
Preload Images
Preload the images in the cache so that the images load faster
var imagePreload=new Array()
for (i=0;i<image.length;i++)
{
imagePreload[i]=new Image()
imagePreload[i].src=image[i]
}
Image effects
The following JavaScript function renders the cool transition when we move from one image to the next. This is accomplished by using a visual filter - RevealTrans, which specifies which of the twenty-three available transition types should be used (0-22). Using the apply() and play() methods of the filter, we can invoke the transition.
function image_effects()
{
var selobj = document.getElementById('slidehow_transition');
var selIndex = selobj.selectedIndex;
slideShow.filters.revealTrans.Transition=selIndex
slideShow.filters.revealTrans.apply()
slideShow.filters.revealTrans.play()
}
Slideshow manually
Use the Next and the Previous buttons to manually start the slideshow. The previous_image() and Next_image() functions are pretty straightforward.
function previous_image()
{
if (slideshow.checked==false)
{
if (num>0)
{
num--
image_effects()
document.images.slideShow.src=image[num]
}
if (num==0)
{
num=image.length
num--
image_effects()
document.images.slideShow.src=image[num]
}
}
}
function next_image()
{
if (slideshow.checked==false)
{
if (num<image.length)
{
num++
if (num==image.length)
num=0
image_effects()
document.images.slideShow.src=image[num]
}
}
}
Automatic slideshow
Finally, this code changes the images after a certain time. For this, we use the setTimeout() method to create the delay. SetTimeout() takes two parameters. The first parameter is a string that is a snippet of JavaScript code executed when the specified interval has elapsed. The second parameter is an integer that specifies the number of milliseconds.
function slideshow_automatic()
{
if (slideshow.checked)
{
if (num<image.length)
{
num++
if (num==image.length)
num=0
image_effects()
timeDelay=setTimeout("slideshow_automatic()",4000)
document.images.slideShow.src=image[num]
}
}
if (slideshow.checked==false)
{
clearTimeout(timeDelay)
}
}
Conclusion
Overall, this is a very simple script, you can copy the same and paste it wherever you want. No sweat!
