This article is to ensure how to create a simple SharePoint 2016 Page layout without using:
- SharePoint designer
- Design Manager
Before doing anything, you need to create the base of the layout.
Following placeholders are minimal and commonly used in any template.
PlaceHolderAdditionalPageHeadPlaceHolderPageTitlePlaceHolderMain
Place Holders
PlaceHolderAdditionalPageHead
This place holder is used to define additional CSS and other scripts and inline CSS if you have any.
We will be using this to register a CSS and register a different CSS for the SharePoint Edit Mode.
<asp:Content ContentPlaceHolderId="PlaceHolderAdditionalPageHead" runat="server">
<!—Your code goes here-->
</asp:Content>
PlaceHolderPageTitle
This place holder will be mainly for the page title.
<asp:Content ContentPlaceHolderId="PlaceHolderPageTitle" runat="server">
<!—Your code goes here-->
</asp:Content>
PlaceHolderMain
This is the main section for your template. Here, you can define web part zones or any other HTML code segments such as Bootstrap or static HTML as you want.
<asp:Content ContentPlaceHolderId="PlaceHolderMain" runat="server">
<!—Your code goes here-->
</asp:Content>
Base Template
Adding standard SharePoint controls, you can make your base template as follows:
<%@ Page Language="C#" Inherits="Microsoft.SharePoint.Publishing.PublishingLayoutPage,
Microsoft.SharePoint.Publishing,Version=15.0.0.0,Culture=neutral,PublicKeyToken=71e9bce111e9429c" %>
<%@ Register TagPrefix="SharePointWebControls" Namespace="Microsoft.SharePoint.WebControls"
Assembly="Microsoft.SharePoint, Version=15.0.0.0, Culture=neutral, PublicKeyToken=71e9bce111e9429c" %>
<%@ Register TagPrefix="WebPartPages" Namespace="Microsoft.SharePoint.WebPartPages"
Assembly="Microsoft.SharePoint, Version=15.0.0.0, Culture=neutral, PublicKeyToken=71e9bce111e9429c" %>
<%@ Register TagPrefix="PublishingWebControls" Namespace="Microsoft.SharePoint.Publishing.WebControls"
Assembly="Microsoft.SharePoint.Publishing, Version=15.0.0.0, Culture=neutral,
PublicKeyToken=71e9bce111e9429c" %>
<asp:Content ContentPlaceHolderId="PlaceHolderAdditionalPageHead" runat="server">
</asp:Content>
<asp:Content ContentPlaceHolderId="PlaceHolderPageTitle" runat="server">
</asp:Content>
<asp:Content ContentPlaceHolderId="PlaceHolderMain" runat="server">
</asp:Content>
Extend Your Template
PlaceHolderAdditionalPageHead
First, add general CSS registration to this section:
<SharePointWebControls:CssRegistration
name="<% $SPUrl:~sitecollection/Style Library/~language/Themable/Core Styles/pagelayouts15.css %>"
runat="server"/>
Then I'm going to define a CSS for EDIT mode, this will be really helpful when you are hiding some tags when not in the Edit Mode.
<PublishingWebControls:EditModePanel runat="server">
<SharePointWebControls:CssRegistration
name="<% $SPUrl:~sitecollection/Style Library/~language/Themable/Core Styles/editmode15.css %>"
After="<% $SPUrl:~sitecollection/Style Library/~language/Themable/Core Styles/pagelayouts15.css %>"
runat="server"/>
</PublishingWebControls:EditModePanel>
Then, you will need to add other scripts or CSS formatting if necessary.
<style type="text/css">
<!-- Styles -->
</style>
<script type="text/javascript">
</script>
Finally, you will have your AdditionalPageHead as below.
AdditionalPageHead
<asp:Content ContentPlaceHolderId="PlaceHolderAdditionalPageHead" runat="server">
<SharePointWebControls:CssRegistration
name="<% $SPUrl:~sitecollection/Style Library/~language/Themable/Core Styles/pagelayouts15.css %>"
runat="server"/>
<PublishingWebControls:EditModePanel runat="server">
<SharePointWebControls:CssRegistration
name="<% $SPUrl:~sitecollection/Style Library/~language/Themable/Core Styles/editmode15.css %>"
After="<% $SPUrl:~sitecollection/Style Library/~language/Themable/Core Styles/pagelayouts15.css %>"
runat="server"/>
</PublishingWebControls:EditModePanel>
<style type="text/css">
<!-- Styles -->
</style>
<script type="text/javascript">
</script>
</asp:Content>
PlaceHolderPageTitle
Just add the SharePoint Page Title here.
<asp:Content ContentPlaceHolderId="PlaceHolderPageTitle" runat="server">
<SharePointWebControls:FieldValue FieldName="Title" runat="server"/>
</asp:Content>
PlaceHolderMain
Here goes one web part zone for simplicity.
<asp:Content ContentPlaceHolderId="PlaceHolderMain" runat="server">
<WebPartPages:WebPartZone runat="server" Title="Top Left" ID="TopLeftZone">
<ZoneTemplate></ZoneTemplate></WebPartPages:WebPartZone>
</asp:Content>
Final Template
<%@ Page Language="C#" Inherits="Microsoft.SharePoint.Publishing.PublishingLayoutPage,
Microsoft.SharePoint.Publishing,Version=15.0.0.0,Culture=neutral,PublicKeyToken=71e9bce111e9429c" %>
<%@ Register TagPrefix="SharePointWebControls" Namespace="Microsoft.SharePoint.WebControls"
Assembly="Microsoft.SharePoint, Version=15.0.0.0, Culture=neutral, PublicKeyToken=71e9bce111e9429c" %>
<%@ Register TagPrefix="WebPartPages" Namespace="Microsoft.SharePoint.WebPartPages"
Assembly="Microsoft.SharePoint, Version=15.0.0.0, Culture=neutral, PublicKeyToken=71e9bce111e9429c" %>
<%@ Register TagPrefix="PublishingWebControls" Namespace="Microsoft.SharePoint.Publishing.WebControls"
Assembly="Microsoft.SharePoint.Publishing, Version=15.0.0.0, Culture=neutral,
PublicKeyToken=71e9bce111e9429c" %>
<asp:Content ContentPlaceHolderId="PlaceHolderAdditionalPageHead" runat="server">
<SharePointWebControls:CssRegistration
name="<% $SPUrl:~sitecollection/Style Library/~language/Themable/Core Styles/pagelayouts15.css %>"
runat="server"/>
<PublishingWebControls:EditModePanel runat="server">
<SharePointWebControls:CssRegistration
name="<% $SPUrl:~sitecollection/Style Library/~language/Themable/Core Styles/editmode15.css %>"
After="<% $SPUrl:~sitecollection/Style Library/~language/Themable/Core Styles/pagelayouts15.css %>"
runat="server"/>
</PublishingWebControls:EditModePanel>
<style type="text/css">
<!-- Styles -->
</style>
<script type="text/javascript">
</script>
</asp:Content>
<asp:Content ContentPlaceHolderId="PlaceHolderPageTitle" runat="server">
<SharePointWebControls:FieldValue FieldName="Title" runat="server"/>
</asp:Content>
<asp:Content ContentPlaceHolderId="PlaceHolderMain" runat="server">
<WebPartPages:WebPartZone runat="server" Title="Top Left" ID="TopLeftZone">
<ZoneTemplate></ZoneTemplate></WebPartPages:WebPartZone>
</asp:Content>
Copy this template to a file samplepage.aspx.
Upload the Content Template
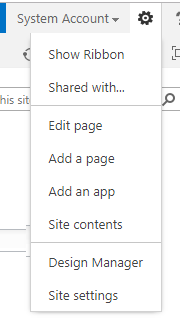
First, navigate to Site Settings:

Then, find the Web Designer Galleries and go to Master Pages and page Layouts:

Then Upload document and choose the file that you saved previously.

Then, you need to choose correct content Type.
It should be PageLayout and you can Map with any Content Type. For example, I will be mapping with Article Page.

After that, save the page and don’t forget to publish the page.

Now we are ready to use the new page layout.
Go to the Pages Library and try to create a New Page. You will see your content type listed there.

