Introduction
Elia Sarti summarized in his article SplitButton: an XP style dropdown split button [^] that we may encounter a particular situation that specific actions derived logically from one. There is a equivalent(ToolStripDropDownButton) for ToolStrip in .NET.
Actually there is another situation that specific options logically because of one action makes us ask a SplitButton for help. That's why ToolStripSplitButton exists. But we cannot resolve these kind of situations only by ToolStrip. A SplitButton with its button part has all the characteristics of a Button is very useful.
Maybe, you do not clearly understand the two kinds of situations. I will give each of the two an example.
Example for Actions Derived Logically from One
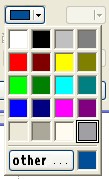
Every person who often uses computers may have accomplished some kind of picking color operations. Very often, a SplitButton with its button-part's backcolor indicates the currently selected color and a dropdown Control to list all the regularly used colors for these kinds of operations. The following image is a screenshot of setting color for Windows XP OS's window's color.

Example for Options Logically Because of One
In GIS and CAD industry, especially in GIS, a series of coordinates and its visual style (which is composed by fill pattern, transparence, borderline style and so on.) make up a geometric figure. To select a perfect visual style, we may change a geometric's visual style frequently. To change it one by one is very easy but also very time consuming. Because very often the difference between many geometric figures is only lay on fill pattern or transparence or borderline style or transparence and borderline style. To change the visual style in batches is a good idea. We should make a choice which one or two of the visual style options need to be changed in batches. SplitButton will work in this case.

Use the Code
Copy the SpitButton.cs file to your project, and drag the SplitButton to the Container Control from toolbox. Selecting your prefer image for the split part of the SplitButton (I have provided two most often used SplitImages together with the source code). Subscribing to the right event and giving right response is all the left things one should do to use the Control.
[Browsable(true)]
[Category("Action")]
[Description("Occurs when the button part of the SplitButton is clicked by the mouse.")]
public event MouseEventHandler ButtonMouseClick;

[Browsable(true)]
[Category("Action")]
[Description("Occurs when the button part of the SplitButton is
	double clicked by the mouse.")]
public event MouseEventHandler ButtonMouseDoubleClick;

[Browsable(true)]
[Category("Action")]
[Description("Occurs when the split part of the SplitButton is clicked by the mouse.")]
public event MouseEventHandler SplitMouseClick;

[Browsable(true)]
[Category("Action")]
[Description("Occurs when the split part of the SplitButton
	is double clicked by the mouse.")]
public event MouseEventHandler SplitMouseDoubleClick;
The following screenshot of the demo explains how to use the SplitButton clearly.

Implementation
Very easy. Repaint again.
- First, paint two buttons for button part and split part separately.

- Second, paint the gap between the button part and split part. I use two very small images from a button to cover the gap. Just have a look at the code.

graphics.DrawImage(img, new Rectangle(x,y+1,_partWidth,base.Height-2),
           new Rectangle(0, 1, _partWidth, base.Height - 2), GraphicsUnit.Pixel);
- Then, paint the Split line.

- Finally, add support for
Backcolor, Backgroundimge, Image, ImageAlign, Text, and TextAlign property.
This is a simple control. That's all. For details, read the code.
Something Else
Together with the source code, I provide a ContextContainer class, it is used to drop down any kind of controls.
ContextContainer _contextContainer;
public Form1()
{
    InitializeComponent();
    _contextContainer = new ContextContainer(new UserControl1());
    _contextContainer.ContextMode = ContextMode.MultiSelect;
}
private void splitButton5_SplitMouseClick(object sender, MouseEventArgs e)
{
    _contextContainer.Show(splitButton5);
}
The above code block can be found in the Form1.cs file. It shows how to use the ContextContainer to dropdown a control.
I did not post the ContextContainer formally, because one problem still exists. It has bothered me for a little long time. If Dock property of a control contained by a UserControl is set to Fill, the UserControl's size will shrink to 2*2 when we use the ContextContainer to drop it down. If you know why, please tell me. Thank you.
History
- 25th December, 2010: Initial post
