Introduction
I decided to write this article in order to save time to those people who must install and set up Subversion on Windows machines, having no idea of how to do that and no time to search for any piece of information on the internet.
It took two days for me and enormous efforts to understand what is going on with Subversion and how to make it work. I asked my friend who is working on a parallel project in the Computer Science department of my university how much time he spent setting up SVN with Apache on their Linux server. He told it took him one month!!! :) Well, no comments.
Let's get down to business, we don't have much time.
Prerequisites
First of all, we need to download SVN and Apache.
Subversion
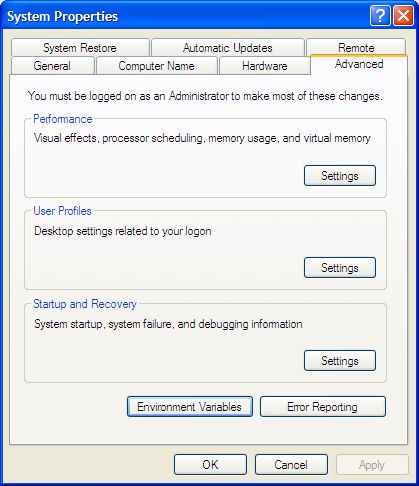
Install Subversion to any directory, then add the bin sub-directory to the environment path. For example: if we installed svn into C:\programs\programming\svn-win32-1.4.0, then go to Start -> Settings -> Control Panel -> System.
Click on the Advanced tab and choose Environment Variables.


The next step is to create a directory which will be a root for all the repositories of our source control.
- Open the command prompt.
- Let's say that we want our root directory be named as c:\svnroot. Then, create this directory either in command prompt or using Explorer.
- Create repositories in the svn root directories using the following commands:
- svnadmin create c:\svnroot\test1
- svnadmin create c:\svnroot\test2

Apache server
Now, we can install the Apache server.
When the installation is finished, go to the bin directory within the Subversion installation, find two files with extension *.so, and put them into the (Apache)/modules directory. The files are mod_authz_svn.so and mod_dav_svn.so.
Go to the conf sub-directory within the Apache installation directory and open the httpd.conf file in any text editor.
Add the following lines:
LoadModule dav_module modules/mod_dav.so
LoadModule dav_svn_module modules/mod_dav_svn.so
LoadModule authz_svn_module modules/mod_authz_svn.so
After that, add the following block:
<Location /svn/>
    DAV svn
    SVNParentPath c:/svnroot/ #specify the root for repositories
    #http://www.archivesat.com/CVS_developers_help/thread45479.htm
        post which discuss why you need to specify /svn/ and not /svn

    #list repositories
    SVNListParentPath on
    # our access control policy
    AuthzSVNAccessFile bin/apachesvnauth #authentication file
                   #path where policy is written for each user

    AuthType Basic #type of authentication
    AuthName "Subversion repository" #the name of the authentication
                                      #and the name of repository realm
    AuthUserFile bin/apachesvnpasswd #the name of the
                                      #file with user passwords values
    Require valid-user #permit to log-in only for authorized users
</Location>
- <Location /svn/> - if you type in your browser something like this: http://localhost:8080/svn/, then Apache will know how to find your root repository using
SVNParentPath. - SVNParentPath c:/svnroot/ - specify the root for the repositories.
- SVNListParentPath on - permit to see the list of repositories using http://localhost:8080/svn/.
- AuthzSVNAccessFile bin/apachesvnauth - authentication file path where the policy is provided for each user. The file is stored in the bin sub-directory of Apache.
- AuthType Basic - the type of authentication.
- AuthName "Subversion repository" - the name of the authentication and the name of the repository realm.
- AuthUserFile bin/apachesvnpasswd - the name of the file with user password values, stored in the bin subdirectory of the Apache installation.
- Require valid-user - permit to log-in only for authorized users.
Building the password file
We use the AuthUserFile bin/apachesvnpasswd entry, which tells Apache to find the file with passwords in the bin sub-directory within the Apache installation directory. We need to build this file. Go to that directory using the command prompt and type the following command:
htpasswd.exe -c apachesvnpasswd user1
You will be prompted to enter the password for user user1, and the file apachesvnpasswd will be created in the bin sub-directory. In order to add another user, just type the same command without -c and provide the name of another user.
htpasswd.exe -c apachesvnpasswd user2
Note: only the users we created will be able to log into our repositories because we used the Require valid-user parameter.
Building the authentication file
The following block is an example of the authentication file:
[/] * = r [test1:/] user1 = rw user2 = [test2:/] user1 = r user2 = rw
Explanations
- [/] * = r - gives access to everyone to read all the repositories
- [test1:/] - gives read and write permissions to user1 for repository test1, and user2 can not read or write
- [test2:/] - user1 can read from repository test2, and user2 has full access rights
Run Apache
Theoretically, we are at the stage when we can run Apache and test our Subversion. So start Apache, open the web browser and write something like this: http://localhost:8080/svn/.
If you don't get any errors, you will be prompted to type the username and password.

Provide the username you created and the password, and press OK. You will see the following page:

References
