
Introduction
Browsing the Internet, I was unable to find what I needed, and so decided to give it a crack myself. It does exactly what I wanted it to be capable of doing. However, I am still new to this, as such please excuse stupid errors and please give me constructive critism about the code and idea. Thank you!
Progress Bar
The problem with the ProgressBar is that I only knew when certain events had been triggered. Thus, the progress would pause in a position for a while and then suddenly jump, not giving a true representation of what was going on. I considered placing a label on the form that would update with the latest information. The issue here being that the user would have no indication as to how many steps were involved. Finally, the problem with this was 'cleanly' creating the labels and associated text for each task. Suffice to say, I wasn't happy with these ideas.
Solution
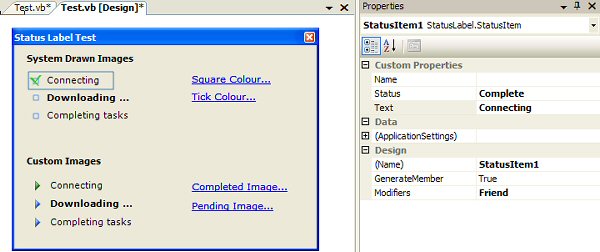
I decided I needed a reason to learn about Design-Time controls. Herein, this control was born. I decided that I wanted a control that could display the various tasks that needed to be accomplished, and basically tick them off as each task was completed. I also wanted to be able to display an image that would also show progress. The control has a few features, such as system drawn image (customizable colouring) when no image is present. Design time features include being able to add/delete status items straight in the editor, no coding necessary. It does what it's supposed to do, and definitely suits my application. Hopefully, this is useful for someone else too.
Control Usage
To begin using this control, it's as easy as doing the following. I will explain at the end!
Imports StatusLabel
Imports StatusLabel.StatusLabel
Imports StatusLabel.StatusItem

Public Class frmMain
   Inherits System.Windows.Forms.Form

   Dim Status As New StatusLabel.StatusLabel

   Private Sub AddItem()
      Dim si as new StatusItem

      si.Name = "Item1"
      si.Text = "Connecting"
      si.Status = CurrentStatus.None

      Status.Items.Add(si)
   End Sub

   Private Sub RemoveItemByIndex(ByVal Index As Int16)
      Status.Items.RemoveAt(Index)
   End Sub

   Private Sub RemoveItemByItem(ByVal Item As StatusItem)
      Status.Items.Remove(Item)
   End Sub

End Sub

End Class
Explanation
The imports are mostly to make the code easier to input. A simple reference to the DLL would be sufficient.
I have ommitted the location, size, etc... code since this article is focused on the control itself and its usage.
You add an item much like any other collection (ComboBox, ListBox, etc...). Next, you assign the item some a name, text, and a status. The available modes are:
- None - No icon is shown and the text is not indented
- Pending - The pending icon is shown and the text is indented
- Running - The pending icon is shown and the text is indented and bold
- Complete - The complete icon is shown and the text is indented, not bold
Altering a property is simple, and can be done much like any other control. The same goes for removing. An example of changing the status:
Status.Items.Item(0).Status = CurrentStatus.Pending
An example of changing an icon (GIF, JPG, PNG, ICO are all supported):
Status.CompleteImage = Image.FromFile("Some_File.jpg")
Features
- GDI image displayed when no image available
- Ellipsis (...) displayed automatically when status item is in running state
- Customisable colours for box and tick
- Tick and box can be replaced with images
- Design-time support
Known Issues
Transparent images are supported, however if they are icons with a transparent colour, this colour will be shown. I wasn't able to work out how to fix this, if you know, please contact me and let me know.
Planned Updates
- Support for transparent images
- Text/image alignment
- Autosizing
- Design-time moving (up/down)
- Progress bar inclusion showing total progress
