Introduction
This tutorial is a step by step procedure for drawing an owner-drawn button control.This tutorial is about the redrawing the button control.
1.Open up the AppWizard and create a new project titled btncolor.Just create a basic dialog box without any document / view architecture.

2.Then click on the ResourceVew tab in the 'Workspace' window. Proceed to edit the dialog box IDD_BTNCOLOR_DLG. It will already contain the Buttons 'Ok' and 'Cancel'. Delete the 'TODO :' message and cancel button.
3.Just drag n' drop the buttons needed, in this example 'color' . Then select and right click to edit their properties. The MFC keeps track of these buttons by their unique ID, a macro located in the "Resource.h" file. For code clarity, change the name of the ID to IDC_BUTTON_COLOR and modify the caption of the button.
4.Change the style of the push button to OwnerDraw.

5.Now that our buttons and are in place we need to wire them into our application. We do this via the class wizard. (Control + W) Click on the Member Variables tab .

6.Add the Message Map Entry WM_DRAWITEM for CBtnColorDlg.And Edit the code for OnDrawItem as shown below.
void CBtncolorDlg::OnDrawItem(int nIDCtl, LPDRAWITEMSTRUCT lpDrawItemStruct)
{
if(nIDCtl==IDC_BUTTON_COLOR)
{
CDC dc;
RECT rect;
dc.Attach(lpDrawItemStruct ->hDC);
rect = lpDrawItemStruct->rcItem;
dc.Draw3dRect(&rect,RGB(255,255,255),RGB(0,0,0));
dc.FillSolidRect(&rect,RGB(100,100,255));
UINT state=lpDrawItemStruct->itemState;
if((state & ODS_SELECTED))
{
dc.DrawEdge(&rect,EDGE_SUNKEN,BF_RECT);
}
else
{
dc.DrawEdge(&rect,EDGE_RAISED,BF_RECT);
}
dc.SetBkColor(RGB(100,100,255));
dc.SetTextColor(RGB(255,0,0));
TCHAR buffer[MAX_PATH];
ZeroMemory(buffer,MAX_PATH );
::GetWindowText(lpDrawItemStruct->hwndItem,buffer,MAX_PATH);
dc.DrawText(buffer,&rect,DT_CENTER|DT_VCENTER|DT_SINGLELINE);
dc.Detach();
}
CDialog::OnDrawItem(nIDCtl, lpDrawItemStruct);
}
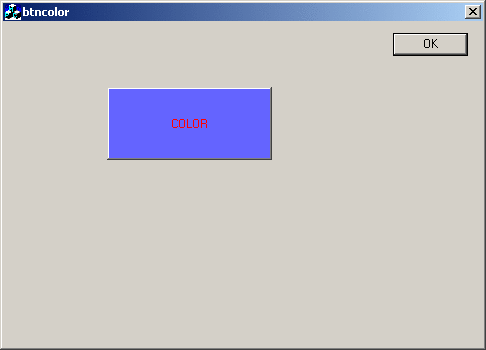
That's it Build the Code and Run it.
