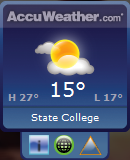
Introduction
I've been a developer for over 10 years and recently entered the world of widgets/gadgets, thanks to my employer, AccuWeather.com. My first real widget was for the Google home page. I also released a toolbar for Internet Explorer that provides a current weather forecast. My attention then turned to developing a gadget for Vista that provided similar information. The data comes directly from AccuWeather.com via an XML feed that has been customized for the Vista gadgets being developed for AccuWeather.com.
The gadget expands on the default gadget packaged with Vista by providing weather alerts and a more comprehensive city lookup.
This article will detail exactly how I built the Vista AccuWeather forecast gadget, the obstacles I overcame, and how I used the functionality provided by the Vista Sidebar API.
Background
I'm not going to cover every detail of building the gadget; I'm going to make the following assumptions:
- You know JavaScript, CSS and DHTML and how to program in these languages. Many great articles detailing these languages are available on the web.
- You understand the basic concepts of AJAX, and using the
XMLHttpRequest object. Countless informative articles cover the use of the XMLHttpRequest object and XML in JavaScript and are freely available to the public.
How It All Works
The Vista AccuWeather forecast gadget itself is quite simple in function. I wrote a JavaScript library that pulls weather data from an XML feed and then creates objects from that data to be used in the gadget. I won't go into detail about the weather data or the library I've built to consume it. The library is included in the download. The gadget itself is pure DHTML, JavaScript and CSS; I do not need any 3rd party libraries or objects, with the exception of the XMLHttpRequest object that is provided by Microsoft and that comes standard with Windows Vista. The gadget uses the following Sidebar capabilities:
- Flyouts (Flyouts are a nice way to provide extra information when the user clicks on the gadget in the sidebar. For the weather gadget, flyouts provide a 5 day forecast and also allow the user to perform a city search.)
- Gadget settings (Settings for the gadget allow customization. For this gadget, city selection and Metric or English measurement settings are stored. By design, settings will be lost if the gadget is removed from the sidebar. However, if the sidebar itself is closed, the user logs off, or reboots, the settings are remembered and will be retrieved once the sidebar is reopened.)
- Different states when docked and undocked (The gadget provides a different view when it is docked versus undocked. This is accomplished using CSS layout as well as some JavaScript to modify the content depending upon docked or undocked state.)
I'm going to cover three topics in greater detail to give you an idea of how to use these in gadgets and to provide a richer user experience.
Flyouts
Flyouts are very useful for several of reasons. They provide the ability to display data that may not fit completely within the constraints of the sidebar. They also provide a more rich and dynamic experience to the user. Additionally, flyouts allow the developer to potentially collect data that might not be possible with the standard settings dialogs.
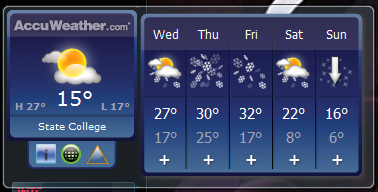
As shown in the image above, the flyout provides additional information that would not be visible on the standard gadget view. You can add more dynamic content, including more JavaScript and HTML.
A flyout is defined as follows:
function showExtendedFlyout() {
    if (System.Gadget.Flyout.show==false) {
        if (DataComplete) {
            System.Gadget.Flyout.file = "weatherExtended.html";
            System.Gadget.Flyout.show=true;
            System.Gadget.Flyout.onHide = blankFunction;
        }
    } else {
        System.Gadget.Flyout.show=false;
    }
}
I first check to see if a flyout is being displayed. The total number of flyouts is unlimited, but only one can be displayed at a time. If a flyout is currently being displayed, I close it using System.Gadget.Flyout.show=false. Each flyout requires its own HTML file. I also defined a blank function, which is run when the Extended Weather flyout is hidden, because there are multiple flyouts for the gadget. The one above is the Extended Forecast flyout, the other flyout performs a lookup. When that flyout is closed, it performs some updates to the current location. onHide must be set to a blank function, or the code will run for the settings flyout which will cause errors.
The example of the settings flyout is below:
function showSettingsFlyout() {
    if (System.Gadget.Flyout.show==false) {
        System.Gadget.Flyout.file = "findLocation.html";
        System.Gadget.Flyout.show=true;
        System.Gadget.Flyout.onHide=function() {lookupClosed();}
    } else {
        System.Gadget.Flyout.show=false;
    }
}
function lookupClosed() {
    if (System.Gadget.Settings.read("Location")!='') {
        location=System.Gadget.Settings.read("Location");
        retrieveWeather();
    }
}
The settings flyout is a little more complex. The function checks a setting covered later in this article. This flyout required me to define and set a blank function for the prior flyout. If I did not, it would try to run the lookupClose function, which isn't appropriate for Extended Forecast flyout.
Here is some of the code within the flyout:
<html>
<head>
    <meta http-equiv="MSThemeCompatible" CONTENT="yes" />
    <meta http-equiv="Content-Type" content="text/html; charset=Unicode" />
    <link href="css/settings.css" type="text/css" rel="stylesheet" />
    <script language="javascript" src="js/settings.js" type="text/javascript">
    </script>
</head>
<body onload="init()">

<div class="header">Unit of Measure</div>

<p><input type="radio" name="unit"
value="english">English <input type="radio"
name="unit" value="metric">Metric </body> </html></p>
The flyout HTML is very straightforward. The JavaScript for it is equally simple:
function loadForecastPage(dayNumber) {
    var shell = new ActiveXObject("WScript.Shell");
    shell.Run(
       System.Gadget.document.parentWindow.CurrentForecasts.forecastArray[
                      dayNumber-1].url);
}

function init() {
    background.style.width = "233px";
    background.style.height = "174px";
    background.src = "url(images/bg-5day.png)";

    for (count=1;count<=5;count++) {
        wrapper.children["day"+count].children["day"].innerText =
         System.Gadget.document.parentWindow.CurrentForecasts.forecastArray[
                                                     count-1].shortWeekDay;
        wrapper.children["day"+count].children["sym"].children["icon"].src =
                     "images/icons/sm/" +
          System.Gadget.document.parentWindow.CurrentForecasts.forecastArray[
                                               count-1].daytimeIcon + ".png";
        wrapper.children["day"+count].children["hi"].innerHTML =
          System.Gadget.document.parentWindow.CurrentForecasts.forecastArray[
                                               count-1].daytimeHigh+"°";
        wrapper.children["day"+count].children["lo"].innerHTML =
          System.Gadget.document.parentWindow.CurrentForecasts.forecastArray[
                                              count-1].nighttimeLow+"°";
    }
}
One of the calls is to the parent window to retrieve some data. System.Gadget.document.parentWindow allows reference to the parent window and then any objects defined in this window can be accessed.
Flyouts are fairly easy and simple to use. There are two different flyouts, one that provides informational content, while the other provides a more complex way of querying some data, allowing the user to interact and then save settings associated with that choice.
Gadget Settings
Gadget settings are a built in functionality of the Vista sidebar. There are two parts to the settings available to each gadget: the storage of settings and the built in settings dialog.
Storing the gadget settings and retrieving them is very easy:
if (System.Gadget.Settings.read("Location")!='') {
        location=System.Gadget.Settings.read("Location");
    } else {
        System.Gadget.Settings.write("Location", location);
    }
From the code snippet above, both a read and a write to settings are performed. A read is performed first, and if that setting doesn't exist, the result is an empty string. To read is very simple and straightforward, as well as to write. Here, I use read to determine if a location has been saved. If not, I write the default location to the settings for later retrieval.
As discussed earlier, the settings are only saved as long as the gadget resides on the sidebar, if you remove the gadget from the sidebar (not undock), the settings are lost and the gadget will return to the defaults. There are methods for keeping settings persistent using API calls to write to the registry, etc., but for the weather gadget, it actually better not to have persistent storage. The reason is that a user can have multiples of the gadget displayed at the same time, each with a different location set and its own additional settings. Therefore, there is no crossover of settings from one gadget to another.
The other functionality is the settings dialog, which can be accessed via the spanner icon on the gadget.
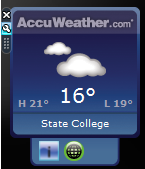
This icon only shows when settings for a gadget have been defined:
System.Gadget.settingsUI = "Settings.html";
System.Gadget.onSettingsClosed = settingsClosed;
You can also associate events with the settings. For example, I have an event triggered when the settings are closed. The settings dialog looks like the screenshot below:
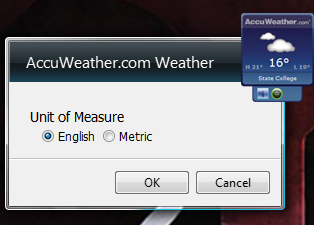
Some of the elements are default: the heading, the icon in the top right, the buttons. The content itself is HTML. The objects are standard HTML objects, such as in the example below:
<html>
<head>
    <meta http-equiv="MSThemeCompatible" CONTENT="yes" />
    <meta http-equiv="Content-Type" content="text/html; charset=Unicode" />
    <link href="css/settings.css" type="text/css" rel="stylesheet" />
    <script language="javascript" src="js/settings.js"
            type="text/javascript"></script>
</head>
<body onload="init()">

<div class="header">Unit of Measure</div>

<p><input type="radio" name="unit"
value="english">English <input type="radio"
name="unit" value="metric">Metric </body> </html></p>
As you can see, there is nothing special about the settings dialog. It's just a way to prompt the user for settings that setup gadgets preferences. In this example, the user preference is units of measure.
function settingsClosed() {
    units=System.Gadget.Settings.read("units");
    retrieveWeather();
}
The code above executes when the settings dialog is closed, then stores the selection in the gadget settings store and then reloads the data. Settings allow the user to customize the gadget, how it functions, or how it displays. This is especially useful if you want to provide the ability to switch between Metric and English measurements for all users; especially as metric is the more widely used measurement outside of the USA.
Docked vs Undocked
Gadgets can have two states, docked and undocked. When docked, they appear on the sidebar.

However, they can also be undocked. By default, the gadget appears exactly the same undocked or docked if an undocked state is not defined. The gadget display can be customized by tracking when the gadget is docked or undocked. Undocked gadgets are not constrained to the toolbar and therefore can consume more screen space and display more content.
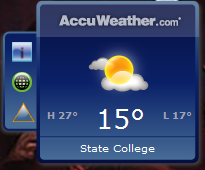
As you can see, the layout of the gadget has changed from its docked version. A side by side comparison follows:


The gadget is slightly larger, and the layout is different. This is the simplest of changes, however more complex changes can occur. An example of another gadget I'm developing follows, showing difference between its docked and undocked states.
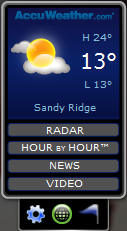
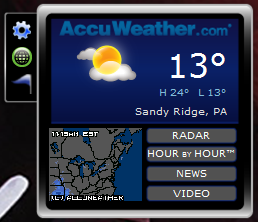
To determine whether a gadget is docked or undocked is fairly simple using the following code:
System.Gadget.onUndock=checkState;
System.Gadget.onDock=checkState;
This code sets up an event that is fired whenever the gadget is docked or undocked. The checkState function looks like this:
function checkState() {
    if (!System.Gadget.docked) {
        undockedState();
        retrieveWeather();
    } else {
        dockedState();
        retrieveWeather();
    }
}
This determines if the gadget is docked or undocked and calls another function that then performs the layout by modifying the positioning of the elements in the gadget. A brief snippet:
function dockedState() {
    with (document.body.style) {
        width = "130px";
        height = "244px";
    }
    background.style.width = "130px";
    background.style.height = "244px";
    background.src = "url(images/bg-docked.png)";

    with (header.style) {
        width="120px";
        height="15px";
        top="7px";
        left="7px";
    }
    ....
}

function undockedState()
{
    document.body.style.width = "267px";
    document.body.style.height = "236px";

    background.style.width = "267px";
    background.style.height = "234px";
    background.src = "url(images/bg-current.png)";

    with (header.style) {
        width="174px";
        height="40px";
        top="5px";
        left="0px";
    }
    ....
}
The div elements are modified using JavaScript to reposition and change the content accordingly with the different states. Standard JavaScript and CSS were used to modify the elements and their positioning.
Putting It All Together
Gadgets can consist of the following types of files: HTML, CSS, JavaScript, images, XML.
A gadget can have any number of these files organized in any way, the only criteria is that if you want to develop a gadget that can be localized, it has to be put in a specific directory structure:
AccuWeatherForecast.gadget
    -en_US
        -Gadget files here
        Gadget.xml
    -Other languages can be included
The gadget XML file is the most important file, since it tells the sidebar about the gadget and how to run it, etc. An example:
<gadget>
    <name>AccuWeather.com Weather</name>
    <namespace>AccuWeather</namespace>
    <version>1.0</version>
    <author name="AccuWeather.com">
        <info url="www.accuweather.com" />
    </author>
    <copyright>2006</copyright>
    <description>AccuWeather.com Current Conditions</description>
    <icons>
        <icon height="48" width="48" src="icon.png"/>
    </icons>
    <hosts>
        <host name="sidebar">
            <base type="HTML" apiVersion="1.0.0" src="weather.html" />
            <permissions>full</permissions>
            <platform minPlatformVersion="1.0" />
        </host>
    </hosts>
</gadget>
This tells the sidebar a little bit about the gadget, defines an icon and copyright information that is visible in the add to sidebar dialog, and also the base HTML page for the gadget.
To package a gadget for deployment, zip up the entire directory and then rename the zip file to gadgetname.gadget, which file can then be distributed to other users. Double clicking the file will allow the installation of the gadget. A recommendation is to also sign the gadget with a code signing certificate, allowing the end user to more easily identify the source of the gadget.
Further Discussion
The goal of this article was not necessarily to teach someone how to write JavaScript or use CSS and HTML, but to cover some of the key topics involved with building a gadget. I am a firm believer in coding by example, and I have included the full source of my gadget for reference. I've detailed some of the finer points of gadget development that I believe the developer community will find interesting and useful.
References
Please refer to the Gadgets Competition page at CodeProject.
Copyright and Legal
This article is copyrighted as is the data provided by the XML feed. It is not to be distributed without prior written consent from AccuWeather.com. You may use this code as a basis for your own gadgets but copying it without any reference back to me, Chris Motch, is just not nice. If you do use this code, let me know, just so I can keep track of where it's being used.
This gadget is an AccuWeather.com product and has been developed by Chris Motch who is an employee of AccuWeather.com.
Revision History
- 30th January, 2007: Article first published
- 31st January, 2007: Updated source files, images with minor changes and fixes
License
This article has no explicit license attached to it, but may contain usage terms in the article text or the download files themselves. If in doubt, please contact the author via the discussion board below. A list of licenses authors might use can be found here.
