Introduction
The application that will be used in this article is based on an UltraLite 10 database and will use a technology called MobiLink 10 to allow for data exchange between the mobile UltraLite database and the central database. Although MobiLink has the ability to synchronize to most major databases (including SQL Server, IBM DB2, Oracle and Sybase), for the sake of this sample we will be using SQL Anywhere as the central (consolidated) database. All of these tools are included in the free SQL Anywhere 10 Developer Edition.
Requirements
The following tools are required to get started with developing the application:
Step 1: Setting Up the Remote Databases
In my previous tutorial, we created a remote UltraLite database and mobile .NET application targeting a Windows Mobile (WinCE) device. Please ensure that you have walked through this tutorial to make sure you are comfortable using an UlltraLite database.
Step 2: Setting Up Replication
In this article, I am not going to walk through setting up data replication using MobiLink, as there are already a number of excellent articles and webcasts on the topic. In the project you downloaded (from above), there is a \db subdirectory containing a batch file called start_ml.bat. Execute this file to create a new SQL Anywhere central database. It will also start a MobiLink server and connect it to the central SQL Anywhere database. At this point, MobiLink is sitting waiting for client synchronization requests.
Step 3: Adding Replication Logic to the Mobile Application
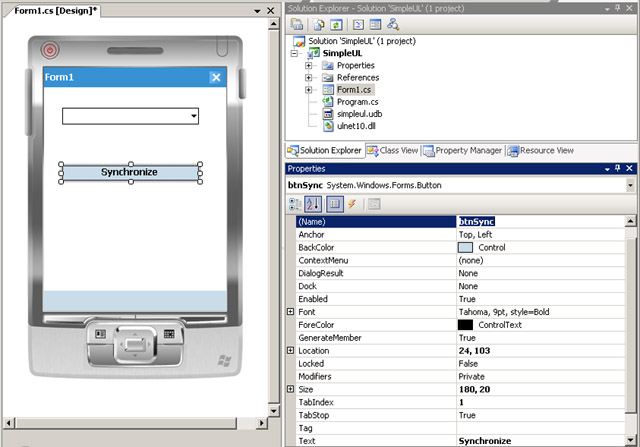
Now that the central database and MobiLink have been configured and started, the next step is to add logic to initiate data replication from the mobile device to the MobiLink server (which in turn requests data from the central SQL Anywhere database). Open the application created from the previous tutorial and add a button of the Name: btnSync (as seen in the image below).

Double click the button to add the following synchronization code:
private void btnSync_Click(object sender, EventArgs e)
{
try
{
ConnUL.SyncParms.UserName = "user1";
ConnUL.SyncParms.Stream = ULStreamType.TCPIP;
ConnUL.SyncParms.StreamParms = "";
ConnUL.SyncParms.Version = "customer";
ConnUL.Synchronize();
}
catch (System.Exception t)
{
MessageBox.Show("Synchronization Error: " + t.Message);
}
}
Step 4: Starting the Emulator
Since we are going to want to test data replication, we will need to start the emulator and get an actual Active Sync connection between the emulator and the desktop. To do this, choose Tools | Device Emulator Manager. Right click on one of the Windows Mobile 5.0 emulators and choose Connect.

Once the emulator starts, open Active Sync (on your desktop) and choose File | Connection settings. Enable the "Allows Connections to one of the following:" and choose DMA from the below combo box and press OK.

In the Device Emulator Manager, right-click on the chosen emulator and choose Cradle (as seen below). This should create an Active Sync connection to your emulator. NOTE: If there is a problem, try disabling the DMA option in the Active Sync application and re-enabling it.

Step 5: Deploy and Test the Mobile Application
Now that we have an Active Sync connection we can deploy the mobile application. From Visual Studio, change the target from "Windows Mobile 5.0 Pocket PC Emulator" to "Windows Mobile 5.0 Pocket PC Device" and choose Build | Deploy Solution.

Once the application has successfully deployed, open File Explorer on the device, switch to the \Program Files\SimpleUL directory and click on the SimpleUL application.


At this point, we can now initiate a connection to the MobiLink server by clicking on the "Synchronize" button. You should see a few rows logged to the MobiLink server window which indicate that 5 rows have been downloaded to the mobile device. Try synchronizing again. This time you should notice that no rows are downloaded, which is because MobiLink is only sending the new data changes.

Next Steps
At this point, we have set up a bi-directional data exchange of information between a mobile database and a central server. The obvious next step is to implement the ability to make changes to the mobile database and upload the changes. Since the remote database is already tracking changes, the only change required is to implement data uploads to modify the mobile application to insert, update or delete data.
Summary
In this article, we have created a very simple data replication application using a single standalone database. The MobiLink server is an extremely high performance server which scales to 100,000s of mobile users (such as the 2008 US Census, which will use MobiLink to support 500,000 mobile census workers). Since MobiLink supports the majority of existing databases on the server side, it can easily be integrated into any existing corporate system.
