First, let me introduce my development environment. I’m using Visual Studio 2010 with Office 2010 and all my VSTO applications are basing on VSTO 4.0 and .NET Framework 4.0. All my demo code is based on them and if you are using VS 2008, you can port this code to VS2008 very easily. The only thing that you need take care of is that there are two new features in .NET Framework 4.0, dynamic types and optional parameters, which are widely used in VSTO 4.0. (You can Google these features and I’m not going to talk more about them in the article .)
.)
Create VSTO Project
Build Development Environment
It’s easy to build a development environment for VSTO. Microsoft does a excellent job. You just need to install Visual Studio 2010 with VSTO 4.0 and Office 2010 for building VSTO application.
Create Project
Choose New Project->C#->Office->Word 2010 Add-in (Please check image below):
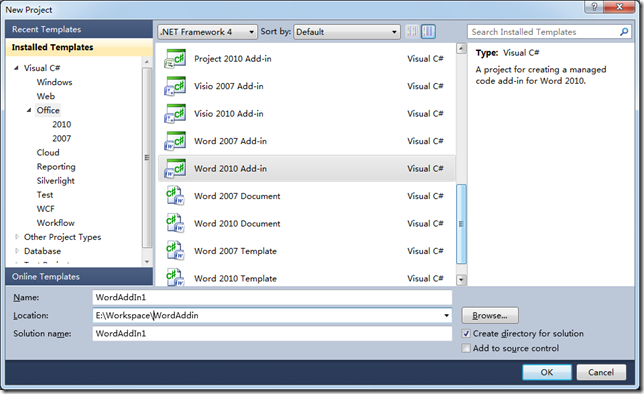
From this image, we know that there are other two types of project, Word 2010 Document and Word 2010 Template besides Word 2010 Add-in. Their difference is that the Add-in project will create an Application level add-in and every time when Word is starting up, Word will load this add-in, but Document project and Template project are Document Level projects. They will create Word files and the code will only be loaded and executed when a particular Word document is opened by the end user. (Document project will create .docx file and Template project will create .dotx file)
Add Customized Ribbon
Right click project –>Add new item->Office->Ribbon (Visual Designer):
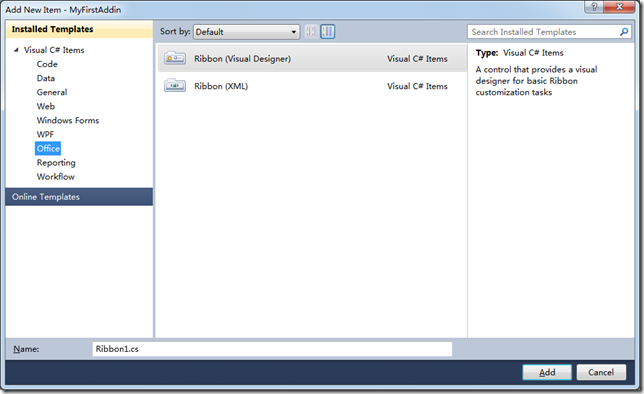
Add a new button on Ribbon and name it Hello.
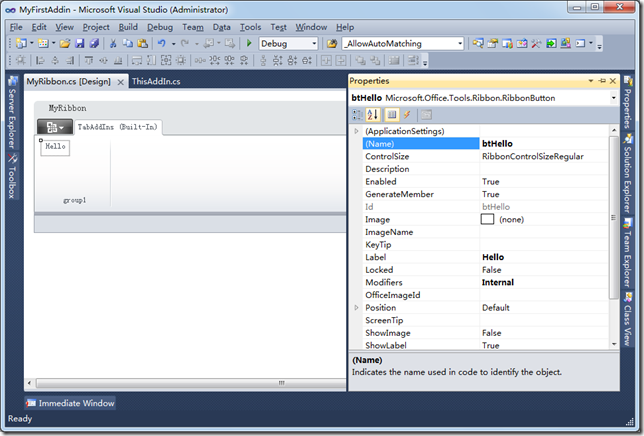
Double click Hello button and add this code in btHello_Click method:
1:         private void btHello_Click(object sender, RibbonControlEventArgs e)
2:         {
3:             System.Windows.Forms.MessageBox.Show("Hello World!");
4:         }
Press F5 to run the current Project and Visual Studio will help you to start up a new Word instance. Click Add-ins tab in Ribbons and click Hello button. If you see the Hello World! message box, then your first VSTO application is done, Congratulations!
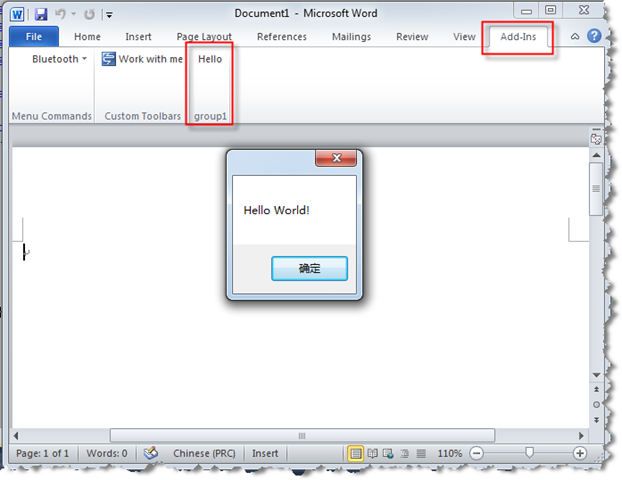
Let’s make some change for our first VSTO application. From the last screenshot, we find that our customized Ribbon is along with Ribbons from other Add-in in the same Ribbon Tabs. Now we want to make our Ribbon independent. In Visual Studio, please open Ribbon Visual Designer and click Ribbon Tab (Check Image below). We change ControlIdType to Custom and ControlID to MyFirstAddin. In this way, our Ribbon will be loaded in a new Ribbon Tab, called MyFirstAddin.
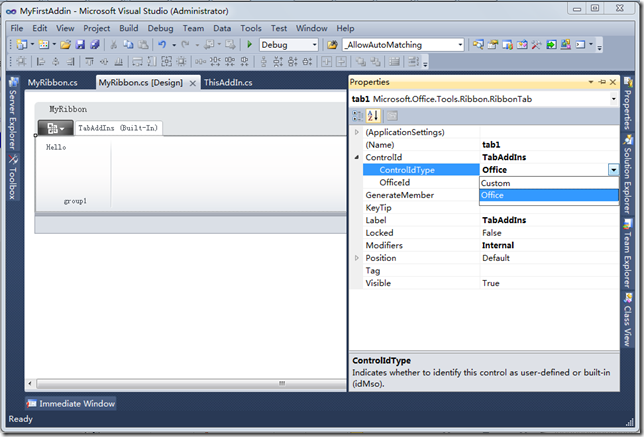
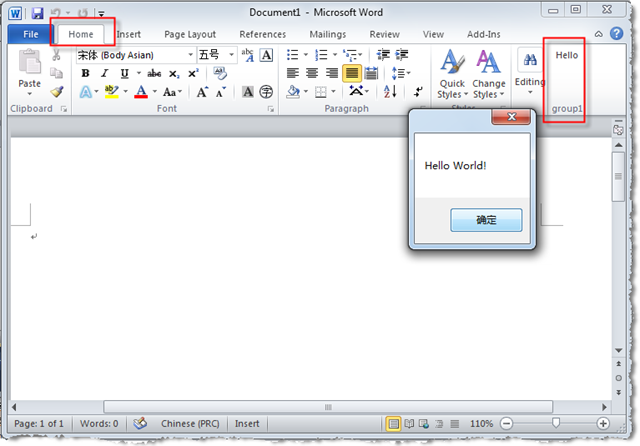
* There is a small trick. If your boss wants you to insert the customized Ribbon to Office built-in tabs, we can also achieve this task. Just change the ControlIdType to Office and Set OfficeID as TabHome, please check image below:
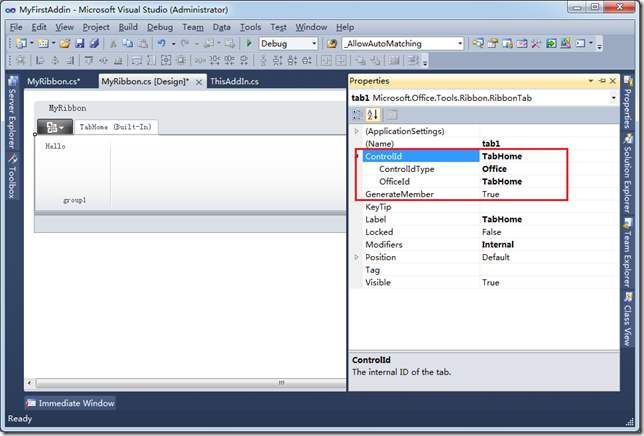
Result screenshot:
You can get other OfficeIDs from here: Office 2010 IDs, Office 2007 IDs.
Add Task Pane
Create Task Pane
Task Pane is a useful control and it gives you a way to provide users with a familiar interface to access your solution’s features. First let’s create a User Control, which will be used in Task Pane. and our main features will be added in this user control. 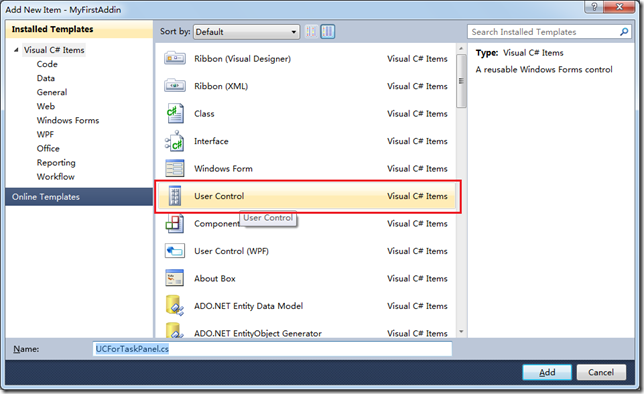
Let's add a label on User Control first. (We won’t add more functions in this task pane this time.)
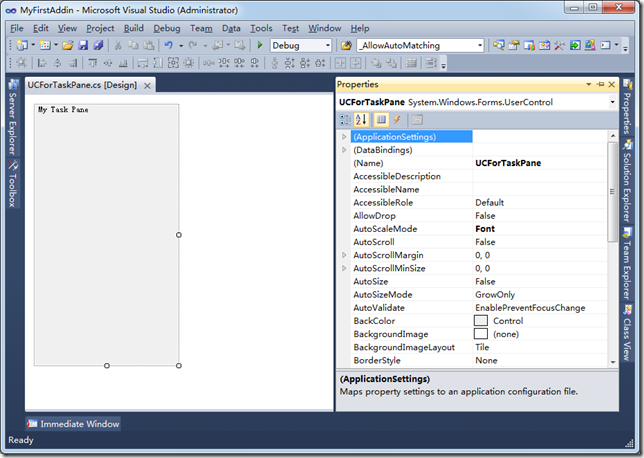
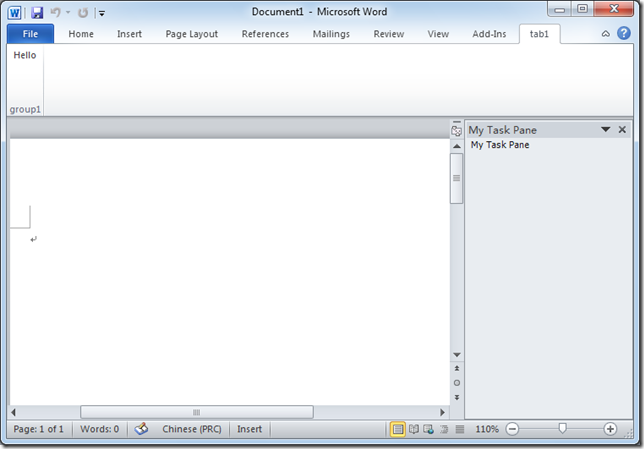
In ThisAddIn.cs file, we will add this code. In this way, Task Pane will be displayed after Addin loads:
1: public partial class ThisAddIn
2: {
3: public CustomTaskPane _MyCustomTaskPane = null;
4:
5: private void ThisAddIn_Startup(object sender, System.EventArgs e)
6: {
7: UCForTaskPane taskPane = new UCForTaskPane();
8: _MyCustomTaskPane = this.CustomTaskPanes.Add(taskPane, "My Task Pane");
9: _MyCustomTaskPane.Width = 200;
10: _MyCustomTaskPane.Visible = true;
11: }
12:
13: private void ThisAddIn_Shutdown(object sender, System.EventArgs e)
14: {
15: }
16:
17: #region VSTO generated code
18:
19: #endregion
20: }
Result screenshot:
Use Ribbon to control Task Pane
We have finished a Task Pane and we are going to use your customized Ribbon to control this Task Pane display. First, we will refine our Ribbon, add two buttons and add icons for buttons. Please check images below:
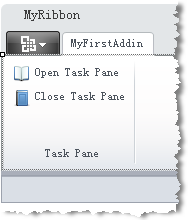
Create Onclick event for Open Task Pane and Close Task Pane:
1:         private void btnOpen_Click(object sender, RibbonControlEventArgs e)
2:         {
3:             if (Globals.ThisAddIn._MyCustomTaskPane != null)
4:             {
5:                 Globals.ThisAddIn._MyCustomTaskPane.Visible = true;
6:             }
7:         }
8:
9:         private void btnClose_Click(object sender, RibbonControlEventArgs e)
10:         {
11:             if (Globals.ThisAddIn._MyCustomTaskPane != null)
12:             {
13:                 Globals.ThisAddIn._MyCustomTaskPane.Visible = false;
14:             }
15:         }
Run your project and check the result.
Summary
In this article, we learned the basic information about VSTO development, including Ribbon and Task Pane. The sample code can be downloaded here. In the following articles, I will show you more samples and more detailed information about VSTO development in Word, Excel and Outlook.
And if you have any questions, please email me at justin.tyrael@gmail.com.


