Introduction
Note: This will be the first in a series of beginning XNA articles.
When starting an XNA project, you quickly discover that hard things are easy, and easy things are hard. One of the first things you want to do is to output some text. The TextOutput component presented here is an XNA drawable component that can output that text for you in an efficient batched manner. It was developed mainly for use as a debugging aid.

Background
XNA is a set of software tools that make developing games and multimedia applications a lot easier. XNA is built on top of the .NET 2.0 Framework, but it includes its own environment and additional libraries. Currently only C# is officially supported by XNA, but technically any .NET language should be able to work under it. The neat part is that programs written to XNA can be compiled to run under both Windows and XBox-360.
- You can get the latest XNA Game Studio Express from Microsoft here.
- You will also need Microsoft's Visual C# Express. (You can create XNA projects in the pro versions of VS, but you still need Express to install Express and to compile some of the content.)
Believe it or not, the first few versions of XNA had no built in support for displaying text what-so-ever. The development community quickly came up with several solutions. But most of them involved having to run a separate program to compile your own fonts to bitmap, having to copy that bitmap file to your project and then using a library to load that bitmap into a spriteBatch so that it could be rendered onto the screen. Luckily, Microsoft decided to include a built-in solution in the latest version of XNA that simplifies things a little by having the font automatically converted by XNA's built in content management system.
Once you have the latest version of XNA GSE installed, you can go under Help to learn how to draw text on the screen. In the current version it is under:
"Help:Contents:XNA Game Studio Express:Programming Guide:How to: Draw Text."
The code example from that help is:
ForegroundBatch.Begin();
string output = "Hello World";
Vector2 FontOrigin = CourierNew.MeasureString( output ) / 2;
ForegroundBatch.DrawString( CourierNew, output, FontPos, Color.LightGreen,
FontRotation, FontOrigin, 1.0f, SpriteEffects.None, 0.5f );
...
ForegroundBatch.End();
That is not that bad, but it is a little cumbersome. Plus, it can be slow calling the sprite batch many times.
Using the code
To use the TextOutput component, add the TextOutput.cs file to your project. Note, you will also have to create a file called Arial.SpriteFont (just copy it from the sample project).
Add a using statement to the following namespace:
using UTM.CSIS.Xedge;
Add a member variable for the new object inside of your main game class:
TextOutput textOutput;
Add the component to your game in its constructor:
this.Components.Add(textOutput = new TextOutput(this));
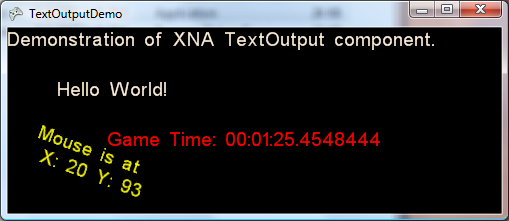
Now we can easily output text to anywhere on the screen by using the WriteAt method, or we can output text that follows the mouse around by using the writeAtMouse method:
textOutput.WriteAt(50, 50, "Hello World!");
textOutput.writeAtMouse("Mouse is\r\n here");
The text will be stored in a list and when the component draws itself, it will automatically draw all of the text you have submitted.
Points of Interest
You can also output text in different colors or at different rotations.
textOutput.WriteAt(100, 100, "This will be red.", Color.Red);
How the Code Works
This is a component that inherits from DrawableGameComponent. Because of this, once you add this component to your main game, it will automatically Load and Draw itself.
Here is a class diagram that shows how the class is setup. By the way, did you know you can generate these neat diagrams right from Visual Studio just by right-clicking on the class?

The most important method is the WriteAt method. It simply adds the text and attributes to a list as shown below. It is overloaded so that you can call it with or without the color parameter.
public void WriteAt(int x, int y, string s, Color c)
{
textNode n = new textNode();
n.X = x;
n.Y = y;
n.Text = s;
n.FontColor = c;
n.Rotation = m_FontRotation;
m_List.Add(n);
}
The WriteAt method uses the following struct to hold the text and attributes:
struct textNode
{
     public int X, Y;
     public string Text;
     public Color FontColor;
     public float Rotation;
}
Now, when it comes time to draw, the code simply loops though the list and outputs all of the text in one fast sprite batch.
public override void Draw(GameTime gameTime)
{
base.Draw(gameTime);
if (m_Enabled)
{
m_SpriteBatch.Begin(SpriteBlendMode.AlphaBlend,
SpriteSortMode.FrontToBack, SaveStateMode.SaveState);
foreach (textNode n in m_List)
{
m_SpriteBatch.DrawString(m_SpriteFont, n.Text,
new Vector2(n.X, n.Y), n.FontColor,
n.Rotation, new Vector2(0, 0), 1.0f, SpriteEffects.None, 0.5f);
}
m_SpriteBatch.End();
m_List.Clear();
}
}
Note, the Draw method will be called for us automatically, since we inherited the class from the DrawableGameComponent base class.
History
- Version 1.0 - July 2, 2007
