Introduction
Tri-state checkboxes can be very helpful to implement custom functionality to provide three different options to choose in a single control. For example, you may want to implement a security control panel UI to set permissions for a collection of users, and the possible status for these permissions may be: "Allow", "Denied", "Unset".
Background
A few days ago, I was asked to construct a tristate checkbox Web Control. My first approach was to do it by means of a Web Control class that inherits from the CheckBox class. I found this approach a little boring, so I decided to try another approach, by means of JavaScript and images that represent these three conditions (states). In this article, I will use a simple enough approach, preserving the principle of reusability of code by means of building a Web Control class.
Using the Code
- Make a new Web Control class to contain our tri-state checkbox control. You may use Visual Studio 2005 to create the new Class Library of Web Controls. A default "Class1.cs" will appear in the Solution Explorer. Change the name of the class to some other more relevant name. Remember to inherit the
WebControl class in your new class. Also add the references needed. - Create the class properties for:
DefaultState, DefaultAction, ImagePath, Name, and CheckBoxstyle. Implement the images and state values containers for the three states of the checkbox. I did this part using "span" containers to store state values and <img> tags to allocate the state image. - Implement the JavaScript to handle client the
OnClick events of our tri-state checkboxes and embed this script in a C# function called Build(). - Write code for rendering the control as an image and two
<span> tags: one for the state value and the other for the checkbox custom action. - Write code for the
OnLoad event for the Web Control to write the JavaScript we talked about earlier. - Build the Solution.
public class TriStateCheckBox : WebControl
{
string _DefaultState = "1";
string _DefaultAction = "1";
string _name = string.Empty;
string _imagespath = "images/";
CheckBoxTableStyle _CheckBoxStyle = CheckBoxTableStyle.classic;
public string DefaultState
{
get { return _DefaultState; }
set { _DefaultState = value; }
}
public string DefaultAction
{
get { return _DefaultAction; }
set { _DefaultAction = value; }
}
public string Name
{
get { return _name; }
set { _name = value; }
}
public string ImagePath
{
get { return _imagespath; }
set { _imagespath = value; }
}
public enum CheckBoxTableStyle
{
classic,
flat,
xp
}
public CheckBoxTableStyle CheckBoxStyle
{
get { return _CheckBoxStyle; }
set { _CheckBoxStyle = value; }
}
private string Build()
{
string script = "<script>";
script += "function settristate(obj)";
script += "{";
script += "var temp='';";
script += "var _obj=document.getElementById('value_'+obj);";
script += "temp = _obj.innerHTML;";
script += "if(temp == '1')";
script += "{";
script += "document.getElementById('tristate_'+obj).src = '" +
ImagePath + "2.bmp/';";
script += "document.getElementById('value_'+obj).innerHTML = '2';";
script += "}";
script += "if(temp == '2')";
script += "{";
script += "document.getElementById('tristate_'+obj).src = '" +
ImagePath + "3.bmp';";
script += "document.getElementById('value_'+obj).innerHTML = '3';";
script += "}";
script += "if(temp == '3')";
script += "{";
script += "document.getElementById('tristate_'+obj).src = '" +
ImagePath + "1.bmp';";
script += "document.getElementById('value_'+obj).innerHTML = '1';";
script += "}";
script += "}";
script += "function GetValues(obj){var ret = " +
"document.getElementById('value_'+obj).innerHTML;return ret;}";
script += "function GetActions(obj){var ret = " +
"document.getElementById('accion_'+obj).innerHTML;return ret;}";
script += "</script>";
return script;
}
protected override void Render(HtmlTextWriter output)
{
output.Write("<IMG id='tristate_" + Name + "' onclick=settristate('" +
Name + "') src='" + ImagePath + _DefaultState + ".bmp'>");
output.Write("<span id='value_" + Name +
"' style='VISIBILITY: hidden' name='value_" +
Name + "'>3</span>");
output.Write("<span id='accion_" + Name +
"' style='VISIBILITY: hidden' name='accion_" +
Name + "'>" + DefaultAction + "</span>");
}
protected override void OnLoad(EventArgs e)
{
base.OnLoad(e);
HttpContext.Current.Response.Clear();
HttpContext.Current.Response.Write(Build());
}
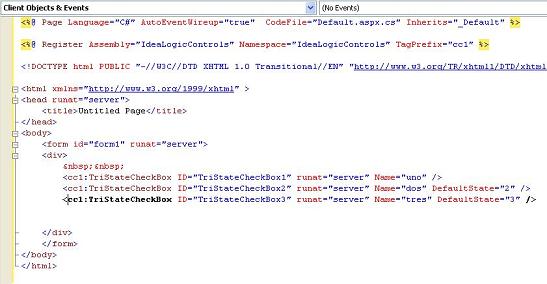
As shown, tri-state checkboxes can be added into any ASPX page.

Use the property tags to set the name of the TriStateCheckBox. Also, you can set (optional) the DefaultState and DefaultAction, and I hope to add in the near future an option to set the checkbox style.

History
- First build: August 22, 2007.
