
Introduction
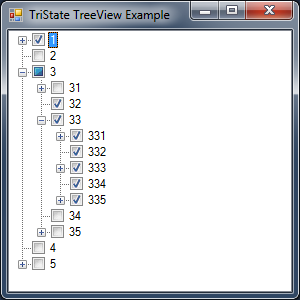
Tri-State Tree Views are Tree View controls with checkboxes which allow for three states - Checked, UnChecked and Mixed. Checked and UnChecked are self-explanatory and work the same as usual, but the Mixed state is new and is used to indicate that not all child nodes share the same state. These controls are being used more frequently now, especially in Installers or when selecting directories to perform some work on, but the standard .NET Tree View control still only allows for checkboxes with the standard two states. The control presented here allows for all three states to be used.
Background
There are already a few Tri-State Tree View controls available, but none of them seem suited for working with directory structures.
In this implementation, I have attempted to retain the functionality of existing commercial Tri-State Tree Views - specifically that each node remembers whether it has been ticked ('Checked') and changing the ticked state of a Child Node will not change the ticked state of a Parent Node. Additionally, the control can be fully manipulated by using the keyboard, it is not required to use the mouse to change a node's Checked Status. For performance, when a Node's state is changed, only the affected nodes are recalculated - this keeps performance fast even for large trees.
There is no need for specific code in your application to handle the new functionality, unless you are adding new nodes either after the tree's creation or when a node is expanded (more on this later).
The states are handled by setting each node's StateImageIndex (a standard member of the System.Windows.Forms.TreeNode class), which refers to an image in an ImageList created during class construction. The ticked state is stored in the node's Checked member variable as usual.
The control can operate in two modes - Standard and Installer.
Standard mode never changes the Checked status of a parent node, only the image displayed is changed dependent upon the Checked state of child nodes.
Installer mode automatically sets parent nodes to Checked if all child nodes are Checked, or UnChecked if at least one child node is UnChecked. This behaviour is not visible to the user, only when programmatically accessing the nodes states.
Using the Code
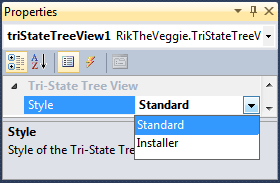
Add the file TriStateTreeView.cs to your project and compile it. A new control TriStateTreeView will then appear at the top of the Toolbox and may be added to your form like any other control. Setting the control's CheckBoxes property is not required, but may be done so if you wish. The control defaults to Standard behaviour, for use in an Installer set Style to Installer in the Properties.
The control can be used like a normal TreeView, no additional code is required to use the new functionality. Nodes which are added before the tree is created will automatically display an UnChecked box.
Nodes added as a parent node as expanded will display with the same check state as their parent (if you think about selecting folders on a disk, selecting a parent folder automatically includes all sub-folders).
Checking a child node will not cause the parent node to be checked (if you think about selecting folders on a disk, selecting a sub-folder should not automatically select the parent folder).
To display a state of your own choosing, or to add nodes at any other time, it is necessary to edit the node's StateImageIndex property.
System.Windows.Forms.TreeNode tn;
tn.StateImageIndex = (int)RikTheVeggie.TriStateTreeView.CheckedState.UnChecked;
tn.StateImageIndex = (int)RikTheVeggie.TriStateTreeView.CheckedState.Checked;
tn.StateImageIndex = (int)RikTheVeggie.TriStateTreeView.CheckedState.Mixed;
Using the Example
The included example project populates the tree programmatically before the window is displayed. Every other node is also expandable (it includes a 'dummy' node which is replaced when the parent is expanded) and demonstrates adding new nodes programmatically via the BeforeExpand event.
About the Code
The class is derived from the standard System.Windows.Forms.TreeView class. An enum CheckedState is used so we can refer to the states by nice semantic names rather than numbers. A variable IgnoreClickAction is created to allow us to ignore the events raised when a node's state is programmatically changed.
enum TriStateStyles stores the allowed styles of tree, the selected style is stored in the variable TriStateStyle.
To allow the style to be selected from the Properties window, set System.ComponentModel.Category etc before the getter/setter.
public class TriStateTreeView : System.Windows.Forms.TreeView
{
public enum CheckedState : int { UnInitialised = -1, UnChecked, Checked, Mixed };
int IgnoreClickAction = 0;
public enum TriStateStyles : int { Standard = 0, Installer };
private TriStateStyles TriStateStyle = TriStateStyles.Standard;
[System.ComponentModel.Category("Tri-State Tree View")]
[System.ComponentModel.DisplayName("Style")]
[System.ComponentModel.Description("Style of the Tri-State Tree View")]
public TriStateStyles TriStateStyleProperty
{
get { return TriStateStyle; }
set { TriStateStyle = value; }
}
};
The constructor derives a new class from the standard System.Windows.Forms.TreeView class:
public TriStateTreeView() : base()
{
StateImageList = new System.Windows.Forms.ImageList();
for (int i = 0; i < 3; i++)
{
System.Drawing.Bitmap bmp = new System.Drawing.Bitmap(16, 16);
System.Drawing.Graphics chkGraphics =
System.Drawing.Graphics.FromImage(bmp);
switch ( i )
{
case 0:
System.Windows.Forms.CheckBoxRenderer.DrawCheckBox
(chkGraphics, new System.Drawing.Point(0, 1),
System.Windows.Forms.VisualStyles.
CheckBoxState.UncheckedNormal);
break;
case 1:
System.Windows.Forms.CheckBoxRenderer.DrawCheckBox
(chkGraphics, new System.Drawing.Point(0, 1),
System.Windows.Forms.VisualStyles.CheckBoxState.
CheckedNormal);
break;
case 2:
System.Windows.Forms.CheckBoxRenderer.DrawCheckBox
(chkGraphics, new System.Drawing.Point(0, 1),
System.Windows.Forms.VisualStyles.
CheckBoxState.MixedNormal);
break;
}
StateImageList.Images.Add(bmp);
}
}
OnCreateControl is invoked by the system before the tree is first displayed. The default CheckBoxes functionality is disabled as we're providing our own implementation with an additional state. The helper function UpdateChildState() is used to set each node to display an empty check box.
protected override void OnCreateControl()
{
base.OnCreateControl();
CheckBoxes = false;
IgnoreClickAction++;
UpdateChildState(this.Nodes, (int)CheckedState.UnChecked, false, true);
IgnoreClickAction--;
}
OnAfterCheck is invoked by the system whenever the state of a checkbox is changed, whether by a user or code. Before doing any work here, we check the IgnoreClickAction variable to ensure that it's safe to do so (we don't want to do anything if we're explicitly changing states in code).
After setting the new state in StateImageIndex, any Child nodes are set to the same state (e.g., if a parent is selected, it automatically selects all children). Finally, any Parent nodes are informed of the new state as they may need to change their own state to Mixed.
protected override void OnAfterCheck(System.Windows.Forms.TreeViewEventArgs e)
{
base.OnAfterCheck(e);
if (IgnoreClickAction > 0)
{
return;
}
IgnoreClickAction++;
System.Windows.Forms.TreeNode tn = e.Node;
tn.StateImageIndex = tn.Checked ? (int)CheckedState.Checked :
(int)CheckedState.UnChecked;
UpdateChildState(e.Node.Nodes, e.Node.StateImageIndex, e.Node.Checked, false);
UpdateParentState(e.Node.Parent);
IgnoreClickAction--;
}
OnAfterExpand is invoked by the system whenever a node is expanded. UpdateChildState is called here just in case new children are added as a side-effect of expanding the node (see OnBeforeExpand in the attached example).
protected override void OnAfterExpand(System.Windows.Forms.TreeViewEventArgs e)
{
base.OnAfterExpand(e);
IgnoreClickAction++;
UpdateChildState(e.Node.Nodes, e.Node.StateImageIndex, e.Node.Checked, true);
IgnoreClickAction--;
}
The helper function UpdateChildState is used to replace the state of Child nodes with that of the Parent. It is usually called with ChangeUninitialisedNodesOnly = false so that nodes are always changed, but may be called with ChangeUninitialisedNodesOnly = true so that only uninitialised nodes are changed (e.g., so that we don't override any explicit status set by the user when creating the tree).
protected void UpdateChildState(System.Windows.Forms.TreeNodeCollection Nodes,
int StateImageIndex, bool Checked, bool ChangeUninitialisedNodesOnly)
{
foreach (System.Windows.Forms.TreeNode tnChild in Nodes)
{
if (!ChangeUninitialisedNodesOnly || tnChild.StateImageIndex == -1)
{
tnChild.StateImageIndex = StateImageIndex;
tnChild.Checked = Checked;
if (tnChild.Nodes.Count > 0)
{
UpdateChildState(tnChild.Nodes, StateImageIndex,
Checked, ChangeUninitialisedNodesOnly);
}
}
}
}
The helper function UpdateParentState is used to notify Parent nodes that their Child has changed and they may need to change their own state as a result. It is here that we determine whether to make a node as Mixed.
In Installer mode, the Parent node's Checked state is automatically updated based on the current Child nodes.
The code here could be compacted, but I like the explicit ifs as it makes the logic easier to follow especially for newcomers to the language.
protected void UpdateParentState(System.Windows.Forms.TreeNode tn)
{
if (tn == null)
return;
int OrigStateImageIndex = tn.StateImageIndex;
int UnCheckedNodes = 0, CheckedNodes = 0, MixedNodes = 0;
foreach (System.Windows.Forms.TreeNode tnChild in tn.Nodes)
{
if (tnChild.StateImageIndex == (int)CheckedState.Checked)
CheckedNodes++;
else if (tnChild.StateImageIndex == (int)CheckedState.Mixed)
{
MixedNodes++;
break;
}
else
UnCheckedNodes++;
}
if (TriStateStyle == TriStateStyles.Installer)
{
if (MixedNodes == 0)
{
if (UnCheckedNodes == 0)
{
tn.Checked = true;
}
else
{
tn.Checked = false;
}
}
}
if (MixedNodes > 0)
{
tn.StateImageIndex = (int)CheckedState.Mixed;
}
else if (CheckedNodes > 0 && UnCheckedNodes == 0)
{
if (tn.Checked)
tn.StateImageIndex = (int)CheckedState.Checked;
else
tn.StateImageIndex = (int)CheckedState.Mixed;
}
else if (CheckedNodes > 0)
{
tn.StateImageIndex = (int)CheckedState.Mixed;
}
else
{
if (tn.Checked)
tn.StateImageIndex = (int)CheckedState.Mixed;
else
tn.StateImageIndex = (int)CheckedState.UnChecked;
}
if (OrigStateImageIndex != tn.StateImageIndex && tn.Parent != null)
{
UpdateParentState(tn.Parent);
}
}
The control can be navigated by the keyboard cursor keys, but by default the Space Bar does nothing. By handling OnKeyDown and checking for Space, we can enable full functionality via the keyboard.
Simply toggling the node's Checked state will cause OnAfterCheck to be called by the system.
protected override void OnKeyDown(System.Windows.Forms.KeyEventArgs e)
{
base.OnKeyDown(e);
if (e.KeyCode == System.Windows.Forms.Keys.Space)
{
SelectedNode.Checked = !SelectedNode.Checked;
}
}
One problem I ran into during development was that clicking anywhere on a node (checkbox, label, etc.) would cause the node's Checked state to change. By overriding OnNodeMouseClick, I was able to test for the current location of the mouse and ignore any clicks which were not on the StateImage (the CheckBox).
As with OnKeyDown, simply toggling the node's Checked state causes OnAfterCheck to be called by the system.
protected override void OnNodeMouseClick
(System.Windows.Forms.TreeNodeMouseClickEventArgs e)
{
base.OnNodeMouseClick(e);
System.Windows.Forms.TreeViewHitTestInfo info = HitTest(e.X, e.Y);
if (info == null || info.Location !=
System.Windows.Forms.TreeViewHitTestLocations.StateImage)
{
return;
}
System.Windows.Forms.TreeNode tn = e.Node;
tn.Checked = !tn.Checked;
}
About the Example
The example code included here demonstrates adding nodes programmatically before the tree is fully created (i.e., before it's displayed to the user) and adding nodes programmatically when a parent node is expanded.
The example was created by starting a new C# Windows Forms Application, adding the TriStateTreeView.cs file to the project, compiling, then dropping the TriStateTreeView control onto the form (Form1). The function triStateTreeView1_BeforeExpand was associated with the BeforeExpand event of the tree.
Nothing fancy going on in the Form's constructor, just call the helper function PopulateTree with the empty tree.
public Form1()
{
	UseWaitCursor = true;

	InitializeComponent();

	PopulateTree(triStateTreeView1.Nodes, "");

	UseWaitCursor = false;
}
This helper function adds 5 nodes to the specified subtree (ParentNodes). PreText is placed before each node's label just to keep things looking pretty.
To demonstrate child nodes, every other node creates a 'dummy' child which will be replaced when the node is expanded.
private void PopulateTree(TreeNodeCollection ParentNodes, string PreText)
{
for (int i = 0; i < 5; i++)
{
TreeNode tn = new TreeNode(PreText + (i + 1).ToString());
if (i % 2 == 0)
{
tn.Nodes.Add("");
}
ParentNodes.Add(tn);
}
}
By handling the BeforeExpand event, we can check for 'dummy' nodes which need replacing with proper data. When such a node is detected, we simply remove it and call PopulateTree with the parent's subtree and text.
private void triStateTreeView1_BeforeExpand(object sender, TreeViewCancelEventArgs e)
{
TreeView tv = sender as TreeView;
tv.UseWaitCursor = true;
if ((e.Node.Nodes.Count == 1) && (e.Node.Nodes[0].Text == ""))
{
e.Node.Nodes.RemoveAt(0);
PopulateTree(e.Node.Nodes, e.Node.Text);
}
tv.UseWaitCursor = false;
}
Points of Interest
This was developed and compiled under VS2010 for .NET 4, but will probably work for other versions too. Please add a comment if you get it working under different conditions! If there's demand, I'll add an option so that it acts like an 'installer' - that is, a Parent node will automatically get ticked when all Child nodes are ticked.
Credits
History
- 26 May 2011 - Initial upload
- 30 May 2011 - Added Installer mode
