Introduction
This article talks about programming Outlook Add-ons in C# and explains the Outlook object model.
Background
Actually I am planning to write three articles about Outlook Add-ons. In this first article, I will explain the basic concepts and Outlook Object model and gradually, I will move to the programming part. This first article will explain only preliminary things, not advanced topics. I have used Visual studio 2008 Beta version to create the demo code.
Using the Code
Before delving into the code, we will see some keywords & the Outlook object model.
Outlook application is a COM based server. When a .NET developer needs to code with COM, the developer needs to know about PIA (Primary Interop Assembly). Microsoft already delivered PIA with installation of Office setup. During development, you write your managed code against an interop assembly (IA). This is a managed .NET equivalent of the COM type library. There are several ways of getting an interop assembly, and there are some deployment issues that we need to consider. After you build your code, at run time, the CLR places a proxy between your managed code and the Office component you're talking to. At run time, when you make a call from managed code to an (unmanaged) Office function, the CLR performs a number of operations for you. One of the most important of those is marshaling. Marshaling takes the parameter values you've passed in your managed method call and hands them off to the underlying unmanaged method. The ultimate goal of any interop assembly is to provide .NET types which look and feel like the original COM types. The interoperability layer (in conjunction with a runtime generated proxy termed the Runtime Callable Wrapper, or RCW) takes care of various details regarding marshaling data types. For example, if an interface method was defined to take a COM-based BSTR parameter, .NET developers are free to pass a CLR-based System.String.
Outlook Object Model
Outlook object model is a very well organized list of objects. These objects are arranged and make use of common designs and patterns. The primary object is Application, which is the root for all other objects. Once we get this object, we can take control of the Outlook application. Internally this is nothing but an instance of the Outlook application.
Some of the other objects are:
- Email items
- Contacts
- Distribution list
- Calender
- Appointment
- Task..... etc.
Now we go to the programming part. Visual Studio has already added a Shared Addin project wizard with installation.
To create a new Outlook addin:
- Open a new Visual Studio project.
- Select the "Other project types" and choose "Shared Add-in" project.
- This will lead you through a dialog wizard.
I have created a project called OutlookAddButton. - Select a programming language as C#.
- Select the application host as Outlook.
- Enter Addin name and Addin description.
- Choose Addin options.
Now the Visual Studio IDE will have two projects, one is called OutlookAddButton and the other one is called OutlookAddButtonSetup. Actually we are going to write code in OutlookAddButton only, but for installation and setup we can customize the OutlookAddButtonSetup project.
Now we will add a command button in the standard Outlook commandbar. When we look into the code of OutlookAddButton, we can see the primary class Connect which has been created through the dialog wizard. This class is the heart beat of Outlook Add-in programming. This class inherits the interface called IDTExtensibility2.
The connect class has two private instances, one is called applicationObject and another one is called addInInstance.
applicationObject is nothing but the Outlook application instanceaddInInstance is the addin project instance
Connect Class - Members
OnConnection() | This method will be called when your Add-in is connected to the host. |
OnDisconnection() | This method is called when the Add-in is being disconnected from the host. |
OnAddInsUpdate() | The OnAddInsUpdate() method is called if the end user inserts or removes Add-ins to the host. |
OnStartupComplete() | This method is called after the host application has completed loading. |
OnBeginShutdown() | This method is called when the host is in the process of shutting down. |
I will explain more details about this class in my next article.
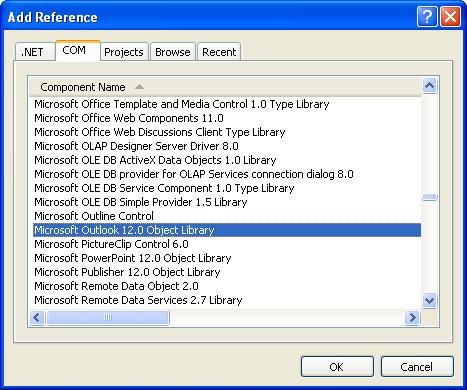
First, we will look at this sample application. This application will add one command button into the Outlook standard commandbar. When you click it, this will simply show a message. First add a reference to the OutlookAddon project. Go to Solution Explorer and click Add Reference.

public void OnStartupComplete(ref System.Array custom) {
    CommandBars cmdBars = applicationObject.ActiveExplorer().CommandBars;
    try {
        btnHello = (CommandBarButton)cmdBars["standard"].Controls["Hello"];
    } catch (Exception e) {
        btnHello = (CommandBarButton)cmdBars.Add(1,
                    System.Reflection.Missing.Value,
                    System.Reflection.Missing.Value,
                    System.Reflection.Missing.Value);
        btnHello.Caption = "Hello";
        btnHello.Style = MsoButtonStyle.msoButtonCaption;
    }
    btnHello.Visible = true;
    btnHello.Click += new _CommandBarButtonEvents_ClickEventHandler(btnHello_Click);
}

void btnHello_Click(CommandBarButton Ctrl, ref bool CancelDefault) {
    System.Windows.Forms.MessageBox.Show
	("Hello, \n Welcome to Outlook addon programming");
}
Go through the sample code attached to get an idea.
Installation
In the same solution, you can find another project called OutlookAddonButtonSetup, which is used to create an MSI package for installation. (Cool, right?) Go to Solution Explorer, right click the project and select Rebuild. After rebuilding, you can file MSI package in the folder. If you want to install, just click the installation menu. This will install the addon to Outlook.
Points of Interest
I will give more details in my second article.
History
- 7th October, 2007: Initial post
