Introduction
Hi everyone! This article will help you to extend menu items with properties represented by any objects you like. All you need is to put a special MenuExtender component on your form and every menu item will be extended with a property, represented by any object you like.
Background
You can extend menu items in your application by, for example, inheriting a class from menu item and then changing your class to this inherited class in designer code. All the properties that were added to the child will be represented in the property grid. But if you decided to extend your menu items with an additional property and you already have more than 100 menu items, then you probably need to:
- Extend all of them with one mouse click (or by dragging one component to your form)
- Be sure that other menu items that you or other developers are going to add would be extended in the same way
You can also add any events, so that the class that extends your menu items could react(you can create event handlers as for any other class with events, like button).
All this is done by simply adding a special extender component to your form.
Using the Code
First of all we'll construct a custom class that extends menuitems. You need to inherit it from component (System.ComponentModel.Component).
<serializable(), /> _
Public Class Command
Inherits Component
In addition, you need to add some class attributes such as TypeConverter and Editor. We need them to link property grid editor for the command class. As this class is a custom class and can contain anything we want, we need to create our own editor for it.
Public Class CommandEditor
    Inherits System.Drawing.Design.UITypeEditor
First of all, inheriting our editor from UITypeEditor gets a great part of functionality from the base class. Also we can choose how our editor will appear in the property grid:
Public Overloads Overrides Function GetEditStyle_
    (ByVal context As System.ComponentModel.ITypeDescriptorContext) _
    As UITypeEditorEditStyle
    Return UITypeEditorEditStyle.Modal
End Function
UITypeEditorEditStyle.Modal tells us that our edit form for the command class will be modal. You can make it dropdown if you wish so, just type Return UITypeEditorEditStyle.DropDown.
Now we need to take the last and the biggest step for CommandEditor, define its EditValue function:
Public Overloads Overrides Function EditValue_
(ByVal context As ITypeDescriptorContext, _
ByVal provider As IServiceProvider, ByVal value As Object) As Object
Dim edSvc As IWindowsFormsEditorService = CType(provider.GetService( _
GetType(IWindowsFormsEditorService)), IWindowsFormsEditorService)
If edSvc Is Nothing Then
Return Nothing
End If
We get a special service to show our edit form in the property grid.
Dim form As CommandEditForm
If (Not value Is Nothing) Then
Dim cmd As Command = CType(value, Command)
If edSvc.ShowDialog(form) = DialogResult.OK Then
Return form.ResultCommand
Else
Return form.NoChangesCommand
End If
End Function
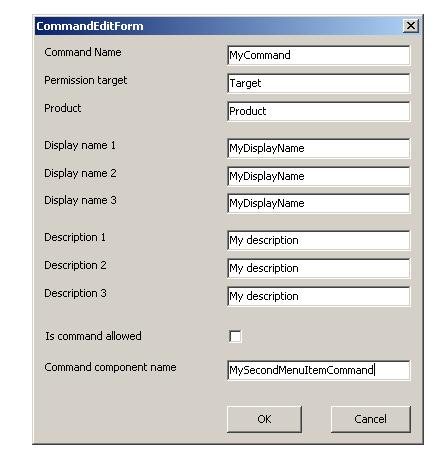
Now we get a command from the editing value, then show our edit form in a very special way: edSvc.ShowDialog(form). The code of the edit form is quite straight forward, but you should note, that you can't create an instance of a command to store its state. If you do it, you have a new command in designer every time you open your edit form in the property grid. And as every command is serialized in the windows form designer generated code, after you open the editor 5 times you'll have 5 new commands. To avoid this you need to store the command state inside a CommandEditForm. All code inside the form is commented well and one can easily find out what any single line of code does.
Sure, the component is quite complicated, but you can ask questions and I will update the article with more details and/or answer your questions immediately.
Points of Interest
For now, I'm very interested in design patterns and refactoring. I am always looking for good examples for patterns and trying to write better code.
