Introduction
ASP.NET 1.0 did not come with a treeview control. I guess this is something many people needed because Microsoft has introduced such a control with ASP.NET 2. Still, there is something particular with MS's TreeView that makes it unpleasant to use when you work with "standard" data: this TreeView needs a data source that implements IHierarchicalEnumerable (for example: XML data..). When you want to bind this TreeView with SQL data, you must write some code (i.e., you cannot use declarative syntax, which is ASP.NET's landmark functionality). The CustomTreeView presented here gives the possibility to display data from a standard DataView, and still benefit from ASP.NET's declarative syntax (through the template NodeTemplate).
Background
The CustomTreeView is a templated data-bound control. I will not explain how this works since you'll find the full details on this in MSDN (or in my former article NestedRepeater).
Using the code
Data source
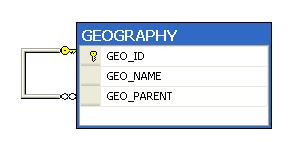
I'll display data from a table called GEOGRAPHY. This table needs a Primary Key / Foreign Key relationship. This is the relationship that creates the hierarchical structure rendered by the treeview. Here, GEO_PARENT references GEO_ID to create father-child relations.

Code behind
The data from GEOGRAPHY is stored into a DataView. A DataRelation is created within the DataView, then the filter RowFilter selects the topmost nodes. Here is the code:
SqlDataAdapter da = new SqlDataAdapter("select * from GEOGRAPHY",
            ConfigurationManager.ConnectionStrings[1].ConnectionString);

DataSet ds = new DataSet();
da.Fill(ds, "geo");
ds.Relations.Add("FatherChild", ds.Tables["geo"].Columns["GEO_ID"],
    ds.Tables["geo"].Columns["GEO_PARENT"]);

myTree.DataSource = ds.Tables["geo"].DefaultView;
myTree.RowFilter = "GEO_PARENT is null";
myTree.RelationName = "FatherChild";

myTree.DataBind();
Note that the DataRelation is given a name, and this name is supplied to the CustomTreeView through the property RelationName.
On the Webform
In this example, I'll display a tree with countries, regions, cities... and some illustrative functionalities with links and a button. To use the CustomTreeView on your webform, you must first register the assembly:
<%@ Register tagprefix="WCC"
    Namespace="WebCustomControls" Assembly="WebControls"%>
If you use Visual Studio, you must add a reference to "WebControls.dll" in your project for this line to work properly. And then:
<WCC:CustomTreeView id=myTree runat="server">
  <NodeTemplate>
    <%# (Container.DataItem as DataRow)["GEO_NAME"]%>
        <%# String.Format("<a href=\"http://www.google.com/search?q={0}\"
             target=\"_blank\">Google</a>",
                 (Container.DataItem as DataRowView)[1])%>
    <asp:ImageButton runat=server ID=BnSend
       ImageUrl="~/IMGs/Valid.gif"
       CommandArgument=<%# (Container.DataItem as DataRowView)[0] %>
       ImageAlign=AbsMiddle
       OnCommand=DoValid />
  </NodeTemplate>
</WCC:/NodeTemplate>
With the NodeTemplate class, you can add whatever control for each node. This template will be instantiated for each node.
In order to expand/close the node, you must click the "folder" images (see below for an example). This leaves you the possibility to use the "Click" event on the node's content.
Images
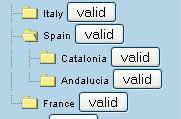
To keep things simple here, the URL for the images is hard-coded. All the images are located in a directory "IMGs" placed under the website's root folder. You can display your own images by supplying the appropriate images (but keeping the names that are hard-coded) in the /IMGs folder. But be sure to keep the "menu_bar_invisible.gif" image as it is. If you decide to use your own images, note that all the images must have identical dimensions. You also may add some extra properties in order to allow the host webform to dynamically specify the URLs. When you add some controls into the NodeTemplate, be sure that the images used to render the tree's branches are big enough, otherwise margins will appear between these images, thus "breaking" the tree, as shown below:

In this example, the image's height is just 16 pixels, while the button needs at least 24 pixels. Here, you have to supply your own larger images.
How it works
A few things need some explanation.
m_lstColumnNeedVisualRendering
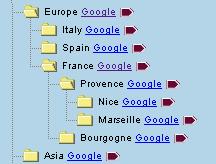
We use this list in order to know where we must display "menu_bar.gif" and where we must display "menu_bar_invisible.gif". These are the two images used to visually render the tree (the tree's branches). The difficulty comes from the fact that there must be no bar once we have reached the last child of a node, even if this last child has sub-children.

In the example above, the vertical bar under "Europe" stops when we reach "France", even if the sub-nodes under France are also in Europe. m_lstColumnNeedVisualRendering is a list of booleans, one boolean for each column in the tree structure. If the element at position i in the list is true, then a bar is displayed for column i, otherwise an invisible GIF is "displayed".
m_listOpenedNodes
This list allows us to know which nodes were expanded when the user submitted the form that hosts the CustomTreeView. This way, we can render the CustomTreeView in exactly the same state as it was on the client's browser. On the generated HTML, this list is stored inside a hidden field (<input type=hidden...>). When the user expands a node, the JavaScript client code adds this node to the list (and removes it, if the user subsequently closes the node). On postback, the content of this hidden field is read by using the Request.Form collection. This is because the hidden field's viewstate is not handled by .NET (since it was dynamically added to the control).
JavaScript
Under each node, all child nodes are placed inside a SPAN. If the node's ID is i, then the SPAN's ID is 'Level_i'. The "folder" image for the node has an ID 'Image_i'. When the user clicks on a node, the JavaScript function ExpandNode will show/hide the adequate SPAN, and change the folder image to reflect the change.
Conclusion
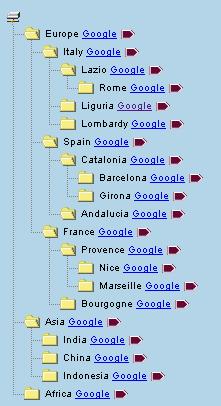
So here's the output:

With each node, a hyperlink has been added, to allow the user to display the Google page for this item. An ImageButton has also been added. When clicked, this button submits the webform. Once the Click event has been handled server-side, the tree is displayed in exactly the same state on the user's browser.
