Introduction
This article provides a drag and drop way of creating radio button GridView row selectors that behave in the same way as the GridView's own "Select" link buttons.
Background
One thing that's always bothered me about the GridView control is the counter-intuitive appearance of the Select link provided to select a single row. Since pretty much every other time you ask your user to select one item in a list you do it with radio buttons, I couldn't help but feel it would have been more intuitive to make the Select button a radio button. As it happens, this was one of the first things I thought when I started learning ASP.NET two years ago. But now, it didn’t exactly prove trivial to implement. I found some articles telling me how to do it, but these involved a bit of wiring per control and, really, if you're going to apply radio button row selection across your entire site, it should be much simpler than that just from a maintainability point of view.
Now that I've had more experience and studied for a few qualifications, I came up against the same issue again, and decided to solve it properly so I wouldn't have to worry about it anymore. I wanted a pure drag and drop control with no wiring, to replace the Select link, and this is what I came up with.
The Code
Since it's a pretty simple piece of code all in all, you can see the control in all its glory below:
[DefaultProperty("Text")]
[ToolboxData("<{0}:GridViewRowSelector
  runat="\""server\"></{0}:GridViewRowSelector>")]
public class GridViewRowSelector : RadioButton
{
    protected override void Render(HtmlTextWriter writer)
    {
        GridViewRow row = (GridViewRow)this.NamingContainer;
        int currentIndex = row.RowIndex;
        GridView grid = (GridView)row.NamingContainer;
        this.Checked = (grid.SelectedIndex == currentIndex);
        this.Attributes.Add("onClick", "javascript:" +
             Page.ClientScript.GetPostBackEventReference(grid,
             "Select$" + currentIndex.ToString(), true));
        base.Render(writer);
   }
}
Using the Code
Using the code is simple, just follow these steps:
- Click on your website in the Solution Explorer and click "Add Reference..."
- Select the Browse button on the .NET Components tab, or select the Browse tab in VS2008.
- Select the DLL provided (this is the Utilities.dll found in the Debug/bin directory on the zip file).
Then, just drag and drop the GridViewRowSelector from your toolbox into a template field on the GridView control.
To create the template field on the GridView, select the Common Functions menu for your GridView (the little arrow at the top right corner in Design view), select Add Column, and then add a TemplateColumn with no header text.
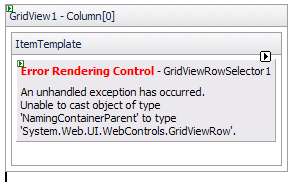
To get the designer up that allows you to drag an element into the template field, select the Common Functions menu again for your GridView, then select “Edit Templates”. You should be able to select the ItemTemplate for your template column and drag the GridViewRowSelector into the appropriate box on the designer. Do not worry that it displays an error – this is simply because I haven’t yet added an appropriate control designer that deals with the design mode. I may do this later, but feel it’s not necessary since the control displays correctly at design time outside of template editing.

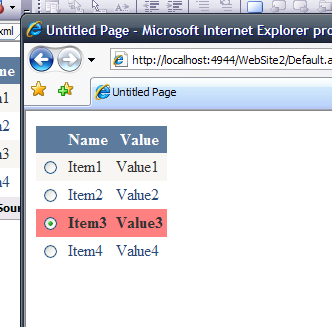
If you set the GridView's SelectedRow style to display with a different background colour, then your selected row will be highlighted in the colour as well (as shown in the picture at the top of the article).
Points of Interest
The hoops that had to be jumped through to get this working really stem from one major problem in the GridView control: the absence of a SelectRow function that allows you to select a row and fire the GridView.SelectionChanged event. If you can make do without the GridView.SelectionChanged event, then the process of creating a control to select the row isn’t too bad. You can just catch the CheckedChanged event of your RadioButton, update the GridView.SelectedIndex with the row number that the radio button belongs to, and away you go. However, I like using the GridView.SelectionChanged event in my pages to display subsidiary data (particularly now that AJAX is in the mix) so, since I’ll be using this control quite a bit, I really don’t want to work that particular piece of functionality.
Since there isn’t a GridView.SelectRow method and there isn’t a way of invoking the SelectionChanged event on the GridView since it’s protected, the only way I could realistically think to do this was to create a client-side onClick event handler that would fire in exactly the same way as the Select link of the GridView itself, thus fooling it into thinking its own Select link had been clicked.
Of course, you can’t just fire the same JavaScript command to impersonate a postback from the Select link as ASP.NET provides measures against this for security reasons (such as preventing XSS attacks), so you need to register the postback link.
The simple bit was keeping radio button display in line with that of the selected row. The server control itself is just an extended radio button that updates its own Checked property during the Render event by navigating up its control parent hierarchy to reach the GridView row that it’s contained by, then casting to a GridViewRow object and using the Selected property of the row.
