Introduction
With the release of .NET Framework 3.0, Microsoft introduced a new file format called XPS (XML Paper Specifications) with the .Xps extension. This file format was thought of as a standard for documents portability; in fact, XPS documents can be read on every system without having installed the originating application (as it is for PDF documents).
.NET Framework 3.x fully supports this kind of documents which can be created and manipulated with extreme precision. Manipulating this kind of documents via code (particularly writing) is not often simple, especially if you need to add pictures, thumbnails, digital signatures, and other supported contents.
Even if the .NET Framework 3.x exposes several classes to read, write, and manage XPS documents, in this article, I want to show you how to create XPS documents starting from Microsoft Word 2007 documents (.docx and .doc formats) with very few steps.
In fact, we can create XPS documents by writing a few lines of Visual Basic 2008 code and referencing Visual Studio Tools for Office main assemblies. We’ll see this in action inside a WPF application. Two are the prerequisites you must adhere to: you need to have Microsoft Word 2007 installed and the XPS/PDF exporter add-in.
Using the code
First of all, open Visual Studio 2008 and create a new WPF Application for Visual Basic. Then, add a reference to the following assemblies:
- ReachFramework.dll
- Microsoft.Office.Interop.Word.dll
- Microsoft.Office.Tools.v9.0.dll
- Microsoft.Office.Tools.Word.v9.0dll
- Microsoft.VisualStudio.Tools.Office.Runtime.v9.0.dll
As you can understand, we’re adding a reference to all VSTO assemblies for Visual Studio 2008 but without creating an Office solution.
On the presentation layer, we want to let the user choose a Word 2007 document by clicking a button and automatically show the exported document from within a WPF DocumentViewer control. The following XAML code could accomplish this:
<Window x:Class="Window1"
  xmlns="http://schemas.microsoft.com/winfx/2006/xaml/presentation"
  xmlns:x="http://schemas.microsoft.com/winfx/2006/xaml"
  Title="Window1" Height="300" Width="300">
    <Grid>
<Grid.RowDefinitions>
<RowDefinition Height="40"/>
<RowDefinition></RowDefinition>
</Grid.RowDefinitions>
        <DocumentViewer Grid.Row="1" Name="DocumentViewer1" />
        <Button HorizontalAlignment="Left"
           Margin="10,10,10,5" Name="Button1"
           Height="25" Width="150">
              Select a document</Button>
    </Grid>
</Window>
Then, we can go to write managed code. First of all, we have to add the following Imports directives:
Imports Microsoft.Office.Interop.Word
Imports Microsoft.Win32
Imports System.Windows.Xps.Packaging
Second, we could write a method to export to XPS the Word document selected by the user. Comments within the code should be helpful:
Private Function exportAsXps(ByVal fileName As String) As Boolean
Try
‘documents collection
Dim wordInstance As New _
Microsoft.Office.Interop.Word.Application
wordInstance.Documents.Add(fileName)
‘replacing the extension with.Xps
Dim outputName As String = _
String.Concat(IO.Path.GetDirectoryName(fileName), "\", _
IO.Path.GetFileNameWithoutExtension(fileName), ".xps")
‘and saves specifying name and format
Dim doc As Document = wordInstance.ActiveDocument
doc.SaveAs(outputName, WdSaveFormat.wdFormatXPS)
wordInstance.Quit()
Dim xpsDoc As New XpsDocument(outputName, IO.FileAccess.Read)
DocumentViewer1.Document = xpsDoc.GetFixedDocumentSequence
Return True
Catch ex As Exception
MessageBox.Show(ex.ToString, "", _
MessageBoxButton.OK, MessageBoxImage.Information)
Return False
End Try
End Function
Once we have our method, using it is really simple. We can call it from the Click event handler for the button we implemented to select a Word document:
Private Sub Button1_Click(ByVal sender As System.Object, _
ByVal e As System.Windows.RoutedEventArgs) Handles Button1.Click
Dim ofd As New OpenFileDialog
Dim result As Nullable(Of Boolean)
With ofd
.Title = "Select a Word document"
.Filter = "Documents|*.docx;*.doc|All files|*.*"
result = .ShowDialog
If result = True Then
Dim exportResult As Boolean = exportAsXps(.FileName)
End If
End With
End Sub
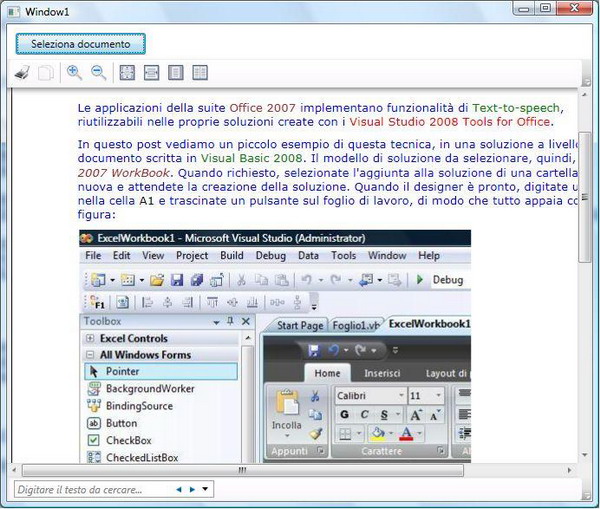
The above picture shows the result of the conversion of a .docx (Word 2007) document of mine.
Points of Interest
With very few lines of code and without having Microsoft Word executing, we can create XPS documents from our Word contents, even when very articulated. The code can be surely enhanced, but I think it can be a good starting point if you’re interested in this kind of operations.
Using this technique, you can export documents not only to XPS but also to all formats which are supported by Microsoft Word 2007.
