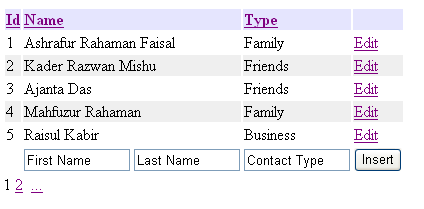
Introduction
ASP.NET 3.5 introduces a new data binding control named the ListView. ASP.NET already has a lot of data bind controls; it should be more than 10. But the good news is, ListView can literally replace all other data binding controls in ASP.NET. ListView control makes data binding easier than previous controls. It has included styling with CSS, flexible pagination, and sorting, inserting, deleting, and updating features.
Complete ListView

In this article, I will describe features in ListView step by step with related code review.
- Data binding
- Data pager
- Sorting
- Insert, update and delete
DataBinding
The ListView is a template driven control which means that it will not render anything. By default, the developer must completely specify the HTML he/she wants to render in the form of templates. To show data in ListView control, you need to take a LayoutTemplate (to define top level of HTML for output rendering). To show data, you need to take ItemTemplate and AlternativeItemTemplate to show alternative row as with different CSS. Here is the example of simple data binding with AlternativeItemTemplate.
//very simple databinding in ListView
<LayoutTemplate>
 <table border="0" cellpadding="1">
  <tr style="background-color:#E5E5FE">
   <th align="left"><asp:LinkButton ID="lnkId" runat="server">Id</asp:LinkButton></th>
   <th align="left"><asp:LinkButton ID="lnkName" runat="server">Name</asp:LinkButton></th>
   <th align="left"><asp:LinkButton ID="lnkType" runat="server">Type</asp:LinkButton></th>
   <th></th>
  </tr>
  <tr id="itemPlaceholder" runat="server"></tr>
 </table>
</LayoutTemplate>
<ItemTemplate>
  <tr>
   <td><asp:Label runat="server" ID="lblId"><%#Eval("ID") %></asp:Label></td>
   <td><asp:Label runat="server" ID="lblName"><%#Eval("FirstName")+"
	"+Eval("LastName") %></asp:Label></td>
   <td><asp:Label runat="server" ID="lblType"><%#Eval("ContactType") %></asp:Label></td>
   <td></td>
  </tr>
</ItemTemplate>
<AlternatingItemTemplate>
  <tr style="background-color:#EFEFEF">
   <td><asp:Label runat="server" ID="lblId"><%#Eval("ID") %></asp:Label></td>
   <td><asp:Label runat="server" ID="lblName"><%#Eval("FirstName")+" "+
	Eval("LastName") %></asp:Label></td>
   <td><asp:Label runat="server" ID="lblType"><%#Eval("ContactType") %></asp:Label></td>
   <td></td>
  </tr>
</AlternatingItemTemplate>
Here Layout template is making header of the control, and ItemTemplate is showing data taken from table by Binding columns with Label controls, and AlternativeItemTemplate does the same as ItemTemplate just changing CSS for alternative columns.
DataPager
To add pagination in the listview, you need to add an asp:DataPager control, better to put this control inside LayoutTemplate at the end of the LayoutTemplate. DataPager control has many options to show pagination and these are useful too. Here I have just used a simple one.
<asp:DataPager ID="ItemDataPager" runat="server" PageSize="5">
    <Fields>
         <asp:NumericPagerField ButtonCount="2" />
    </Fields>
</asp:DataPager>
Sorting
It is very easy to sort data in ListView. Sort functionality is defined in the CommandArgument property of the button that contains the columns to be sorted. It occurs when a button with its CommandName property set to Sort is clicked. And you need to make a call to the Sort method named onsorting="ListView1_Sorting".
// to allow sort if click on the header of the table make
//table header controls clickable
//and give commandname and commandargument
<tr style="background-color:#E5E5FE">
 <th align="left"><asp:LinkButton ID="lnkId" runat="server"
	CommandName="Sort" CommandArgument="ID">Id</asp:LinkButton></th>
 <th align="left"><asp:LinkButton ID="lnkName" runat="server"
	CommandName="Sort" CommandArgument="FirstName">Name</asp:LinkButton></th>
 <th align="left"><asp:LinkButton ID="lnkType" runat="server"
	CommandName="Sort" CommandArgument="ContactType">Type</asp:LinkButton></th>
 <th></th>
</tr>
Insert, Update and Delete
To insert data into ListView, you need to add a tag in ListView named InsertItemTemplate. Add to add inserted code, add code in ItemCommand.
HTML Code
<InsertItemTemplate>
    <tr runat="server">
        <td></td>
        <td>
        <asp:TextBox ID="txtFname" runat="server"
		Text='<%#Eval("FirstName") %>' Width="100px">First Name</asp:TextBox>
        <asp:TextBox ID="txtLname" runat="server"
		Text='<%#Eval("LastName") %>' Width="100px">Last Name</asp:TextBox>
        </td>
        <td><asp:TextBox ID="txtCtype" runat="server"
	Text='<%#Eval("ContactType") %>' Width="100px">Contact Type</asp:TextBox></td>
        <td><asp:Button ID="InsertButton" runat="server"
		CommandName="Insert" Text="Insert" /></td>
    </tr>
</InsertItemTemplate>
CS Code
In the CS file, insert this code in ItemCommand:
if (e.CommandName == "Insert")
{
    TextBox txtFname = (TextBox)e.Item.FindControl("txtFname");
    TextBox txtLname = (TextBox)e.Item.FindControl("txtLname");
    TextBox txtCtype = (TextBox)e.Item.FindControl("txtCtype");
    string insertCommand = "Insert into [Contacts]
	    ([FirstName],[LastName],[ContactType]) Values('" + txtFname.Text + "', '"
                 + txtLname.Text + "', '" + txtCtype.Text + "');";
    SqlDataSource1.InsertCommand = insertCommand;
}
In the same way, code for Update and Delete will be done using EditItemTemlpate. Please check the attached source files to get the complete code.
History
- 24th March 2008: First version of the article
