Contents
File hashes are used to verify the authenticity and integrity of files - especially
those transmitted over the internet. When downloading a file from MSDN for instance,
you are presented with the SHA-1 Hash - a list of seemingly random characters and
numbers that are generated using the SHA-1 encryption algorithm to uniquely identify
that file. If even a single bit of that file is changed, the hash itself will change.
Most importantly, it is nearly impossible to create a different file that will produce
the same hash, making spoofing unfeasable.
But the question remains, how can I easily verify that hash against the file that
I actually downloaded? This article will present a window shell extension that gives
you easy access to the hash of any file quickly and easily.
There are two coding concepts covered in this article. The first is cryptographic
hash and the second is windows shell extensions. The cryptographic hash, of which
there are many different algorithms, produces the digital fingerprint of a file.
The .NET Framework provides 6 System.Security.Cryptography.HashAlgorithm implementations that can be used for
generating the digital fingerprint: MD5, SHA-1,SHA-256,SHA-384,SHA-512 and RIPEMD-160.
The two most commonly used when downloading a file are MD5 and SHA-1. Windows shell
extensions take us beyond the comfortable realm of managed code and force us to
implement COM to integrate into the unmanaged world of Win32. For this
element of the utility,code is pulled directly from Dino Esposito's article
Manage with the Windows Shell: Write Shell Extensions with C#. Dino's explanation
of the COM interfaces and sample code were invaluable to this project. To really
understand the implemention of a shell extension, I highly recommend his article.
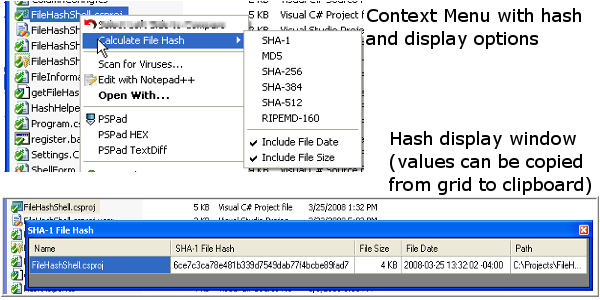
With the integration into the Windows Explorer context menu, generating the hash
as simple as selecting one or more files then right-clicking to display the context
menu. From this menu, you can select which type of file hash you want to generate
by selecting the sub-menu option. You will then be presented with a window containing
the file name, the hash that you selected, plus the full path to the file(s) that
you selected. This DataGridView table allows for selecting of the desired values
and copying to the clipboard if you need to publish the hash value. It's that easy!
Generating a file hash is a very straighforward task. In the code sample below,
the specific implementation of the HashAlgorithm abstract type is created based
on a user selected HashType enumeration value. Next, using a System.IO.FileStream object, the file is opened and streamed into the
HashAlgorithm object to let it do its magic. The resulting Byte array is then put into a StringBuilder so that the hash string
can be returned to the calling object.
public static string GetFileHash(string filePath, HashType type)
    {
        if (!File.Exists(filePath))
            return string.Empty;

        System.Security.Cryptography.HashAlgorithm hasher;
        switch(type)
        {
            case HashType.SHA1:
            default:
                hasher = new SHA1CryptoServiceProvider();
                break;
            case HashType.SHA256:
                hasher = new SHA256Managed();
                break;
            case HashType.SHA384:
                hasher = new SHA384Managed();
                break;
            case HashType.SHA512:
                hasher = new SHA512Managed();
                break;
            case HashType.MD5:
                hasher = new MD5CryptoServiceProvider();
                break;
            case HashType.RIPEMD160:
                hasher = new RIPEMD160Managed();
                break;
        }
        StringBuilder buff = new StringBuilder();
        try
        {
            using (FileStream f = new FileStream(filePath, FileMode.Open, FileAccess.Read, FileShare.Read, 8192))
            {
                hasher.ComputeHash(f);
                Byte[] hash = hasher.Hash;
                foreach (Byte hashByte in hash)
                {
                    buff.Append(string.Format("{0:x2}", hashByte));
                }
            }
        }
        catch
        {
            return "Error reading file." + new System.Random(DateTime.Now.Second * DateTime.Now.Millisecond).Next().ToString();
        }
        return buff.ToString();
}
 public enum HashType
    {
        [Description("SHA-1")]
        SHA1,
        [Description("SHA-256")]
        SHA256,
        [Description("SHA-384")]
        SHA384,
        [Description("SHA-512")]
        SHA512,
        [Description("MD5")]
        MD5,
        [Description("RIPEMD-160")]
        RIPEMD160

    }
The trick comes in when you want to be able to right-click on the file in Windows explorer and generate the hash. This is where Dino Esposito's expertise comes in. By modifying the code found in his article, I was
able to hook into the shell context menu and add my menu option along with the sub-menu selections for the various hash types. This code can be found in the FileHashShellExt.cs file in the sample project.The key element for
this integration are the
IContextMenu interface. The first method,
QueryContextMenu, in conjunction with a shell32
DragQueryFile method allows you to interrogate the number and type of files that were
selected to determine if the custom menu option should be added. The second method,
InvokeCommand provides back the information on the sub-menu item selected so that you can execute the proper hash type.
Now that you have your code ready to go, you need to make Windows aware of your
utility. This is handled via the registry. It's easy enough to register an assembly
for COM interop, but how do you let Windows know what exactly it's supposed to do
with it? By implementing the
System.Runtime.InteropServices.ComRegisterFunctionAttribute attribute along with the
RegisterServer method. This method will get executed when
you register the assembly with regasm.exe to add the needed registry entries that tell the Windows Shell to accept the new extension and present the context menu option for all files.
[System.Runtime.InteropServices.ComRegisterFunctionAttribute()]
static void RegisterServer(String str1)
{
try
{
RegistryKey root;
RegistryKey rk;
root = Registry.LocalMachine;
rk = root.OpenSubKey("Software\\Microsoft\\Windows\\CurrentVersion\\Shell Extensions\\Approved", true);
rk.SetValue(guid.ToString(), "FileHash shell extension");
rk.Flush();
rk.Close();
root = Registry.ClassesRoot;
rk = root.CreateSubKey("*\\shellex\\ContextMenuHandlers\\FileHash");
rk.SetValue("", guid.ToString());
rk.Flush();
rk.Close();
}
catch(Exception e)
{
System.Console.WriteLine(e.ToString());
}
}
There is an associated method
UnregisterServer that is called when you unregister the assemply with regasm.exe and the "/u" flag to remove the registry entries. If you install the
Shell extension via the demo project installer, all
of this is taken care of for you. If you choose to download the code and install
it manually, you can use the register.bat and unregister.bat files respectively
(you'll want to check that the paths to regasm.exe and gacutil.exe are correct for
your environment.
