Introduction
To start with I am posting an example which enable developer to expose the
WF as Web Service,
so that the Client from any domain can use this work flow capability as a service.
The other options that are available with windows work flow and web
servicein VS 2008 are:
1) Windows Work flow can consume a Webservices.
2) By Using "WebServiceFaultActivity" from the toolbox, we can emit
fault message to the client
post exception handling.
In my next articles I would be covering the same.
Background
(Optional) Is there any background to this article that may be useful
such as an introduction to the basic ideas presented?
Using the code
A brief description of how to use the article or code. The
class names, the methods and properties, any tricks or tips.
Blocks of code should be set as style "Formatted"
like this:
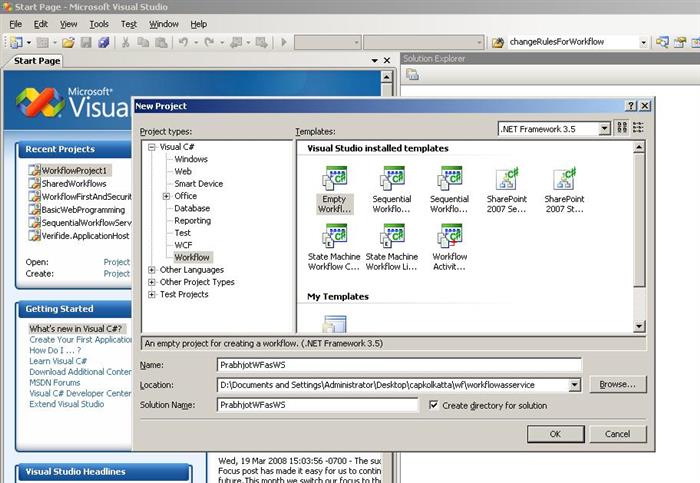
First Create a Empty Project in Visual Studio 2008, name it "PrabhjotWFasWs".

Fig 1
Add a class "Mathservice.cs" to our project, and declare a Interface
name "MathService",
with a Method name as "DivideNumber" inside the same file.

Fig 2.
Defining Interface is mandatory, as here the Interface MathService, with a method,will get associated with
the "webServiceInput" activity
from the tool box),in the Workflow. This Interface method will take the shape
of "Webmethod" from Webservice point of view and the "WebserviceInput" acitivity would behave as a gate
for input parameter for the Work flow for getting activated and initialized.
Therefore probably this is first time,we are saying goodbye to Dictionary
Object as input parameter.
Next step is to add a workflow type "sequentialWorkFlow with codeseparation", into our project and
name it "WorkflowasService.xoml".
Then drag three activities in the same order- WebserviceInput,codeactivity, WebServiceOutput.
Now we will set the properties of the activities. Select the WebserviceInput shape and press f4,
to view the property window.
In the Property window of the Webserviceinput activity, we click the
eclipse next to interfacetype selection option,
kindly select our interface name as "MathService", and select Method name as "DivideNumber", post this we
would expend the parameters tree in the same property window.It will expand to "Dividend" and "Divisor" parameters.
As shown in Fig 3 and Fig 4

fig3

Fig4
Next select the eclipse associated with the "Dividend" parameter. In the Pop
Out window select the option
"Bind to a new Member", assign "A", to new member name and also select a "create Property" option, as shown in Fig. 5
This will result in creation of a declarative property in the view code of the workflow.

Fig 5
Similarly for the another parameter "Divisor", again select the "Bind to a new member",
assign "B", to New member name, and select the create Property option as shown in Fig 6.

Fig 6
Make sure that in the property window, we change the property of "IsActivating" to "true" .Similarly we Select the
Webserviceoutputactivity1 shape and open its property windows, We will create a new Property "C",and bind it to
the Return Value Property as shown in Fig.7 Plus make sure we assign WebserviceInputactivity1 to the InputActivityname property.
Each webserviceoutput activity would be linked with one webserviceinput activity. Fig 7

Fig7
Now we have to add the action the code Activity, where the real division activity takes place. For which double
click the codeactivity shape in the Workflow and type this code c=a/b. fig 8

Fig 8
Now we are done all you have to do is to first Build the project and the right click on the project
name in the Solution explorer and click on “Publish as webservice”. Fig 9.

Fig 9
Once you are done will see that a new project file is created in the same solution explorer with a .asmx file,
set it as startup project and run the project you will get a familiar Web service testing page. Fig 10 and Fig 11.

Fig 10

Fig 11
Use the "var" button to to wrap Variable or class names in
<code> tags like this.
Points of Interest
Did you learn anything interesting/fun/annoying while writing
the code? Did you do anything particularly clever or wild or zany?
History
Keep a running update of any changes or improvements you've
made here.
