Updated with links of Design Patterns, .NET Best Practices & Model View Presenter
The 3 Musketeers: - Model, View and Controller using ASP.NET MVC – Part 2
Introduction and Goal
Pre-requisite
Installing the ASP.NET MVC
What’s our goal?
Model the easy musketeer
The second musketeer the view
The Controller – the heart of ASP.NET MVC
Download Code
This is my second article in learn MVC step by step. In my previous article we had discussed how we can develop MVC application in ASP.NET using HttpHandler. In case you have missed the first part I have given the link below. I am sure Httphandler is a tough way to implement MVC, but if you have understood the concept then you have understood the basics of implementing MVC. Ok, now good news in VS 2008 we have a something readymade given by Microsoft ASP.NET community the ASP.NET MVC. In this section we will discuss step by step how we can use the ASP.NET MVC to build the three Musketeer’s Model, View and Controller. It’s a clean approach and easy to build upon as it encapsulates the HttpHandler implementation for MVC, thus bringing in simplicity.
The three Musketeers part 1 (Do read it to clear your fundamentals of how you can develop MVC using core ASP.NET ) HTTPHandler.aspx
Other Articles
For Design Patterns, click here
For .NET Best Practices, click here
For Model View Presenter, click here
We would suggest you to read the concept of MVC and HttHandlers to understand this tutorial more appropriately HTTPHandler.aspx . To understand the concept of HttpHandler and module you can read my HttpModuleandHttpHandle.aspx article.
This article does not discuss the concept of MVC so please read the previous article to basics of MVC.
The first thing you need to do is download the ASP.NET MVC setup from Microsoft link given below.
http://www.microsoft.com/downloads/details.aspx?FamilyId=A24D1E00-CD35-4F66-BAA0-2362BDDE0766&displaylang=en
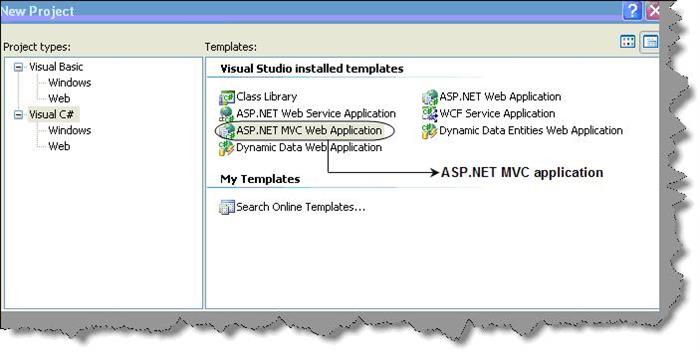
Once you setup the same you should see a MVC solution in your VS 20008 project templates.

We will take a simple example of a customer view. Below is a visual view of things and how it will move. If the action is Home, Home.aspx page will be shown with two links: one is to view customer with sales and the other is to view customer without sales. If the action is ‘ViewCustomersWithOutSales’, it will display a simple view where the customer details are shown without sales figure. If the action is ViewCustomerWithSales, it will show a display of customer with its sales figure.

nce you create the MVC project you will see that solution has three folder controllers, views and model. So we have added a ‘clsCustomer’ class which will load dummy customers in the list. In real projects this class will actually connect to the DAL component to get the data.

All pages in ASP.NET MVC inherit from ‘ViewPage’. So to create a view in ASP.NET MVC we need to select the MVC view page as shown below.

If you have read the principles of MVC the controller loads the model. So there should be a mechanism by which the model data should be sent to the view. That’s done by using ‘ViewData’.

Below is the code for view ‘ViewCustomerWithOutSales’ ASPX behind code. You can see that the page is inherited from ‘ViewPage’ class. Second we have taken the customer data from the ‘ViewData’ and binded the data to a data grid.
namespace MvcApplication.Views.Customers
{
public partial class ViewCustomerWithoutSales : ViewPage
{
protected void Page_Load(object sender, EventArgs e)
{
dtgWithoutSales.DataSource = (clsCustomers) ViewData["Customers"];
dtgWithoutSales.DataBind();
}
}
} |
Same we have done for ‘ViewCustomerWithSales’. The same way we have made ‘Home.aspx’. It does not have any model as such.
To create a controller class you can add an item and take the controller template as shown in the below figure. Note to add the controller class in the controller folder.

The controller class naming convention is bit driven by a naming convention. The main purpose of the controller class is to map the action to the view. So the class name maps with the folder where the view is stored and the ASPX page name maps with the function in the customer controller. For instance the ‘ViewCustomerWithOutSales’ will call the view ‘ViewCustomerWithOutSales.aspx’.

The naming convention is driven by how the routes are registered in the global.asax file. Below is the code snippet which shows how the routing is mapped. So it’s the controller name , the folder name and the ID. We will understand later what is the use of ID.
public static void RegisterRoutes(RouteCollection routes)
{
routes.IgnoreRoute("{resource}.axd/{*pathInfo}");
routes.MapRoute(
"Default", // Route name
"{controller}/{action}/{id}", // URL with parameters
new { controller = "Home", action = "Home", id = "" } // Parameter defaults
);
} |
As we know the role of controller is that to load the model and the call the view. You can see from the below code snippet it has loaded the customers model and passed the same in the ‘ViewData’ to the ASPX behind code.
public ActionResult ViewCustomerWithOutSales()
{
clsCustomers objCustomers = new clsCustomers();
objCustomers.LoadCustomers();
ViewData["Customers"] = objCustomers;
return View();
} |
In the same manner we have coded for other controller.
So when we call the URL http://localhost:1935/Home/Home you will see the below figure.

So when we call http://localhost:1935/Customer/ViewCustomerWithOutSales action you will see the below page with out sales.

When we go to URL http://localhost:1935/Customer/ViewCustomerWithSales you will see the data with out sales.

You can download the code Click here
For further reading do watch the below interview preparation videos and step by step video series.
