
Introduction
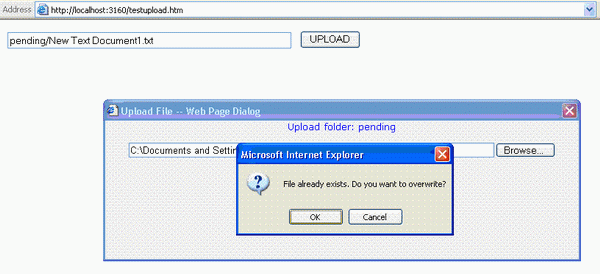
This ASP.NET application is a file uploader dialog box that can be called from classic ASP. It is designed for use in an intranet site. The file uploader displays an overwrite warning as a popup or a warning message. The overwritten file is archived with a time stamp appended to the filename. Checking if the file already exists turned out to be the biggest obstacle. The FileExists Java function uses an ActiveX control that causes browser security warnings. The workaround was to access a code-behind routine by calling AJAX Web Services.
Background
I needed a file uploader dialog box for my ASP Classic intranet site but I couldn't find anything that met my needs. I wanted to prompt the user before overwriting an existing file. Also, I wanted the selected filename to be displayed after the upload was complete. It seems that the FileUploader control clears the filename after uploading a file. I also needed the old file to be archived for the user.
Using the code
Open the project only if you have already installed AJAX.
This project requires IE6, ASP.NET 2.0, AJAX, and JavaScript. The project is self contained with all the needed files and images to run as a demo. Directory permissions must be correctly set on the server to allow the Internet guest account to write to the directories.
Variables must be set in the sample HTML page and in the web.conf to match your needs. Be sure you set testupload.htm as the startup page for the project.
The code can be published into a subdirectory on the website by changing the root directory setting in the web.conf file. Don't forget to set the virtual directory to ASP.NET.
Parent HTML page JavaScript code
The parent page can be any HTML or ASP page in the website that calls the file uploader dialog. The IE routine uses the showModalDialog window opener to display the dialog. Non-IE browsers will use the regular window.open function. The file name is returned to the parent page to populate the textbox with either the full server path or a partial path according to the web.conf setting.
The calling arguments are set in the parent page to control the function of the overwrite prompt. The overwrite prompt can be set to a popup, non-popup message, or no prompt. The old file will be archived with a date/time stamp if the archive location is set.
var btestNonIE = false;
var sReturnForm = "edit_Content";
var sReturnField = "FileName";
var sUploadFolder = "pending";
var sOverwritePrompt = "popup"
var sArchiveFolder = "archive/december";
function Upload() {
var rValue="";
var sOptions = "status=no, resizable= no, scrollbars= no, " +
"toolbar= no,location= no, menubar= no'";
var sFormSize = "";
if (navigator.appName == "Microsoft Internet Explorer"
&& btestNonIE != true) {
sOptions = "status:no; unadorned:yes; " +
"scroll:no; help:no; resizable:no; toolbar:no";
var sRequests = "?folder=" + sUploadFolder;
sRequests += "&archive=" + sArchiveFolder;
sRequests += "&overwrite=" + sOverwritePrompt;
rValue = showModalDialog('FileUploader.aspx' + sRequests +
'', 'FileUploader','dialogHeight:220px; dialogWidth:650px;' +
sOptions + '');
if (rValue != undefined) {
update_field(rValue,sReturnForm,sReturnField);
}
}else{
var sRequests = "?folder=" + sUploadFolder;
sRequests += "&archive=" + sArchiveFolder;
sRequests += "&retForm=" + sReturnForm;
sRequests += "&retField=" + sReturnField;
sRequests += "&overwrite=" + sOverwritePrompt;
window.open('FileUploader.aspx' + sRequests +
'','FileUploader', 'height=220, width=650," +
sOptions + "');
}
}
function update_field(sNewValue,sForm,sField)
{
eval("document." + sForm + "[sField].value = sNewValue;");
}
The ASP.NET code-behind for the Web Method FileExists routine
This code is called by the ASP.NET program's JavaScript listed below. We can now use the System.IO library to check if the file exists on the server. No browser security warning messages will display because the server side code is being called.
<WebMethod()> _
Shared Function CheckFileExists(ByVal FileName As String) As Boolean
If (System.IO.File.Exists(FileName)) Then
Return True
Else
Return False
End If
End Function
ASP.NET default page code using JavaScript for the FileExists routine
This JavaScript code is in the default.aspx page. Using AJAX Web Methods, we can now call server side code from client side code. When the user clicks on the file upload button, the JavaScript calls the above code-behind and checks if the file exists. The user is prompted, or a warning message displays in the file uploader dialog.
This could be done by using JavaScript, but the browser security settings on the PC must allow JavaScript ActiveX without prompting the user. Web Methods allow client side code to run native VB.NET code on the server.
There are two Web Methods calls. One for the popup, and one for the warning message that displays in a label control. The page is submitted after the user clicks OK to overwrite and the file is uploaded.
Hidden variables are used to transfer data between the JavaScript and the code-behind routines.
function CheckFileExists(){
var sOverwrite = document.frmUploadFile.hOverwrite.value;
var sDestFolder=document.frmUploadFile.hDestFolderPath.value;
var sUploadFile=document.getElementById('uploadFile').value;
var sDestFilePathName=GetDestFileName();
if (sOverwrite == "none" || sOverwrite == "" ||
sOverwrite == "message") {
PageMethods.CheckFileExists(sDestFilePathName,FileExistsCallBackNoMessage);
return false;
}
document.getElementById("hFileExists").value="false";
if(sDestFilePathName.length == 0) {return false}
if (sOverwrite == "popup") {
PageMethods.CheckFileExists(sDestFilePathName,FileExistsCallBack);
}
return false;
}
function FileExistsCallBack(result){
if(result) {
if(confirm("File already exists. Do you want to overwrite?")) {
document.getElementById("hFileExists").value="true";
__doPostBack('btnSave','');
}
}
else
__doPostBack('btnSave','');
}
function FileExistsCallBackNoMessage(result){
if(result) {
document.getElementById("hFileExists").value="true";
}
__doPostBack('btnSave','');
}
function FileExistsCallBackMessage(result){
if(result) {
var objUploadLabelMessage=document.getElementById("lblUploadMessage");
var objSaveButton=document.getElementById("btnSave");
document.getElementById("hFileExists").value="true";
EnableSaveButton();
objSaveButton.src="Images/btnOverwrite.jpg";
var objButtonCancel=document.getElementById("btnCancel");
objButtonCancel.src="Images/blank.gif";
var objButtonCancelOverwrite=document.getElementById("btnCancelOverwrite");
objButtonCancelOverwrite.src="Images/btnCancel.jpg";
objUploadLabelMessage.style.forecolor="orangered";
objUploadLabelMessage.innerText="Caution! Destination File exists." +
" Click Overwrite to replace or Cancel.";
document.frmUploadFile.imgBeforeMessage.disabled=false;
document.frmUploadFile.imgBeforeMessage.src="Images/icon_caution.gif";
}
}
function GetDestFileName(){
var sDestFolder = document.frmUploadFile.hDestFolderPath.value;
var sUploadFile = document.getElementById('uploadFile').value;
var sDestFilePathName = sDestFolder + "\\" + FileNameFromPath(sUploadFile);
return sDestFilePathName;
}
Conclusion
Run the demo project and change the settings to see how the file uploader dialog functions. The project code contains many remarks to help with the logic. Not all code is shown above. This is the only way I could find to get around the browser security messages.
