Introduction
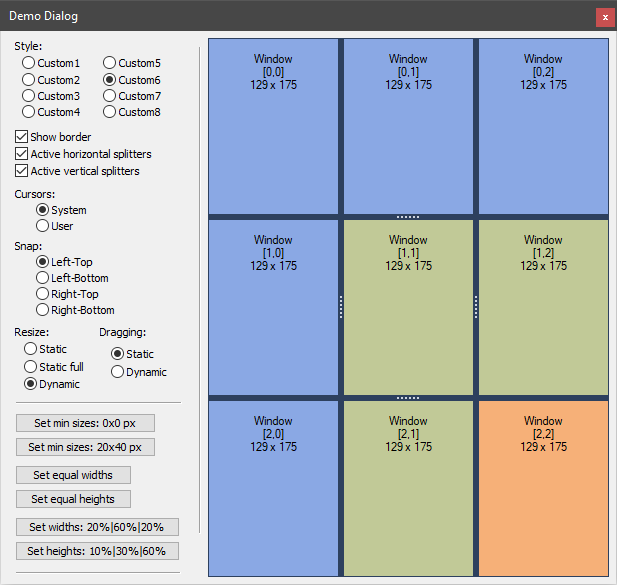
This control is necessary for the partition of the dialog, main or child window of your program by several parts. You can appropriate to each part the window, which SplitterCtrl will manage. As a result, we will get a matrix with the controls. The SplitterCtrl is derived from CWnd and is a common control based on MFC. Generally, SplitterCtrl is similar to CSplitterWnd, but it is easier to use. For example, you can create a complex matrix. For this into one or several cells, it is necessary to put the SplitterCtrl and also to divide on parts.
Also, the binding of a matrix to one of four angles of the parental window is possible. And you can use a mouse for the dynamic or static pulling of boundaries between the windows and more.
Using the Code
The control includes classes:
| Class | Description |
| SplitterCtrl
| Includes all the base functionality, but it does not draw itself.
|
| SplitterCtrl::IRecalc
| This class makes it possible to assign sizes of parts of the control. For using be inherited from SplitterCtrl::IRecalc and realize its functions. Also in constructor of your class, it is necessary to call the SplitterCtrl::SetRecalcManager function with pointer of SplitterCtrl::IRecalc object.
|
| SplitterCtrl::Draw
| This class makes it possible to draw the control. You can draw your window yourself. For this be inherited from SplitterCtrl::Draw and realize its functions. Also in the constructor of your class, it is necessary to call the SplitterCtrl::SetDrawManager function with pointer of SplitterCtrl::Draw object.
|
To create the control and add elements to it, do the following:
#include "SplitterCtrl.h"
SplitterCtrlEx<SplitterCtrlStyle1> m_Splitter;
CListCtrl m_List1, m_List2;
…
…
if( !m_Splitter.Create(this, WS_CHILD | WS_VISIBLE, CRect(0,0,200,200), ID_SplitterCtrl) )
return -1;
if( !m_List1.Create(WS_CHILD | WS_VISIBLE | WS_CLIPCHILDREN | LVS_REPORT, CRect(0,0,0,0),
&m_Splitter,ID_List1) ||
!m_List2.Create(WS_CHILD | WS_VISIBLE | WS_CLIPCHILDREN | LVS_REPORT, CRect(0,0,0,0),
&m_Splitter,ID_List2) )
return -1; m_List1.InsertColumn(0,"00",LVCFMT_LEFT,100);
m_List2.InsertColumn(0,"01",LVCFMT_LEFT,100);
m_Splitter.AddRow();
m_Splitter.AddColumn();
m_Splitter.AddColumn();
m_Splitter.SetWindow(0,0,m_List1.m_hWnd);
m_Splitter.SetWindow(0,1,m_List2.m_hWnd);
if( !m_Splitter.LoadState(AfxGetApp(),"SplitterCtrl","SplitterState") )
{ m_Splitter.Update(); m_Splitter.SetColumnsEqualWidth(); }
m_Splitter.Update();
You can manage the control as a normal matrix, dynamically insert and delete rows and columns (AddRow/AddColumn, InsertRow/InsertColumn, DeleteRow/DeleteColumn). The control makes it possible to assign the sizes (SetColumnWidthForStatic/SetRowHeightForStatic, SetColumnWidthForDynamic/SetRowHeightForDynamic), and also to equalize widths and heights of the cells (SetColumnsEqualWidth/SetRowsEqualHeight). The control is expected to call the Update function to show the results that are set by functions InsertRow, DeleteColumn, SetRowHeightForStatic, SetColumnWidthsForDynamic, etc. Also, you can save and load state of the control from the registry or other sources (LoadState/SaveState). To know all the possibilities, look at the opened interface of the SplitterCtrl class.
Good luck!
History
- 24th December, 2008: Initial version
- 16th March, 2021: Update
