Introduction
This article explains how to make a change password feature in MOSS 2007, so the user can change his/her password. This article doesn't describe how to enable FBA (Forms Based Authentication) in MOSS that you can find easily in different blogs and articles in the internet. I suggest this article on The Code Project: MOSS 2007 – Enabling Forms Authentication [^].
Problem
When you enable forms authentication on MOSS, it means that users credentials are stored in membership database like ASP.NET database. MOSS doesn't facilitate the user to change his/her password in this database.
Solution
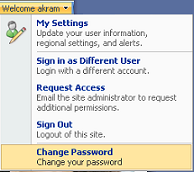
Our suggested solution is adding a new feature (Change Password feature) in the standard user menu:

The feature redirects the user to a custom page (ChangePassword.aspx) that prompts him to enter current and new passwords.

Solution Details
If you are not interested to walk through the solution, you can use the attached files and go directly to Part III Deployment. Actually I got the solution from Sheetal Jain's blog [^] but I added details and clarifications.
The following steps explain the solution in detail:
- Creating ChangePassword.aspx
- Creating
ChangePassword feature - Deployment
1. Creating ChangePassword.aspx
You can do it using Visual Studio by creating a new web site ‘TempSite’ and then:
Adding a new web form ‘ChangePassword.aspx’
Dragging a ChangePassword control form the toolbox to the form
Setting control effective properties like (NewPasswordRegularExpressionErrorMessage, CancelDestinationPageUrl, ContinueDestinationPageUrl)
Applying MOSS master page, by setting ‘MasterPageFile’ page property to your selected master page in MOSS like ‘~/_layouts/simple.master’, then removing all HTML tags and adding content tag for the master page content place holder (PlaceHolderMain for the main content in the middle of the page). The final page should be like this page:
<%@ Page Language="C#" MasterPageFile="~/_layouts/simple.master"  %>

<asp:Content ID="Content1" ContentPlaceHolderId="PlaceHolderMain" runat="server">
<asp:ChangePassword id="myChangePassword"
	newpasswordregularexpressionerrormessage="Error:
	Your password must be at least 7 characters long,
	and contain at least one number and one special character."
runat ="server" CancelDestinationPageUrl="~/pages/default.aspx"
ContinueDestinationPageUrl="~/pages/default.aspx" >
</asp:ChangePassword>

</asp:Content>
2. Creating ChangePassword Feature
Before you start, here is a good tutorial for creating custom features in MOSS [^]:
Create a new folder ‘ChangePassword’ and create a new XML file in it ‘feature.xml’:
="1.0"="utf-8"
<Feature Id="FEAD7555-AE6D-45DD-8260-13B563CB4C71"
Title="Change Password"
Description="Change Password"
Version="1.0.0.0"
Scope="Site"
xmlns="http://schemas.microsoft.com/sharepoint/">
<ElementManifests>
<ElementManifest Location="elements.xml" />
</ElementManifests>
</Feature>
Edit feature Id to a unique GUID, you can get it from guidgen in this path C:\Program Files\Microsoft Visual Studio 8\Common7\Tools\guidgen.exe
Edit feature Title, Description and Version as per your need
Edit Scope property to be ‘Site’ or ‘Web’ to indicate if the feature is used per site or in the entire web
In ElementManifest element, set Location property to an XML file location ‘elements.xml’ that contains more feature properties
Create ‘elements.xml’ in the same folder with ‘feature.xml’ to be as:
="1.0"="utf-8"
<Elements xmlns="http://schemas.microsoft.com/sharepoint/">
<CustomAction
Id="ChangePasswordMenuId"
Title="Change Password"
Description="Change your password"
Sequence="2000"
Location="Microsoft.SharePoint.StandardMenu"
GroupId="PersonalActions" >
<UrlAction Url="~site/_layouts/changepassword.aspx"/>
</CustomAction>
</Elements>
Set CustomAction properties as shown, Location to be ‘StandardMenu’ and UrlAction URL property to be ‘~site/_layouts/changepassword.aspx’ as we are going to add our ChangePassword.aspx to this path.
3. Deployment
Copy ‘ChangePassword.aspx’ file to the following path:
C:\Program Files\Common Files\Microsoft Shared\web server extensions\12\TEMPLATE\LAYOUTS\
Copy ‘ChangePassword’ folder that contains elements.xml and feature.xml to the following path: C:\Program Files\Common Files\Microsoft Shared\web server extensions\12\TEMPLATE\FEATURES\
Open stsadm tool and run the following command:
stsadm -o installfeature -name ChangePassword

Now the feature is installed successfully, but needs to be activated.
Open your site, the select Site Actions - Site Settings - Modify All Site Settings.
From the appeared page, select Site Collection Features (under the Site Collection Administration submenu):

The new feature will be listed, Select Activate.

Now you can find ‘Change Password’ action in the standard user menu:

And this action redirects to changepassword.aspx page:

That is all. Thanks a lot!
Thanks
Many thanks to Ahmad Marwan Madkhana for his support.
History
- 28th December, 2008: Initial post
