Download testTimePicker.zip - 1.23 MB

Introduction
This project is tested only on IE9, ASP.NET 4.0. The Time Picker User Control was developed exclusively for an Intranet site so cross-browser compatibility was not required. The User Control is written VB.NET.
This article shows how to create and add a custom Ajax Time Picker Extender User Control to an ASP.NET application. I didn't have the time to write a Ajax TimeExtender so I decided on using the Ajax Popup Extender and Datalist controls to quickly create a reusable Time Picker. I based the User Control style on the article by Farhan Ejaz that was incompatible with my ASP.NET 4.0 web application. I got the idea of building the Time Picker using an existing Ajax Control from the article by rperetz.
Background
I needed a quick Time Picker control as I began to upgrade existing projects to Dotnet 4.0 and finding my existing control was not compatible with Framework 4.0. I was surprised to find out that the existing Ajax Control Tool Kit did not include a Time Picker Control. Searching the internet didn't turn up any satisfactory Time Pickers so I decided to write a quick custom user control. Unfortunately, vb.net namespaces do not play nice with adding User Controls so an edit to the Inherits line has to made each time the control is added. There are some good articles that explain how to convert a User Control into a Server Control but I didn't have time to investigate this option.
Using the code
Download the project file from the link at the top of this article. Open the project only if you have already installed Visual Studio 2010 or above. The project is self contained with all the needed files and images to run the demo.
Remember to change the Inherits line in the ascx page to the root namespace of your project if adding just the User Control to an existing project.
Adding Time Picker Control to Parent Page
- Copy the User Control Directory to the Web Project.
- Edit the Inherits line in the aspx page of the User Control to point to your projects root namespace. This is usually the name of your VB.NET project.
- Compile the project.
- Add the code to register the User control on the parent page.
- Drag the Ajax Script Manager control and Update Panel onto the parent page.
- Add a Textbox to the parent page.
- Add the Time Picker Extended control using the tag prefix. Intellisense should show the control if it was added correctly to the project.
- Set the Time Picker's TargetControlID to the Textbox ID.
- Set the properties for the Time Picker control.
- Compile and run the project.
<%@ Register Src="CustomControls/TimeExtender.ascx" TagName="TimeExtender" TagPrefix="cc1" %>

<asp:textbox runat="server" id="txtStartTime" />

<ccl:timeextender runat="server" targetcontrolid="txtStartTime" id="TimeExtender1">
Time Picker Control ASCX Source Code
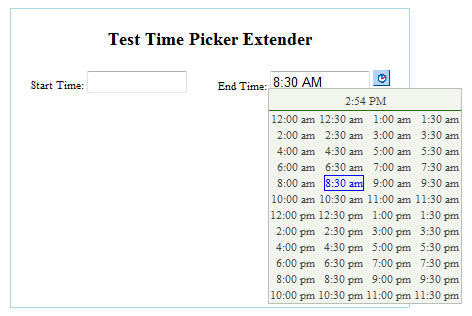
The User Control main page was created by simply adding an Image Button, PopupControlExtender, and Datalist to the ascx page. The Datalist is populated by a dataview that contains the times. A MinuteInterval property allows the Time Picker to display different time intervals. The ShowAMandPM property allows the TimePicker to show only AM or PM or both. The current time is selected by clicking on the time in the heading. Note that there is no Ajax Script Manager or Update Panel on the ASCX page because the Parent page handles these functions.
<asp:ImageButton ID="ibtnShowPicker"
    ImageUrl="btnTimeExtenderBlue.gif"
    OnClientClick="return false;"
    CssClass="btnTimeExtender_Style"
    runat="server" />

     <asp:DataList ID="datalistTimes"
        RepeatDirection="Horizontal"
        RepeatColumns="4"
        OnItemDataBound="datalistTimes_OnItemDataBound"
        CssClass="Datalist_ControlStyle"
        HeaderStyle-CssClass="Datalist_HeaderStyle"
        ItemStyle-CssClass="Datalist_ItemStyle"
        runat="server" >

        <HeaderTemplate>
            <div class="Datalist_HeaderLeft">
            </div>
            <div class="Datalist_HeaderCenter">
            <asp:LinkButton ID="lbtnHeaderTime"
                OnCommand="lbtnHeaderTime_OnCommand"
                ToolTip="click to select current time"
                runat="server" />
            </div>
            <div class="Datalist_HeaderRight">
            <asp:LinkButton ID="lbtnHeaderAM"
                Text="AM"
                OnCommand="lbtnHeaderAM_OnCommand"
                CommandArgument="am"
                runat="server" />
            <asp:LinkButton ID="lbtnHeaderPM"
                Text="PM"
                OnCommand="lbtnHeaderPM_OnCommand"
                CommandArgument="pm"
                runat="server" />
            </div>
        </HeaderTemplate>

        <ItemTemplate>
        <asp:LinkButton ID="lbtnTime"
            CommandName="second"
            OnCommand="lbtnTime_Onclick"
            CommandArgument='<%# Eval("Time") %>'
            Text='<%# Eval("Time") %>'
            runat="server"/>
        </ItemTemplate>
    </asp:DataList>
Time Picker Control Code Behind
The code behind populates the Datalist control by adding times to a Dataset and using the Dataset as the Data Source. A Linkbutton control displays the times allowing the click events to be captured. Times are returned to the parent control using the Popup control's comment. A special routine (SetParentControlValue) had to be added to populate the parent control if a time button is displayed. Textboxes and labels are the only controls setup in the code. Additional controls must be added in the code behind in order for them to work with the Time Picker.
Conclusion
Additional Ajax controls can be created in the same way as the Time Picker control from existing Ajax controls. This technique speeds up development but causes extra work when adding custom controls to existing projects. All the files in the custom User Control must be copied to the project and the root namespace must be set to the projects namespace.
