Introduction
This article introduce a way to built customized QuickLaunch Menu using sitemap provider & deploy it though feature.
Background
Share Point provides left navigation bar with conventional fly-out menu.Sometime the user may need to change the look and feel of left navigation menu item content.At the same time customized menu must be flexible enough to deploy it easily.

Using the code
Steps 1. Define a new Custom XML Provider under tag named “<providers>” in the web.config
<siteMap defaultProvider="CurrentNavSiteMapProvider" enabled="true">
<providers>
<add name="CustomXmlContentMapProvider" siteMapFile="_app_bin/mainMenu.sitemap"
type="Microsoft.SharePoint.Navigation.SPXmlContentMapProvider, Microsoft.SharePoint,
Version=12.0.0.0, Culture=neutral, PublicKeyToken=71e9bce111e9429c" />
</providers>
Steps 2. Create a new .sitemap file in “\_app_bin “folder of virtual directory (i.e topMenu.sitemap)
="1.0"="utf-8"
<siteMap>
<siteMapNode title="At Work Resources" url="/">
<siteMapNode title="Booking Travel" url="http://moss2007/_layouts/viewlsts.aspx?BaseType=1">
<siteMapNode title="America" url="http://www.google1.com"/>
<siteMapNode title="Asia/Australia" url="http://www.google2.com"/>
<siteMapNode title="Europe" url="http://www.google3.com"/>
</siteMapNode>
<siteMapNode title="Branding" url="#">
<siteMapNode title="Brand" url="http://www.google5.com"/>
<siteMapNode title="Branding Guidelines" url="http://www.google6.com"/>
<siteMapNode title="Logos" url="http://www.google71.com"/>
<siteMapNode title="Templates" url="http://www.google72.com"/>
</siteMapNode>
<siteMapNode title="Commonly Used Terms" url="http://www.google711.com"/>
<siteMapNode title="Communities" url="#!">
<siteMapNode title="All Communities" url="www.dasdsa.com"/>
<siteMapNode title="Communities With Web Sites" url="http://www.gdfgd.com">
<siteMapNode title="Women's Environment" url="http://www.erterer.com"/>
<siteMapNode title="BizTalk Server" url="http://www.hksada.com"/>
<siteMapNode title="Commerce Server" url="http://www.hkhk.com"/>
<siteMapNode title="Delivery Management" url="http://www.sdffdsfds.com"/>
<siteMapNode title="Diversity and Inclusion" url="http://www.fsafds.com"/>
<siteMapNode title="Project Workspace" url="http://www.fsddsfsdfds.com"/>
</siteMapNode>
</siteMapNode>
</siteMapNode>
</siteMap>
Step 3. Open your site master page and create a new <asp:Delegatecontrol /> just below the default Quick Launch Menu delegate control & bind this newly created delegate control to Quick Launch ASP Menu control
<SharePoint:DelegateControl runat="server" ControlId="XmlQLNavigationDataSource">
<Template_Controls>
<asp:SiteMapDataSource id="xmlQLSiteMap" ShowStartingNode="true"
    SiteMapProvider="SPNavigationProvider" runat="server" />
</Template_Controls>
</SharePoint:DelegateControl>

<SharePoint:AspMenu id="QuickLaunchMenu" DataSourceId="xmlQLSiteMap"
    runat="server" Orientation="Vertical" StaticDisplayLevels="2" ItemWrap="true"
    MaximumDynamicDisplayLevels="3" StaticSubMenuIndent="0" SkipLinkText="">
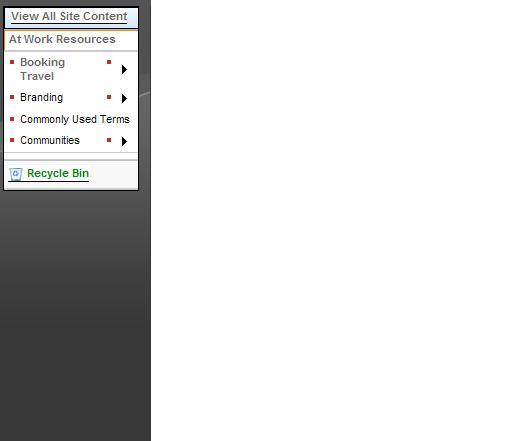
Step 4. Once you do appropriate changes in the master page, quick launch will show all the content from the .sitemap file.
Scroll up to view final outcome of your quick launch.
Step 5.Moss 2007 empowered with Feature which has capability of deploying user action using a piece of xml files. In the real world scenario user may ask to deploy customized quick launch by feature.
Let’s built a new feature to deploy sitemap bounded quick launch. Create a new folder under “C:\Program Files\Common Files\Microsoft Shared\web server extensions\12\TEMPLATE\FEATURES\” & create two xml file
1 feature.xml
2.<file name>.xml
feature.xml :
="1.0"="utf-8"
<Feature Id="541F5F57-C847-4e16-B59A-B31E90E6F9ED" Title="Customized Navigation"
Scope="Site" Hidden="False" DefaultResourceFile="core"
ReceiverAssembly="Microsoft.SharePoint.Publishing, Version=12.0.0.0, Culture=neutral, PublicKeyToken=71e9bce111e9429c"
ReceiverClass="Microsoft.SharePoint.Publishing.NavigationFeatureHandler"
xmlns="http://schemas.microsoft.com/sharepoint/" >
<ElementManifests>
<ElementManifest Location="filename.xml" />
</ElementManifests>
</Feature>
filename.xml:
<!— Comments
XmlQLNavigationDataSource: ID of newly created Delegate Control
xmlQLSiteMap: ID of ASP Menu control
CustomXmlContentMapProvider: custom xml provider defined in the web.config file
-->

<Elements xmlns="http://schemas.microsoft.com/sharepoint/">
<Control Id="XmlQLNavigationDataSource" Sequence="25"
ControlClass="System.Web.UI.WebControls.SiteMapDataSource"
ControlAssembly="System.Web, version=2.0.3600.0, Culture=neutral, PublicKeyToken=b03f5f7f11d50a3a">
<Property Name="SiteMapProvider">CustomXmlContentMapProvider</Property>
<Property Name="ShowStartingNode">true</Property>
<Property Name="ID">xmlQLSiteMap</Property>
</Control>
<HideCustomAction Id="QuickLaunch" HideActionId="QuickLaunch" GroupId="Customization"
    Location="Microsoft.SharePoint.SiteSettings" />
</Elements>
Step 6. Once you built these two xml files under the C:\Program Files\Common Files\Microsoft Shared\web server extensions\12\TEMPLATE\FEATURES\<Your Folder Name>, use stsadm command to install feature & at last restart your IIS to reflect the changes in your site.
Points of Interest
While figuring out this solution, I felt Microsoft SharePoint team is always trying to make their products better to meet end user requirements, and I believe we will be able to see Microsoft's implementation on this issue in the next version.
History
I will keep updating as I dig into the SharePoint world. In fact, there are lots of issues like this. I think Microsoft may make WSS 3.0 much better if they get more time before publishing the next version.
