Introduction
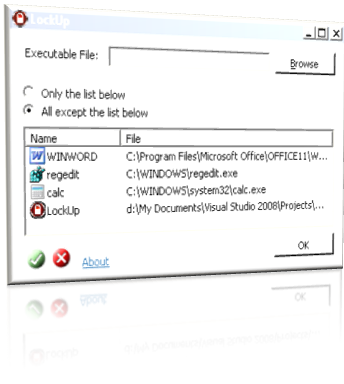
The purpose of this article is to show you hot to restrict the execution of some applications and allow others in Windows XP.
Disclaimer
THE AUTHOR MAKES NO WARRANTIES ABOUT THE USAGE OF THIS ARTICLE OR ANY PARTS OF ITS CONTENTS AND ACCEPTS NO RESPONSIBILITY FOR ANY DATA LOSS OR OTHER SYSTEM TROUBLE THAT MAY OCCUR FROM THIS USAGE OF ANY CONTENTS OF THIS ARTICLE.
Background
I realize it may be a bit awkward to start the article with such a disclaimer, but you should be careful when it comes to playing around with the Registry.
This application manages a certain key that allows/disallows the execution of applications listed under those keys for the HKCU, which means, all the modifications are only applied to the currently logged user.
The Windows Registry is a database which stores settings and options for Microsoft Windows Operating Systems. It contains information and settings for hardware, Operating System software, most non-Operating System software, and per-user settings. The Registry also provides a window into the operation of the kernel, exposing runtime information such as performance counters and currently active hardware.
As the main purpose of this article is to handle certain keys within the Registry, I will only discuss relative code blocks. The following initiates three main keys:
strKeyExplorer = @"Software\Microsoft\Windows\CurrentVersion\Policies\Explorer";
strKeyRestrictRun =
  @"Software\Microsoft\Windows\CurrentVersion\Policies\Explorer\RestrictRun";
strKeyDisallowRun =
  @"Software\Microsoft\Windows\CurrentVersion\Policies\Explorer\DisallowRun";

keyExplorer = Registry.CurrentUser.OpenSubKey(strKeyExplorer, true);
keyRestrictRun = Registry.CurrentUser.CreateSubKey(strKeyRestrictRun,
                          RegistryKeyPermissionCheck.ReadWriteSubTree);
keyDisallowRun = Registry.CurrentUser.CreateSubKey(strKeyDisallowRun,
                          RegistryKeyPermissionCheck.ReadWriteSubTree);
The first key path stored in strKeyExplorer is used to open the Explorer key within the Registry which is the key where we set the main two values for the application. You are advised to open the Registry editor and navigate to the relative key path to notice the changes as they are made, as illustrated in the snapshot below:

The main values that we are concerned about in this article are:
You can see there are two other keys branched from Explorer that hold the exact names of those values inside the key. The process is simply to enable either of the values inside the Explorer key by setting it to 1, or disable it by setting it to 0.
Note: when the two values are enabled, the DisallowRun takes control and overrides the RestrictRun value.
Going back to the two keys branched from Explorer, you can see the application names are simply listed under each key so when their equivalent value under Explorer are enabled, the listed applications under that key are simply Allowed/Disallowed!
Let's take a closer look and open the DisallowRun key and see what it contains:

Using the code
An application is added to the list by the following function:
private void btnAdd_Click(object sender, EventArgs e)
{
    if (txtFileLocation.Text.Length > 0 && File.Exists(txtFileLocation.Text))
    {
        string[] splitted = txtFileLocation.Text.Split('\\');
        string strExists = Convert.ToString(keyRestrictRun.GetValue(
                                   txtFileLocation.Text,"None"));
        if (strExists == "None")
        {
            keyRestrictRun.SetValue(txtFileLocation.Text, splitted[splitted.Length - 1],
                                    RegistryValueKind.String);
            keyDisallowRun.SetValue(txtFileLocation.Text, splitted[splitted.Length - 1],
                                    RegistryValueKind.String);

        }
        else
            MessageBox.Show("File already in the list",
                            "Duplicate application file",
                            MessageBoxButtons.OK, MessageBoxIcon.Error);
        txtFileLocation.Text = String.Empty;
    }
    else
        MessageBox.Show("Please browse for a valid program file first.",
                        "Invalid or incomplete file name",
                        MessageBoxButtons.OK, MessageBoxIcon.Error);

    RefreshList();
    load_image_list();
}
And removed using the following:
private void btnRemove_Click(object sender, EventArgs e)
{
    if (listView1.SelectedIndices.Count > 0)
    {
        try
        {
            keyRestrictRun.DeleteValue(
              listView1.Items[listView1.SelectedIndices[0]].SubItems[1].Text);
            keyDisallowRun.DeleteValue(
              listView1.Items[listView1.SelectedIndices[0]].SubItems[1].Text);
            listView1.Items[listView1.SelectedIndices[0]].Remove();
        }
        catch (Exception) { }
    }

    RefreshReg();
    RefreshList();
    load_image_list();
}
Finally, and after adding the desired application to the keys, we need to set either to disable or enable those listed under both keys, using the following code:
private void RefreshReg()
{
    if (rdOnly.Checked)
    {
        keyExplorer.SetValue("RestrictRun", 0, RegistryValueKind.DWord);
        keyExplorer.SetValue("DisallowRun", 1, RegistryValueKind.DWord);

        try
        {
            keyRestrictRun.DeleteValue(strSrcFile);
        }
        catch (Exception) { }
    }
    else
    {
        keyExplorer.SetValue("RestrictRun", 1, RegistryValueKind.DWord);
        keyRestrictRun.SetValue(strSrcFile, assName, RegistryValueKind.String);

        keyExplorer.SetValue("DisallowRun", 0, RegistryValueKind.DWord);
    }
}
Points of interest
You may be interested in the visual effects of this application like extracting the icons of the listed applications. Well, this is done using:
private void load_image_list()
{
    imglst_SmallIcons.Images.Clear();
    imglst_LargIcons.Images.Clear();

    string[] strValueNames = keyRestrictRun.GetValueNames();
    string tmp = String.Empty;

    foreach (string s in keyRestrictRun.GetValueNames())
    {
        try
        {
            ExtractIconEx(s, 0, largeIcon, smallIcon, 1);
            imglst_SmallIcons.Images.Add(Icon.FromHandle(smallIcon[0]));
            imglst_LargIcons.Images.Add(Icon.FromHandle(largeIcon[0]));
        }
        catch (Exception)
        {
            ExtractIconEx("shell32.dll", 0, largeIcon, smallIcon, 3);
            imglst_SmallIcons.Images.Add(Icon.FromHandle(smallIcon[2]));
            imglst_LargIcons.Images.Add(Icon.FromHandle(largeIcon[2]));
        }
    }
}
And, as for the moving buttons, you can simply add an image to your solution that has the larger size of both states, and simply change the PictureBoxSizeMode property for your control.
private void btnAdd_MouseEnter(object sender, EventArgs e)
{
    btnAdd.SizeMode = PictureBoxSizeMode.StretchImage;
}

private void btnAdd_MouseLeave(object sender, EventArgs e)
{
    btnAdd.SizeMode = PictureBoxSizeMode.CenterImage;
}
Another interesting workaround is that you can simply rename an executable file with the name of one of those listed in the keys! Can you believe that this trick can be that stupid after all!
A suggested remedy (just in case!)
Just in case your Windows gets screwed, and as the effects are only applied to the current user, you can always create a new user account and save those files stored in the screwed account, unless of course you are activating the NTFS on that account!
