Introduction
This article will show how the Unit Testing in VS2008 works and what features are available to everyone.
Background
There are other Unit Testing tools that perform similar functions. One that I have used in the past as many of you have used as well is NUnit. There are other ones that do deviations of Unit Testing as well, such as MBUnit.
Adding the Tests
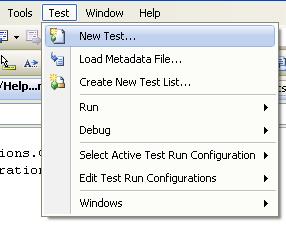
Once you have a project that works and has class files, you can create a Unit Test. To start, we need to create the basic tests. A Unit Test can be created from the Test menu.

Once you select the menu item, this dialog will be displayed

The options are:
- Ordered Test – this will create a test where you set the order of the Unit Tests you desire
- Unit Test – this will create a .cs file; you can then decide what tests you want done
- Unit Test Wizard – A wizard will appear so you can select what classes you want to have in your Unit Test
Unit Test Wizard
If you select the Unit test wizard, this dialog will appear so you can select what classes will be tested:

With this dialog, you now have the ability to select what class methods you want to be Unit Tested. One thing you should be aware of is this dialog will show all methods and properties. It will also show methods you may not want to test. It is up to you to select the right ones to be tested. Before you create the first Unit Test, a test project will be created as shown.

Once you select the methods, the wizard will create the source file(s). There will be a source file for each class that you have selected to be tested. An example of the source code the wizard generates is shown below:
[TestMethod()]
[HostType("ASP.NET")]
[AspNetDevelopmentServerHost("C:\\MyProjects\\backup\\Simple\\SimplePhotos",
"/SimplePhotos")]
[UrlToTest("http://localhost/SimplePhotos")]
public void RescanAlbumIdTest()
{
Rescan_Accessor target = new Rescan_Accessor();
int Albumid = 0;
int expected = 0;
int actual;
actual = target.RescanAlbumId(Albumid);
Assert.AreEqual(expected, actual);
Assert.Inconclusive("Verify the correctness of this test method.");
}
As you can see, the arguments are set with default values; for the test to be completely effective, you must fill in the values that fit your requirement. After you set the correct values, you can run your project as a normal project. The final testing results will appear in the window as shown below.

Unit Tests
The Unit Test option will create a source file that will contain the following code snippet:
[TestMethod]
public void TestMethod1()
{
}
You must fill TestMethod1 to do the tests you need to perform. You can add more tests to test the methods you want tested. This is very similar to NUnit where you write what tests you want to have done.
Ordered Test
When this option is selected, this dialog will appear so you can select what test(s) you want to run and in what sequence:

You will see all of the available tests on the left side. Pick a test and press the button to move it over to the right side. After you have all of your tests listed on the right side, you can move them up or down if the order is not what you had planned. As you make your selections, they are saved in the file OrderedTest1.orderedtest or a similarly formatted name. To edit the list, double click the file to bring it up and then you can make changes. This ordered list will be executed as part of the regular Unit Tests; it is just executed in the order you have designated.
Points of Interest
Once you start the Unit Testing process, you must make sure you keep up with it. Run the tests as part of each build. As new classes or methods are made, you must also create new Unit Tests. When you modify any methods, make sure you also modify the tests. As outlined by chamindu in the article Integrating Visual Studio Team System 2008 Unit Tests with CruiseControl.NET, you can add these to the Cruise control nightly build procedure. For best results, you should have your methods you are testing in a separate assembly. This way you are using the same assembly you are testing for the real project. It also makes the testing easier. An interesting thing to note is each time you run the test, a directory named something like tmp6B.tmp.testgen will be created for each run in the \Local Settings\Temp directory of the user you are logged in as. As far as I can see, they are not cleaned up, so watch this. This directory contains a copy of your entire source tree, so make sure you do not have extremely large files in it as well. In my case, I had a database file which I did an attach in the connection string and the test copied all the files each time I ran the test. I was lucky it was not a large database file.
History
- 11 May 2009 - initial release.
