Introduction
Superfish is an enhanced Suckerfish-style menu jQuery plugin that takes an existing pure CSS drop-down menu so it degrades gracefully without JavaScript)(Superfish). What makes the Superfish a very good plugin is that in addition to being based on pure CSS, whenever you need a good RTL menu you could use Superfish. Here, you can find a good article about How to RTLing Superfish Menu (jQuery Plugin).
So Superfish works great. Let's make it better by adding jQuery UI Theme to it. Here, you can find the complete documents about How to using jQuery UI.
Getting jQuery UI Theme
First, let's download a jQuery UI Theme from here.
After you have selected the theme and downloaded it, you should have a file like this "jquery-ui-1.10.1.custom.zip". Extract it and you will find the folders as below:
- css
- custom-theme ( your selected Theme name)
images - jquery-ui-1.10.1.custom.css
jquery-ui-1.10.1.custom.min.css
- development-bundle (we have nothing to do with this)
- js
jquery-1.9.1.js - jquery-ui-1.10.1.custom.js
jquery-ui-1.10.1.custom.min.js
- index.html
Adding jQuery UI to Superfish
Now, download (A zip archive for Superfish is available here: superfish-master.zip) the superfish plugin with its example. When you extract the zip file, you will find folder "<code>superfish-master" that contains:
- css
- superfish.css
- superfish-navbar.css
- superfish-vertical.css
- images
- js
- hoverIntent.js
- jquery.bgiframe.min.js
- jquery-1.9.0.min.js
- superfish.js
- supersubs.js
- example.html
You should delete "jquery-1.9.0.min.js" from folder js and add "jquery-1.9.1.min.js" and "jquery-ui-1.10.1.custom.min.js" from jQuery UI Theme folder, instead of it. Also add "images" and "jquery-ui-1.10.1.custom.min.css" from css folder of jQuery UI to css folder of superfish. Your superfish folders should be something like this:
- css
images jquery-ui-1.10.1.custom.min.css - superfish.css
- superfish-navbar.css
- superfish-vertical.css
- images
- js
- hoverIntent.js
- jquery.bgiframe.min.js
jquery-1.9.1.min.js jquery-ui-1.10.1.custom.min.js - superfish.js
- supersubs.js
- example.html
Now we have all stuffs that we need.
Open "superfish.css" for editing and search for "/*** DEMO SKIN ***/". As we want to add jQuery UI theme to superfish then we don't need any CSS that sets any color or background or border to superfish, so we replace everything there with just:
.sf-menu {
float: left;
margin-bottom: 1em;
}
.sf-menu a {
border: none;
padding: .75em 1em;
text-decoration:none;
}
Now open "example.html" for editing . We must add "jquery-ui-1.10.1.custom.min.css" stylesheet and "js/jquery-1.9.1.min.js" , "js/jquery-ui-1.10.1.custom.min.js" JavaScripts to "example.html" , so add these tags:
<link rel="stylesheet" type="text/css" href="css/jquery-ui-1.10.1.custom.min.css" media="screen">
<script type="text/javascript" src="js/jquery-1.9.1.min.js"></script>
<script type="text/javascript" src="js/jquery-ui-1.10.1.custom.min.js"></script>
and remove this (we have deleted "
jquery-1.9.0.min.js" before)
<script type="text/javascript" src="js/jquery-1.9.0.min.js"></script>
also :
- We need to add "
ui-state-default" class to "ul.sf-menu li"
$("ul.sf-menu li").addClass("ui-state-default");
(You could find about "addClass" in addClass and about "sf-menu" in here.)
- We need to add "
ui-state-hover" class to "ul.sf-menu li" when the mouse pointer enters "ul.sf-menu li" and remove "ui-state-hover" class when the mouse pointer leaves "ul.sf-menu li".
$("ul.sf-menu li").hover(function () { $(this).addClass('ui-state-hover'); },
                         function () { $(this).removeClass('ui-state-hover'); });
(You could find about "hover" in hover )
so your script should be something like this:
<script type="text/javascript">
jQuery(function(){
jQuery('#example').superfish({
});
$("ul.sf-menu li").addClass("ui-state-default");
$("ul.sf-menu li").hover(function () { $(this).addClass('ui-state-hover'); },
function () { $(this).removeClass('ui-state-hover'); });
});
</script>
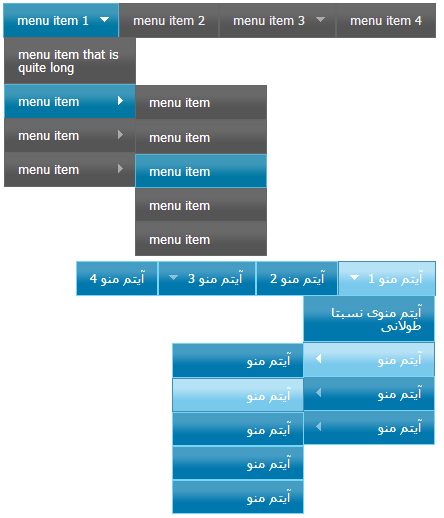
OK, the job is down. Now open "example.html" with a web browser and see the result. Your menu should be something like this:

Adding jQuery UI to Superfish RTL
For making Superfish Menu RTL, you need to do more steps. First from here download Superfish RTL (A zip archive for Superfish RTL is available here: jquery.superfish.zip). When you extract the zip file, you will find folder "rtling-superfish" that contains:
- css
- superfish.css
- superfish-navbar.css
- superfish-navbar-rtl.css
- superfish-rtl.css
- superfish-vertical.css
- superfish-vertical-rtl.css
- images
- arrows-ffffff.png
- arrows-ffffff-rtl.png
- shadow.png
- js
- index.html
We need to copy "superfish-navbar-rtl.css" , "superfish-rtl.css" and "superfish-vertical-rtl.css" to css folder and also, opening "superfish-rtl.css" for editing and replacing "/*** DEMO SKIN ***/" section by:
.sf-menu {float:right;}
In order, to be properly Superfish RTL Menu displayed in IE7 ,IE6, We need to add the folowing code to "superfish-rtl.css" :
.sf-menu{ width:100%;}
.sf-menu.sf-vertical {width:10em;}
.sf-menu li a {position:static;}
Also copy arrows-ffffff-rtl.png to images folder.
Your superfish folders for RTL Menu should be something like this:
- css
- images
- jquery-ui-1.10.1.custom.min.css
- superfish.css
- superfish-navbar.css
superfish-navbar-rtl.css superfish-rtl.css - superfish-vertical.css
superfish-vertical-rtl.css
- images
- arrows-ffffff.png
arrows-ffffff-rtl.png - shadow.png
- js
- hoverIntent.js
- jquery.bgiframe.min.js
- jquery-1.9.1.min.js
- jquery-ui-1.10.1.custom.min.js
- superfish.js
- supersubs.js
- example.html
Now open "example.html" for editing. We must add "superfish-rtl.css", so add this tag:
<link rel="stylesheet" type="text/css" href="css/superfish-rtl.css" media="screen" />
May be add "superfish-vertical-rtl.css" or "superfish-navbar-rtl.css" stylesheets, if you need vertical or navbar menu:
<link rel="stylesheet" type="text/css" href="css/superfish-vertical-rtl.css" media="screen" />
<link rel="stylesheet" type="text/css" href="css/superfish-navbar-rtl.css" media="screen" />
Also find <ul class="sf-menu" id="example"> and put it in <div style="direction: rtl;"> or something like it.
OK, the job again is down. Now open "example.html" with a web browser and see the result. Your menu should be something like this:

History
- First version of this tip is about adding jQueryUI 1.8.23 to Superfish-1.4.8
- Previous version is about adding jQueryUI 1.10.1 to Superfish v1.5.8
References
- Superfish
- RTLing Superfish Menu
- jQuery UI
- addClass
- hover
