Introduction
In the Part 3 of the tutorial, I will explain the process of sending data from the workflow to the task form (InfoPath). In Part 2 of the tutorial I explained retrieving the data from InfoPath form in the workflow by using the Extended Properties of the Task Properties. We will use the Task Properties object to send the data from our workflow to the InfoPath Form.
Implementation
To send the data to the InfoPath form we will need a XML file named ItemMetadata.xml. The file ItemMetadata.xml is case-sensitive, so make sure the file name is exactly the same. This file defines the task schema.
SharePoint pushes the task data to the edit form on load event of the form. We will add the ItemMetadata.xml as secondary data source to our InfoPath form. Irrespective of any use of the ItemMetadata.xml, this file should always be added as the secondary data source.
Creating the ItemMetadata.xml
To create the ItemMetadata.xml, in your task editor add the below XML Element.
<z:row xmlns:z="#RowsetSchema"/>
Each property which is to be pushed from the SharePoint Workflow to the InfoPath Form will be added inside the above XML Element.
To add the property, add an attribute starting with ows, then add a '_', followed by the name of the task element. I have defined the content of ItemMetadata.xml as below.
<z:row xmlns:z="#RowsetSchema"
ows_title=""
ows_technology=""
ows_experience=""
/>
Adding the File as Secondary Data Source
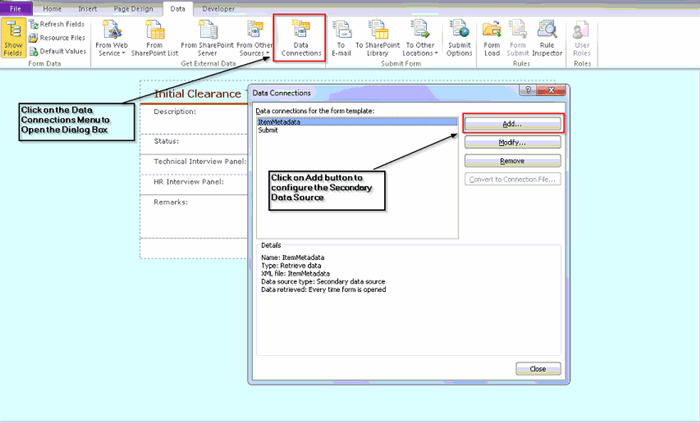
Open the InfoPath Form in Design mode. In the Data Tab, click on Data Connection Menu. On the Data Connection Dialog box, click on Add to configure the Secondary Data Source.
The next step of the wizard takes in information about the type of the connection. Select the Receive data radio button and click on Next.
In next window, Select the XML document radio button, and click on Next.
Now browse the ItemMetadata.xml file on the file system, and click on Next.
In the Next step, select Include the data as a resource file in the form template, and click Next.
The data connection should be named ItemMetadata. Check the Automatically retrieve data when form is opened check box, and click Finish. Now the ItemMetadata.xml file is embedded as a resource file in the InfoPath form. Hence, ItemMetadata.xml is not required to be deployed with the workflow. I have added the file in the Forms folder of the Workflow just for reference.

Bind Controls to Task Schema
On the InfoPath form, drop the controls you want to bind to the task schema. In the sample, I have used text box control to bind the data. To ensure that the task data is not changed, I have made it read-only and change the background color of the text box control to grey.
Right click the control, and click on Text Box Properties. On the Dialog box, select the Data Tab and click the Formula button next to Default Value text box.
On the Insert Formula dialog box, click on Insert a Field or Group. On the Select a Field or Group dialog box, select ItemMetadata connection in Fields drop-down list. Now select the field in that data connection to which you want to data-bind your control, and Click OK. Close all the Dialog boxes by clicking OK.

Configuring the Visual Studio Workflow
In the workflow, we will have to pass the data to the InfoPath form in the MethodInvoking event of the Task, i.e. when we are creating the task. We will use the ExtendedProperties dictionary to upload the data to the InfoPath Form. Use the below code to add the values to ExtendedProperties.
if (listItem != null)
{
       this.createTaskInitialClearanceTaskProperties.ExtendedProperties["ows_title"]
                        = listItem["Title"].ToString();
       this.createTaskInitialClearanceTaskProperties.ExtendedProperties["ows_technology"]
                        = listItem["Technology"].ToString();
       this.createTaskInitialClearanceTaskProperties.ExtendedProperties["ows_experience"]
                        = listItem["Experience"].ToString();
}
Deploy the workflow.
