Introduction
The scope of this article is to introduce the basics of XML-RPC communication by demonstrating an application written in Visual C# .NET and Java. The application is a self running demonstration using features of the java.awt.Robot class provided by the Java2 SDK (j2sdk1.4.2) and a user interface (UI) developed in Visual C# .NET.
The downloadable source code provided includes the example application. I am using Visual Studio .NET 2003 with Framework SDK 1.1 to create this example.
Pre-Requisites
This article assumes the reader to have j2sdk1.4.2 (At least j2sdk1.4) and .NET Framework SDK 1.1 installed on his machine. This application also uses two separate XML-RPC libraries for communication. These libraries are provided as a part of the download for convenience purposes only. Any related documentation for these libraries can be obtained from the website URLs provided in the References section.
- xml-rpc.net-0.8.1 - CookComputing XML-RPC library for .NET
- xmlrpc.jar - Marquée XML-RPC library for Java (Version 1.3)
What is XML-RPC?
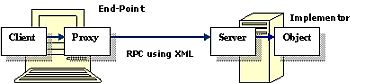
XML-RPC is a set of implementations (per XML-RPC specification) that allow software running on disparate operating systems in different environments to make procedure calls over the Internet. It uses Remote Procedure Calls using HTTP as the transport and XML as the encoding.
XML-RPC is designed to be as simple as possible while allowing complex data structures to be transmitted, processed and returned. Let us now look at some of the basic features of XML-RPC used for developing the example demonstration. Although XML-RPC is typically used to communicate between two different machines running in disparate environments via HTTP; This article demonstrates a client running on the same machine as the server but making use of a feature offered by the Java programming language to develop automated testing applications.
An XML-RPC message is a HTTP-POST request, the body of which should be well-formed XML. A procedure executes on the server and returns a value formatted in XML. Parameters supplied to the method can be scalars, numbers, strings, dates, etc. and list structures.
Following is the format of a simple XML-RPC request which is sent by the client to the server for execution.
POST /RPC2 HTTP/1.0                    // RPC2 Responder
User-Agent: Home/5.00.21 (Win2K)       // Required
Host: www.roundsquare.com              // Required
Content-Type: text/xml
Content-length: 204                    // Required and should be correct

<?xml version="1.0"?>                  // XML payload
<methodCall>
  <methodName>robot.click</methodName> // Name of the method to invoke
  <params> // Required element if parameters have to be supplied
    <param> // Parameter containing a value element
      <value><int>400</int>
     </value> // Element specifying the type and corresponding value
    </param>
    <param>     // Multiple parameters are possible
      <value><int>200</int></value>
    </param>
  </params>
</methodCall>
Following is a response to an XML-RPC request which the server generates upon method execution. A <methodResponse> can contain either a <fault> (error code and description) or a <params> (return value) but not both.
HTTP/1.1 200 OK  // Always return 200 OK unless there is a lower level error
Connection: close
Content-Length: 151 // Required and should be correct
Content-Type: text/xml
Date: Mon, 22 Sep 2003 19:55:08 GMT
Server: Tuff Home/5.00.21-Win2K

<?xml version="1.0"?> // XML payload
<methodResponse>
  <params>
    <param> // Single return value
      <value>
       <string>Clicked</string>
      </value> // Element specifying the type and value
    </param>
  </params>
</methodResponse>
A Quick Look at the java.awt.Robot Class
To quote from the Java 2 Platform, Standard Edition, v 1.4.2 API Specification "This class is used to generate native system input events for the purposes of test automation, self-running demos, and other applications where control of the mouse and keyboard is needed. The primary purpose of Robot is to facilitate automated testing of Java platform implementations e.g. Robot.mouseMove will actually move the mouse cursor instead of just generating mouse move events."
Let us look at some of the important methods of this class some of which are used by our application. Refer to the Java documentation for more details.
public void mouseMove(int x, int y) - Moves mouse pointer to given x and y screen coordinates
public void mousePress(int buttons) - Presses one or more mouse buttons using the Button mask.
public void mouseRelease(int buttons) - Releases one or more mouse buttons using the Button mask.
public void keyPress(int keycode) - Presses a given key for specified keycode.
public void keyRelease(int keycode) - Releases a given key for specified keycode.
public void setAutoDelay(int ms) - Sets the number of milliseconds this Robot sleeps after generating an event.
Wrapping the Robot
Having looked at the methods on the java.awt.Robot class, Let us write a wrapper on top of the java.awt.Robot class to effectively combine the above methods for simulating a mouse click and typing of text into elements on the user interface (UI).
package com.robot;
public class AutoRunner {
{
private static Robot ROBOT;
static {
try {
ROBOT = new Robot();
} catch (AWTException e) {
e.printStackTrace();
}
}
public String type(String s) {
char[] keys = s.toCharArray();
for (int i = 0; i < keys.length; i++) {
type(keyCodes(keys[i]));
}
return "Typed";
}
public String click(int x, int y) {
ROBOT.mouseMove(x, y);
ROBOT.mousePress(InputEvent.BUTTON1_MASK);
ROBOT.mouseRelease(InputEvent.BUTTON1_MASK);
return "Clicked";
}
private void type(int[] code) {
int count = code.length;
int pos = 0;
while (count > 1 && pos < count - 1) {
ROBOT.keyPress(code[pos++]);
}
ROBOT.keyPress(code[pos]);
ROBOT.keyRelease(code[pos]);
while (count > 1 && pos > 0) {
ROBOT.keyRelease(code[--pos]);
}
}
private int[] keyCodes(char key) {...}
private int keyCode(char key) {...}
}
Writing the XML-RPC Server and Client
The client is written using Visual C# .NET platform while the server is implemented using the Java programming language. The client will invoke RPC on the server using XML-RPC for interacting with the UI. The server will parse these requests and translate them into appropriate user actions.
XML-RPC Server
The code for the AutoRunner has to be modified as shown below to support proxy calls using XML-RPC. We will use the Marquée XML-RPC library to handle the client requests. A set of objects need to be supplied for setting up an XML-RPC server that will receive the method calls parsed by the server dispatchers. These objects must implement the XmlRpcInvocationHandler interface which can be achieved by extending the ReflectiveInvocationHandler class. The object to be used for method invocations can also be wrapped by the ReflectiveInvocationHandler via the constructor.
import marquee.xmlrpc.handlers.ReflectiveInvocationHandler;
public class AutoRunner extends ReflectiveInvocationHandler {...}
Creating a server is pretty straightforward as shown below. An instance of marquee.xmlrpc.XmlRpcServer is created and an instance of AutoRunner is registered with the server to handle client requests. The server is then started on port 1971. An available port can be used but care should be taken that the client code should be changed to reflect the correct URL when using the proxy to communicate with the server.
XML-RPC calls to the server will be parsed and corresponding methods on the registered object (if found) will be invoked using Java Reflection e.g. Sending a request with the name of the method as robot.click will invoke the click method with the parameters supplied on the object registered with the name robot which in our case happens to be AutoRunner.
try {
XmlRpcServer server = new XmlRpcServer();
server.registerInvocationHandler("robot", new AutoRunner());
server.runAsService(1971);
} catch(Exception e) {
e.printStackTrace();
}
XML-RPC Client
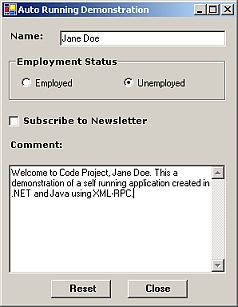
The AutoRunForm is created in Visual C# using Visual Studio .NET. The UI consists of a Text Box (Name), Radio buttons (Employment Status), a Check Box (Subscribe to Newsletter) and a Text Area (Comment) for demonstration purposes. The AutoForm will make use of the RobotProxy to connect with the XML-RPC server and send a request to auto-fill the form upon activation.
namespace Robot
{
public class AutoRunForm : System.Windows.Forms.Form
{
private void AutoRun(DemoData data)
{
RobotProxy proxy = new RobotProxy();
proxy.Url = "http://localhost:1971";
proxy.Timeout = 3000;
ClickControl(proxy, this.Username);
proxy.Type(data.username);
}
private void ClickControl(RobotProxy proxy, Control control)
{
int x = control.RectangleToScreen(control.ClientRectangle).Left;
int y = control.RectangleToScreen(control.ClientRectangle).Top;
proxy.Click(x, y);
}
}
}
Please refer to the CookComputing documentation for details about mapping .NET data types to XML-RPC types. A proxy can be created using CookComputing XML-RPC library in two ways as described below.
- Define an interface for the endpoint proxy and use the
XmlRpcProxyGen to create an instance of the proxy object.
- inheriting from the
XmlRpcClientProtocol class.
We will use the latter technique in our example application.
[XmlRpcUrl(null)]
public interface IRobotProxy
{
[XmlRpcMethod("robot.click")]
public string Click(int x, int y);
}
using CookComputing.XmlRpc;
IRobotProxy proxy = (IRobotProxy) XmlRpcProxyGen.Create(typeof(IRobotProxy));
OR
[XmlRpcUrl(null)]
public class RobotProxy : XmlRpcClientProtocol
{
[XmlRpcMethod("robot.click")]
public string Click(int x, int y)
{
return (string)Invoke("Click", new object[] {x, y});
}
}
Running the Application
Follow the procedure below to run the example application.
- Make sure that your JAVA_HOME system environment variable is set to the appropriate Java SDK version. e.g. If using C:\j2sdk1.4.2, the environment variable is declared as JAVA_HOME=C:\j2sdk1.4.2
- Double click the server.bat file located under the java directory in the distribution package. Use the netstat -a command on the command prompt to verify if the server startup was successful. The port 1971 (server port) must be listed as being used.
- Double click the robot.exe file located under the csharp\bin\release directory in the distribution package.
- Press the Reset button on the UI to re-run the demonstration with a different value for the Name field.
- Close the client application and use Ctrl + C to terminate the server.
An Attempt to run the client without starting the XML-RPC server results in a message box displaying "The operation has timed out." message.
Closing Note
Additional methods to press special keys such as Function (F1, F2 etc.), Alt or Ctrl keys can be incorporated into the wrapper.
Java is a registered trademark of Sun Microsystems.
References/Links
Over 15 years of experience in designing and architecting high availability/scalability financial application software using OO technologies such as C++/Java/C#.


 General
  News
News  Suggestion
  Question
  Bug
Bug  Answer
  Joke
Joke  Praise
  Rant
Rant  Admin
Admin 


