Introduction
Nodejs gives you the power to write server side code using JavaScript. In fact, it is very easy & fast to create a web server using nodejs & there are lots of frameworks built which make the development even more easy & faster.
But there are few challenges in nodejs development:
- Node js is all about callbacks, and with more & more callback, you end up with a situation called callback hell
- Writing readable code
- Writing maintainable code
- You don't get much intellisense support which makes development slow
If you are experienced & have a good knowledge of nodejs, you can use different techniques & try to minimise those challenges.
The best way to solve these problems are by using modern JavaScript ES6, ES7 or typescript, whatever you feel comfotable with. I recommend typescript, because it provides intillisense support for every word of code which makes your development faster.
So I found a framework fortjs - which is very easy to use & its concepts are so cool. Its concept moves around creating a fort. Fortjs enables you to write server-side code which is modular, secure, and pretty much beautiful & readable.
Background
FortJs is a MVC framework & works similar to a real fort. It provides modularity in the form of components. There are three components:
- Wall - This is a top level component & every HTTP request is passed through the wall first.
- Shield - This is available for controllers. You can assign a shield to controller & it will be executed before a controller is called.
- Guard - This is available for methods inside controllers known as worker in fort.js. The guard will be called before the worker is called.
Every component is like a blocker, if the condition does not satisfy - they block the request to pass further. Just like in a real fort - a guard blocks any person if the condition is not satisfied.
I hope you understand this & for more information, read component doc - http://fortjs.info/tutorial/components/.
Using the Code
In this article - I am going to create REST API using fortjs & language typescript. But you can use the same code & steps to implement using JavaScript too.
Project Setup
FortJs provides a CLI - fort-creator. This helps you to set up the project and develop faster. I am going to use the CLI too.
So perform the below steps sequentially:
- Open terminal or command prompt.
- Install the FortJs globally - run the command "
npm i fort-creator -g". - Create a new project - run command "
fort-creator new my-app". Here “my-app” is the name of the app, you can choose any. This will prompt you to choose language with two options: typescript & javascript. Choose your language by using arrow keys and press enter. Since I'm going to use typescript, I have chosen typescript. It will take some time to create the project. - Enter into the project directory - "
cd my-app". - Start the development server with hot reloading - run command "
fort-creator start". - Open the browser & type the URL - http://localhost:4000/.
You should see something like this in the browser.

Let's see how this page is rendered:
REST
We are going to create a REST endpoint for entity user - which will perform the CRUD operations for user such as adding user, deleting user, getting user, and updating user.
According to REST:
- Adding user - should be done using http method "
POST" - Deleting user - should be done using http method "
REMOVE" - Getting user - should be done using http method "
GET" - Updating user - should be done using http method "
PUT"
For creating an endpoint, we need to create a Controller similar to default controller explained earlier.
Execute the command - "fort-creator add". It will ask "what do you want to add ?" Choose controller & press enter. Enter controller name "UserController" & press enter.
Now we have created user controller, we need to add it to routes. Since our entity is user , so "/user" will be a good route. Let's add it - Open routes.ts inside root directory of your project and add UserController to routes.
So our routes.ts looks like this:
import { DefaultController } from "./controllers/default_controller";
import { ParentRoute } from "fortjs";
import { UserController } from "./controllers/user_controller";

export const routes: ParentRoute[] = [{
    path: "/default",
    controller: DefaultController
}, {
    path: "/user",
    controller: UserController
}];
Now fortjs knows that when route - "/user" is called, it needs to call UserController. Let's open the url - http://localhost:4000/user.
And you see a white page right?
This is because - we are not returning anything from index method. Let's return a text "Hello World" from index method. Add the below code inside index method & save:
return textResult('Hello World');
Refresh the url - http://localhost:4000/user
And you see Hello World.
Now, let's convert UserController to a REST API. But before writing code for REST API, let's create a dummy service which will do crud operation for users.
MODEL
Let's create a model "User" which will represent entity user. Create a folder models and a file user.ts inside the folder. Paste the below code inside the file:
export class User {
    id?: number;
    name: string;
    gender: string;
    address: string;
    emailId: string;
    password: string;

    constructor(user) {
        this.id = Number(user.id);
        this.name = user.name;
        this.gender = user.gender;
        this.address = user.address;
        this.emailId = user.emailId;
        this.password = user.password;
    }
}
SERVICE
Create a folder “services” and then a file “user_service.ts” inside the folder. Paste the below code inside the file.
import {
    User
} from "../models/user";

interface IStore {
    users: User[]
};
const store: IStore = {
    users: [{
        id: 1,
        name: "durgesh",
        address: "Bengaluru india",
        emailId: "durgesh@imail.com",
        gender: "male",
        password: "admin"
    }]
}

export class UserService {
    getUsers() {
        return store.users;
    }

    addUser(user: User) {
        const lastUser = store.users[store.users.length - 1];
        user.id = lastUser == null ? 1 : lastUser.id + 1;
        store.users.push(user);
        return user;
    }

    updateUser(user) {
        const existingUser = store.users.find(qry => qry.id === user.id);
        if (existingUser != null) {
            existingUser.name = user.name;
            existingUser.address = user.address;
            existingUser.gender = user.gender;
            existingUser.emailId = user.emailId;
            return true;
        }
        return false;
    }

    getUser(id) {
        return store.users.find(user => user.id === id);
    }

    removeUser(id) {
        const index = store.users.findIndex(user => user.id === id);
        store.users.splice(index, 1);
    }
}
The above code contains a variable store which contains a collection of users and the method inside the service does operations like add, update, delete, and get on that store.
We will use this service in REST API implementation.
REST
GET
For route "/user" with http method "GET", the API should return list of all users. In order to implement this, let's rename our "index" method to "getUsers" making semantically correct & paste the below code inside the method:
const service = new UserService();
return jsonResult(service.getUsers());
so now, user_controller.ts looks like this:
import { Controller, DefaultWorker, Worker, textResult, jsonResult } from "fortjs";
import { UserService } from "../services/user_service";

export class UserController extends Controller {

    @DefaultWorker()
    async getUsers() {
        const service = new UserService();
        return jsonResult(service.getUsers());
    }
}
Here, we are using decorator DefaultWorker. The DefaultWorker does two things - it adds the route "/" & http method "GET". Its a shortcut for this scenario. In the next part, we will use other decorators to customize the route.
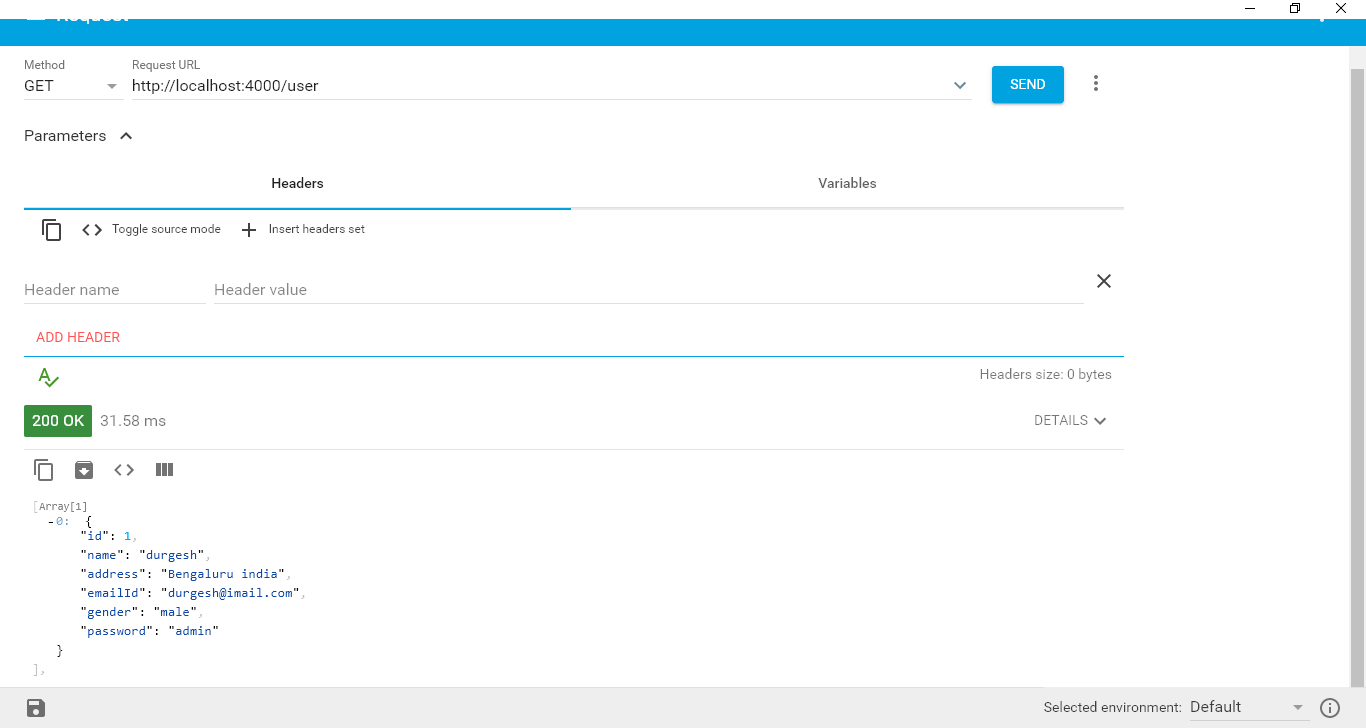
Let's test this by calling url http://localhost:4000/user. You can open this in the browser or use any http client tools like postman or advanced rest client. I am using advanced rest client.
POST
Let's add a method "addUser" which will extract data from request body and add user.
async addUser() {
    const user: User = {
        name: this.body.name,
        gender: this.body.gender,
        address: this.body.address,
        emailId: this.body.emailId,
        password: this.body.password
    };
    const service = new UserService();
    const newUser = service.addUser(user);
    return jsonResult(newUser, HTTP_STATUS_CODE.Created);
}
In order to make this method visible for http request, we need to mark this as worker. A method is marked as worker by adding decorator "Worker". The Worker decorator takes list of http method & make that method available for only those http methods. So let's add the decorator:
@Worker([HTTP_METHOD.Post])
async addUser() {
    const user: User = {
        name: this.body.name,
        gender: this.body.gender,
        address: this.body.address,
        emailId: this.body.emailId,
        password: this.body.password
    };
    const service = new UserService();
    const newUser = service.addUser(user);
    return jsonResult(newUser, HTTP_STATUS_CODE.Created);
}
Now route of this method is the same as name of the method that is "addUser". You can check this by sending a post request to http://localhost:4000/user/addUser with user data in body.
But we want the route to be "/", so that it's a rest API. The route of worker is configured by using the decorator "Route". Let's change the route now.
@Worker([HTTP_METHOD.Post])
@Route("/")
async addUser() {
    const user: User = {
        name: this.body.name,
        gender: this.body.gender,
        address: this.body.address,
        emailId: this.body.emailId,
        password: this.body.password
    };
    const service = new UserService();
    const newUser = service.addUser(user);
    return jsonResult(newUser, HTTP_STATUS_CODE.Created);
}
Now our end point is configured for post request. Let's test this by sending a post request to http://localhost:4000/user/ with user data in body.
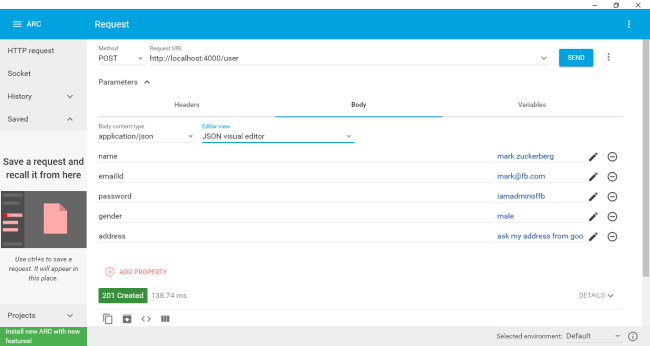
We have created the end point for post request but one important thing to do is validation of data. Validation is a very essential part of a server side web app.
FortJs provides component Guard for this kind of work. A/c to fortjs doc:
Quote:
Guard is security layer on top of Worker. It contols whether a request should be allowed to call the Worker.
So we are going to use guard for validation of data. Let's create the guard using fort-creator. Execute command - "fort-creator add" & choose Guard. Enter the file name "UserValidatorGuard". There will be a file "user_validator_guard.ts" created inside guards folder, open that file.
A guard has access to the body, so you can validate data inside that. Returning null inside method check means allow to call worker & returning anything else means block the call.
Let's understand this in more depth by writing code for validation. Paste the below code inside the file "user_validator_guard.ts":
import { Guard, HTTP_STATUS_CODE, textResult } from "fortjs";
import { User } from "../models/user";
export class UserValidatorGuard extends Guard {
isValidEmail(email: string) {
var re = /^(([^<>()\[\]\\.,;:\s@"]+(\.[^<>()\[\]\\.,;:\s@"]+)*)|
(".+"))@((\[[0-9]{1,3}\.[0-9]{1,3}\.[0-9]{1,3}\.[0-9]{1,3}\])|
(([a-zA-Z\-0-9]+\.)+[a-zA-Z]{2,}))$/;
return re.test(String(email).toLowerCase());
}
validate(user: User) {
let errMessage;
if (user.name == null || user.name.length < 5) {
errMessage = "name should be minimum 5 characters"
} else if (user.password == null || user.password.length < 5) {
errMessage = "password should be minimum 5 characters";
} else if (user.gender == null || ["male", "female"].indexOf(user.gender) < 0) {
errMessage = "gender should be either male or female";
} else if (user.emailId == null || !this.isValidEmail(user.emailId)) {
errMessage = "email not valid";
} else if (user.address == null || user.address.length < 10) {
errMessage = "address length should be greater than 10";
}
return errMessage;
}
async check() {
const user = new User(this.body);
const errMsg = this.validate(user);
if (errMsg == null) {
this.data.user = user;
return null;
} else {
return textResult(errMsg, HTTP_STATUS_CODE.BadRequest);
}
}
}
In the above code:
- We have created a method
validate which takes parameter user. It validates the user & returns the error message if there is validation error, otherwise null. - We are writing code inside the
check method, which is part of guard lifecycle. We are validating the user inside it by calling method validate. - If the user is valid, then we are passing the user value by using "
data" property and returning null. Returning null means guard has allowed this request and the worker should be called. - If a user is not valid, we are returning an error message as text response with HTTP code- "
badrequest". In this case, execution will stop here & worker won't be called.
In order to activate this guard, we need to add this for method addUser. The guard is added by using decorator "Guards". So let's add the guard:
@Guards([UserValidatorGuard])
@Worker([HTTP_METHOD.Post])
@Route("/")
async addUser() {
    const user: User = this.data.user;
    const service = new UserService();
    const newUser = service.addUser(user);
    return jsonResult(newUser, HTTP_STATUS_CODE.Created);
}
In the above code:
- I have added the guard, “
UserValidatorGuard” using the decorator Guards. - With the guard in the process, we don't need to parse the data from body anymore inside worker, we are reading it from
this.data which we are passing from "ModelUserGuard". - The method “
addUser” will be only called when Guard allow means if all data is valid.
One thing to note is that - method "addUser" looks very light after using component & it's doing validation too. You can add multiple guard to a worker which gives you the ability to modularize your code into multiple guards.
Let's try adding user with some invalid data:
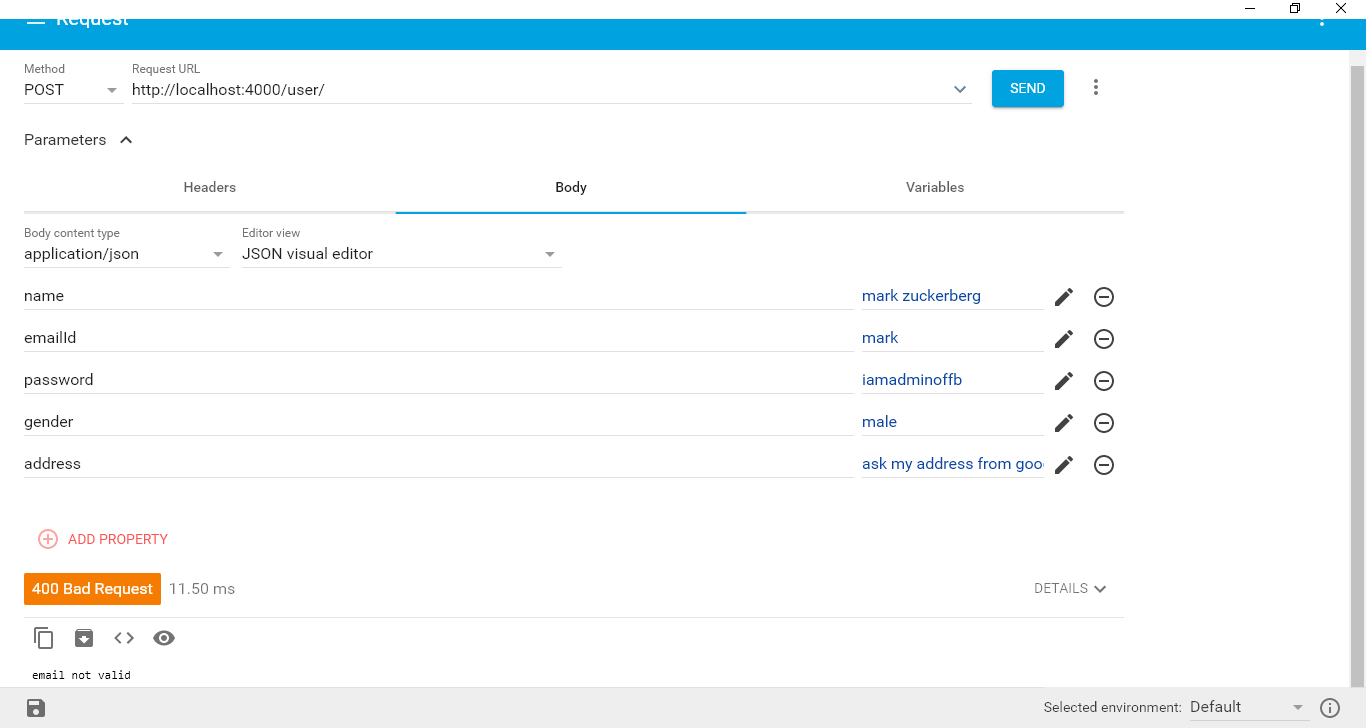
As you can see in the picture, I have tried with sending invalid email & the result is - "email not valid". So it means guard is activated & working perfectly.
PUT
Let’s add another method - “updateUser” with route “/” , guard — “UserValidatorGuard” (for validation of user) and most important - worker with http method “PUT”.
@Worker([HTTP_METHOD.Put])
@Guards([UserValidatorGuard])
@Route("/")
async updateUser() {
    const user: User = this.data.user;
    const service = new UserService();
    const userUpdated = service.updateUser(user);
    if (userUpdated === true) {
        return textResult("user updated");
    }
    else {
        return textResult("invalid user");
    }
}
Update code is similar to insert code except functionality wise that is updating of data. Here, we reutilize UserValidatorGuard to validate data.
DELETE
In order to delete data, user needs to pass id of the user. This can be passed by using three ways:
- Sending data in body just like we did for add & update
- Sending data in query string
- Sending data in route - for this, we need to customize our route
We have already implemented getting data from body. So let's see other two ways:
Sending Data in Query String
Let's create method "removeByQueryString" and paste the below code:
@Worker([HTTP_METHOD.Delete])
@Route("/")
async removeByQueryString() {
const userId = Number(this.query.id);
const service = new UserService();
const user = service.getUser(userId);
if (user != null) {
service.removeUser(userId);
return textResult("user deleted");
}
else {
return textResult("invalid user");
}
}
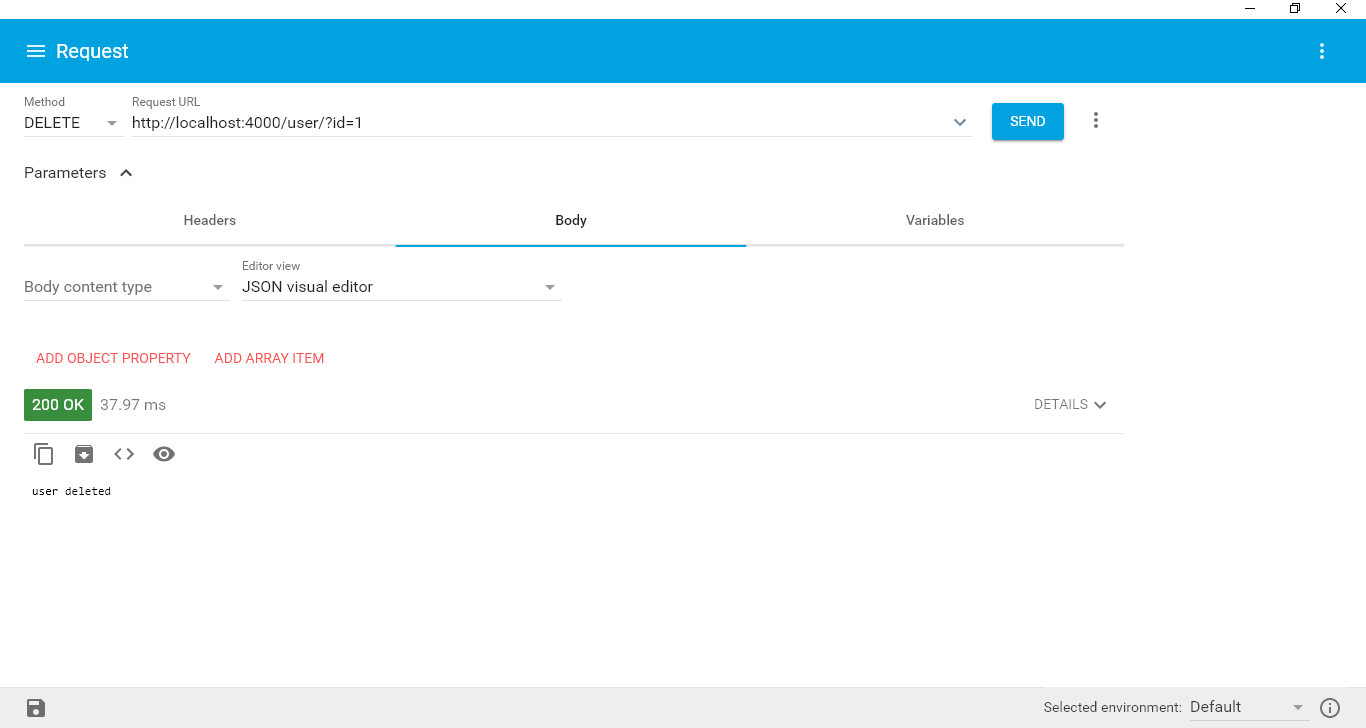
The above code is very simple. It takes the id from query property of controller and removes the user. Let's test this:
Sending Data in Route
You can parameterise the route by using "{var}" in a route. Let's see how?
Let's create another method "removeByRoute" and paste the below code:
@Worker([HTTP_METHOD.Delete])
@Route("/{id}")
async removeByRoute() {
const userId = Number(this.param.id);
const service = new UserService();
const user = service.getUser(userId);
if (user != null) {
service.removeUser(userId);
return textResult("user deleted");
}
else {
return textResult("invalid user");
}
}
The above code is exactly the same as removeByQueryString except that it is extracting the id from route & using parameter in route i.e., "/{id}" where id is parameter.
Let's test this:
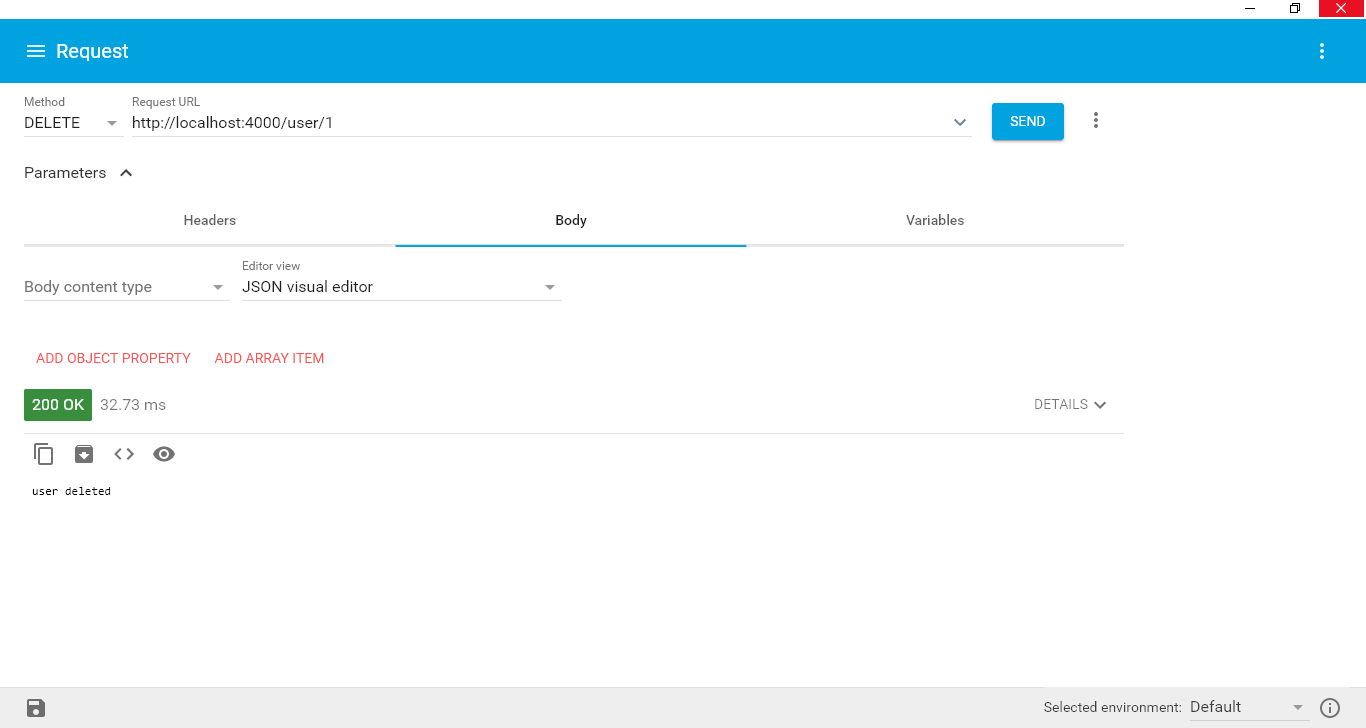
And hence, we have successfully created the REST API using fortjs.
Points of Interest
Code written for fortjs are clear, readable & maintainable. The components help you to modularize your code.
References
- http://fortjs.info/
- https://medium.com/fortjs/rest-api-using-typescript-94004d9ae5e6
