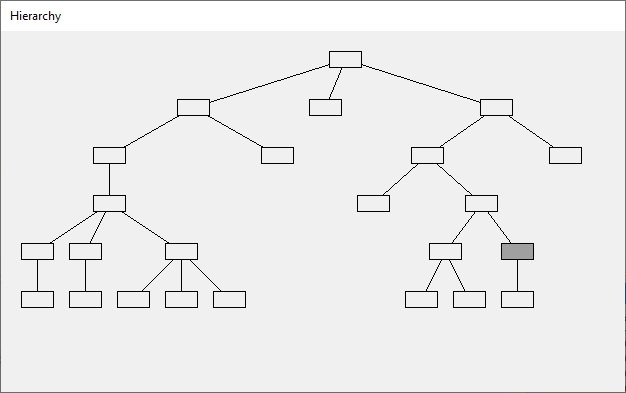
WinForms (.NET Core) control for tree visualization. The control takes care of the layout; and expects your code to draw nodes and edges.
Introduction
Tree visualising algorithms can be very simple or highly sophisticated. It all depends on the »good enough« criteria. Here is a my naive tree drawing algorithm that produces surprisingly good results with minimal effort.

Background
Before we draw a tree in four steps, let's define it. Our tree has eight nodes {A,B,C,D,E,F,G,H}, and seven edges {A-B, A-C, A-D, D-E, A-F, A-G, G-H}. We are going to draw it in four steps.
Step 1: Let us draw a tree like a standard Windows tree control does. Every node occupies a row, and node indentation reflects its' level.

Step 2: Move all parent nodes to the row of their first child.

Step 3: Step number 2 has emptied some rows. Let's delete them.

Step 4: In the final step, we need to recursively center parents over all of their children.

And there you have it. Considering the simplicity of the algorithm, it actually looks quite good.
Using the Code
The algorithm is implemented as a WinForms (.NET Core) control called Hierarchy. You can use it to visualise trees. It takes care of the layout; and expects your code to draw nodes and edges. The control can draw trees from left to right, right to left, top to bottom or bottom up, using the same algorithm.
Control Properties
To control the flow, set the property Direction. The control knows how to draw trees from left to right, right to left, top to bottom and bottom to top.
General node properties (shared between all nodes!) are NodeWidth and NodeHeight. The minimal space in pixels between two nodes is determined by the NodeHorzSpacing and NodeVertSpacing properties.
Passing the Data Source
You feed the data into the control by implementing a simple IHierarchyFeed interface, and then passing it to the Hierarchy via the SetFeed() method.
Here is the interface:
public interface IHierarchyFeed
{
    IEnumerable<string> Query(string key=null);
}
It only has one function which returns a collection of node keys (node identifiers).
Since your code is responsible for drawing nodes and edges, the control really does not need to know more about the node. When it needs to draw it, it passes the node key and rectangle in an event and expects your code to do the rest.
The Query() function accepts a parent key parameter. If this parameter is null, the function returns all root node keys (usually just one?), otherwise it returns child nodes of provided parent node.
The following sample code implements simple file system feed for directories.
public class FileSystemHierarchyFeed : IHierarchyFeed
{
    private string _rootDir;

    public FileSystemHierarchyFeed(string rootDir) { _rootDir = rootDir; }

    public IEnumerable<string> Query(string key = null)
    {
        if (key == null) return new string[] { _rootDir };
        else return Directory.EnumerateDirectories(key + @"\");
    }
}
In the example above, the full path is used as a node key. If you wanted to draw organigram, you'd probably use database identifier of a person as the key.
Disclaimer: Letting the above file feed scan your c: drive is a very bad idea. Just sayin'.
Implementing Drawing
There are two events that you can subscribe to: the DrawEdge event to draw an edge, i.e. a line connecting two nodes. And the DrawNode event to draw a node. Both events will pass you node key, node rectangle, and an instance of the Graphics to use for drawing. This sample demonstrates drawing inside both events.
private void _hierarchy_DrawEdge(object sender, DrawEdgeEventArgs e)
{
Point
start = new Point(
e.ParentRectangle.Left + e.ParentRectangle.Width / 2,
e.ParentRectangle.Top + e.ParentRectangle.Height / 2),
end = new Point(
e.ChildRectangle.Left + e.ChildRectangle.Width / 2,
e.ChildRectangle.Top + e.ChildRectangle.Height / 2);
using (Pen p = new Pen(ForeColor))
e.Graphics.DrawLine(p,start,end);
}
private void _hierarchy_DrawNode(object sender, DrawNodeEventArgs e)
{
string dir= Path.GetFileName(Path.GetDirectoryName(e.Key+@"\"));
Graphics g = e.Graphics;
using (Pen forePen = new Pen(ForeColor))
using (Brush backBrush = new SolidBrush(BackColor),
foreBrush = new SolidBrush(ForeColor))
using(StringFormat sf=new StringFormat() {
LineAlignment=StringAlignment.Center,
Alignment=StringAlignment.Center})
{
g.FillRectangle(backBrush, e.Rectangle);
g.DrawRectangle(forePen, e.Rectangle);
g.DrawString(dir, Font, foreBrush, e.Rectangle, sf);
}
}
Responding to Mouse Events
You can subscribe to standard mouse events (clicks, moves, etc.) and use the NodeAt() function to find out which node was clicked. For example, if you'd like to highlight node on click, subscribe to the MouseUp event, find out which node was clicked, store its key, and call Refresh() to repaint the control.
private string _highlightedNodeKey;
private void _hierarchy_MouseUp(object sender, MouseEventArgs e)
{
    _highlightedNodeKey = _hierarchy.NodeAt(e.Location);
    _hierarchy.Refresh();
}
Then, in the DrawNode event, check the node key against the _highlightedNodeKey and paint it accordingly.
Hacking Edges
Because the DrawEdge event gives you both ends of the edge - the parent node and the child node (with their coordinates), you can chose how to draw your edge. It can be a line, a curve, etc. You may also start your edge at end of the parent node (instead of node center) and draw it to start off the other node.
private void _hierarchy_DrawEdge(object sender, DrawEdgeEventArgs e)
{
Point
start = new Point(
e.ParentRectangle.Right,
e.ParentRectangle.Top + e.ParentRectangle.Height / 2),
end = new Point(
e.ChildRectangle.Left,
e.ChildRectangle.Top + e.ChildRectangle.Height / 2);
using (Pen p = new Pen(ForeColor))
e.Graphics.DrawLine(p, start, end);
}
And here is the result:

History
- 24th December, 2020: Initial version
