When I figured out how to create an image gallery with Hugo and Lightbox2, there’s one thing I left out: image captions.
In Lightbox2 itself, this is straightforward. Here’s the generated HTML from the current version of my Hugo/Lightbox2 gallery, for one single image (image URLs shortened for brevity):
<a href="path/to/image.jpg" data-lightbox="x"><img src="path/to/thumbnail.jpg" /></a>
To add a caption, you just add a data-title attribute:
<a href="path/to/image.jpg" data-lightbox="x" data-title="My caption"><img src="path/to/thumbnail.jpg" /></a>
In my previous image gallery attempts with Jekyll, the list of images always came from a YAML list (either from a data file or directly from the respective page’s frontmatter). In both cases, the list just had an additional property for the caption, which I used to fill the caption in the HTML attribute.
But in my Hugo gallery, the images are page resources, i.e. there is no actual “list of images” defined anywhere. The image files are stored in a subdirectory of the post, and Hugo reads them directly from the file system. So it’s not obvious how/where to store captions per image - that’s why I omitted them in the first version of my Hugo gallery.
As a reminder/comparison, here’s the current version of the line from the shortcode that generates the <a> tag:
<a href="{{ .Permalink }}" data-lightbox="x"><img src="{{ $resized.Permalink }}" /></a>
(for the full shortcode, see the previous post)
Solution: Hugo and EXIF data
I wasn’t even aware that Hugo is able to access the EXIF data of images. I found it out by accident when reading this discussion in the Hugo forum.
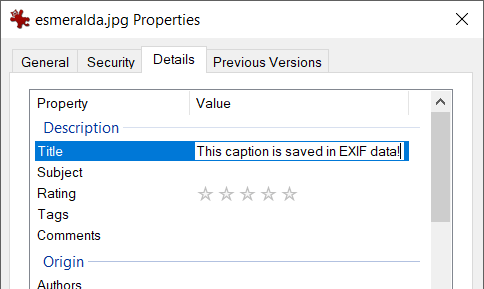
First of all, how to edit an image’s EXIF data? There are probably many tools that can do this, but on Windows 10 (where I’m writing this text right now) you don’t even need a tool, Windows Explorer is enough:
- Right-click on an image in the Explorer ⇒ Properties
-
Go to the Details tab and write the caption into the Title field:

To show this caption in the Hugo image gallery, the line in the shortcode must look like this:
<a href="{{ .Permalink }}" data-lightbox="x" data-title="{{ with .Exif }}{{ .Tags.ImageDescription }}{{ end }}"><img src="{{ $resized.Permalink }}" /></a>
New commit with the changes (shortcode and one image), in the existing example project in the code-examples repo.
That’s all - one changed line of code.
The more I learn about Hugo, the more I like it. As I said in the previous post: IMO the learning curve is insanely steep in the beginning, but apparently I have the hardest part behind me now. Now I’m at the stage where I’m amazed what Hugo can do with very little code.
Alternative solution: load captions from page’s front matter
This is the first solution I had, before finding out about Hugo’s EXIF feature. It works, but I like the EXIF solution better. But for the sake of completeness, I wanted to show this solution as well.
Similar to my second Jekyll gallery, the list of captions is coming from the page’s front matter:
resources:
- src: "img/Pope-Edouard-de-Beaumont-1844.jpg"
  title: "Example caption 1"
- src: "img/esmeralda.jpg"
  title: "Example caption 2"
Note that the list must also contain the image’s name/path, so Hugo knows which text belongs to which image.
Then, the line in the shortcode must be changed like this to show the caption:
<a href="{{ .Permalink }}" data-lightbox="x" {{ if ne .Title .Name }}data-title="{{ .Title }}"{{ end }}><img src="{{ $resized.Permalink }}" /></a>
This works, but I didn’t like it because a) the data for the image gallery is now spread across two places (file system and front matter) and b) I have to duplicate the file name of each image in the front-matter again.
